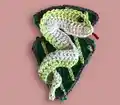
About This House of Wizards Snake Crochet Applique Pattern
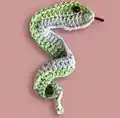
This serpentine applique captures the sleek elegance and cunning nature of the legendary snake house with hunter green and light grey yarn creating beautiful striped layers. The pattern features a unique wavy construction technique that gives the snake natural movement and dimension without complicated shaping. The strategic skips and increases create organic curves that make your snake look like it's mid-slither, while the red forked tongue adds that perfect finishing touch of authentic reptilian detail.

With straightforward row-by-row instructions and helpful visual cues, you'll create a striking snake that's perfect for decorating wizard-themed projects or creating standalone pieces that celebrate ambition and resourcefulness.
Why You'll Love This House of Wizards Snake Crochet Applique Pattern
I absolutely adore how this snake pattern creates such realistic movement with surprisingly simple techniques! The way the strategic skips naturally curve the body is pure crochet magic—no complicated shaping required, yet it looks like you're an expert. I find myself making these in different color combinations because they work up so incredibly fast, usually in under an hour. The layered construction with light grey and light green creates beautiful depth and dimension that makes the snake look truly three-dimensional. What really gets me excited is how you can manipulate the curves during assembly to create your own unique snake pose—some can be coiled, others stretched out, each with its own personality and attitude that perfectly captures that cunning house spirit.
Switch Things Up
I love playing with different color combinations to create unique snake variations that go beyond the traditional house colors! Try working with jewel tones like emerald and teal for a more luxurious serpent, or go dramatic with black and silver for a midnight snake. You could even create a rainbow snake by changing colors every few stitches, which looks absolutely magical and whimsical.
One of my favorite modifications is adding textured scales by working in back loops only during certain sections, which creates raised ridges that catch the light beautifully. I've also experimented with adding small beads or sequins along the spine before assembling the layers, giving the snake a shimmering, realistic quality that's perfect for special projects. Another fun variation is making the tongue extra elaborate—instead of a simple fork, try creating multiple splits or using metallic thread for a tongue that really pops.
For those wanting more dimension, consider stuffing the head section lightly before closing to give your snake a more three-dimensional appearance, or add wire through the body to create a poseable snake that can be bent into any shape you desire. I've even made extra-long versions by doubling the chain foundation, perfect for wrapping around circular projects like wreaths or picture frames. The beauty of this pattern is how forgiving it is—each modification teaches you something new while still looking polished and intentional!
Common Mistakes & How to Fix Them
✗ Pulling the slip stitches too tightly at the tail end will create a stiff, pointed tip instead of the natural tapered shape you want
✗ Missing the strategic skip stitches throughout the pattern will result in a straight snake without the characteristic wavy curves and natural movement
✗ Working the second layer too loosely can cause it to separate from the base layer and lose the dimensional striped effect that makes the snake special
✗ Forgetting to leave the red tongue long enough before trimming will make it disappear into the head instead of creating that distinctive forked appearance