🧶 Beautiful ✨ Detailed 💝 Adorable

Boho Granny Square Bag Pattern

Boho Granny Square Bag Pattern
4.4★ Rating
8-10 Hours Time Needed
4.1K Made This
✂️

Intermediate Level

Ideal for those with basic knitting experience, featuring slightly more advanced stitches and techniques to expand your skills.

⏱️

All-Day Adventure

Requires 8-10 hours, ideal for a full day of immersive knitting.

🏡

Cozy Accent

A warm touch for your space that transforms ordinary corners into inviting nooks filled with handmade charm.

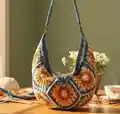
About This Boho Granny Square Bag Pattern

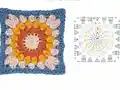
This boho granny square bag pattern is all about creative freedom and self-expression. You'll craft 11 beautiful granny squares using cluster stitches, puff stitches, and traditional crochet techniques, then join them together to create a functional 3D bag. The pattern includes detailed instructions for creating a decorative strap with an eye-catching bead stitch detail, and you can customize your bag with your choice of hardware or a ready-made handle.

Boho Granny Square Bag Pattern crochet pattern - detailed view of completed project

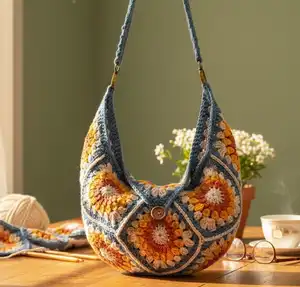
Each square features 5 rows with opportunities to change colors, making this pattern perfect for experimenting with different color combinations or using up your yarn stash. The finished bag includes a fold-over flap with button closure and comfortable strap.

Why You'll Love This Boho Granny Square Bag Pattern

I absolutely love this pattern because it's the perfect blend of traditional granny square techniques with modern boho style! The color-changing possibilities are endless, and I find it so satisfying to watch those individual squares transform into a functional, beautiful bag. What I really appreciate is how forgiving this pattern is—you can make it scrappy and eclectic or coordinated and sophisticated. The bead stitch on the strap adds such a lovely textured detail that elevates the whole design. Plus, there's something incredibly rewarding about carrying a bag you've made yourself, knowing every stitch was placed with your own hands.

Boho Granny Square Bag Pattern step 1 - construction progress Boho Granny Square Bag Pattern step 2 - assembly progress Boho Granny Square Bag Pattern step 3 - details and accessories Boho Granny Square Bag Pattern step 4 - final assembly and finishing

Switch Things Up

I love experimenting with different colorways for this bag! Sometimes I go for a monochromatic look using different shades of the same color family—dusty pinks and mauves create such an elegant, vintage vibe. Other times, I embrace the boho spirit fully and use vibrant jewel tones or earthy sunset colors.

One of my favorite variations is making each square completely different using scrap yarn—it creates this wonderfully eclectic, festival-ready bag that tells a story of all your past projects. You could also try using variegated or self-striping yarn for a completely effortless color-changing effect.

For a more modern minimalist look, I've made this bag in all black or all cream with just one contrasting color for the edging and strap. It's amazing how different the same pattern can look!

If you want to add extra personality, consider embellishing your squares with embroidered details, adding fringe to the flap, or sewing on decorative patches or appliqués. You could even attach tassels to the corners or add beads to the strap for extra sparkle.

The strap is another area where you can get creative—try making it in a contrasting color, adding stripes, or even creating a completely different strap style using braided chains or a simple double crochet band. The possibilities are truly endless with this versatile pattern!

Common Mistakes & How to Fix Them

✗ Not maintaining consistent tension when joining squares together can result in puckering or gaps between the granny squares 
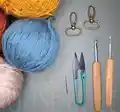
✗ Forgetting to change to the smaller hook size for the foundation chain can make the strap edges look messy and uneven ✗ Placing the button in the wrong position before testing the flap closure can lead to frustration when reassembling ✗ Skipping the back loop only stitches when instructed will change the texture and shape of your squares significantly

Boho Granny Square Bag Pattern

Create your own stunning bohemian-style bag with this beautifully simple granny square pattern! This versatile design allows you to experiment with 1-5 colors, making each bag uniquely yours. Perfect for using up scrap yarn or creating coordinated colorways, this pattern combines traditional granny squares with modern boho flair. The bag features a convenient button closure, adjustable strap with decorative bead stitch detail, and plenty of room for your essentials. Whether you're heading to the farmer's market or meeting friends for coffee, this handmade bag will become your new favorite accessory.

Intermediate 8-10 Hours

Materials Needed for Boho Granny Square Bag Pattern

— Main Fabric

  • 01
    DK weight yarn in 1-5 colors of your choice
  • 02
    Cream, bohemian colors, or scrap yarn in coordinating shades recommended

— Tools Required

  • 01
    6mm (J) crochet hook
  • 02
    5mm (H) crochet hook
  • 03
    Yarn needle
  • 04
    Scissors
  • 05
    Bag hooks/hardware (optional)
  • 06
    Stitch markers
  • 07
    Button for closure
  • 08
    Sewing needle and thread for attaching button

Progress Tracker

0% Complete

— Square (Make 11) :

Row 1 :

Using 6mm J hook, magic ring, chain 3 (counts as first stitch), double crochet 15 stitches more (16 stitches total). Pull magic circle closed, slip stitch into first stitch

Row 2 :

Change color, chain 2 (counts as first stitch), cluster stitch into each stitch (16 total), slip stitch closed. Cluster stitch: Start a double crochet but only pull through the first loop leaving the second loop on the hook, yarn over and double crochet into same stitch and only pull through the first loops ending up with 3 loops on the hook (for the first cluster, the following clusters will have 4 loops on the hook), pull through all 3 loops and chain 1. 3 stitches per cluster, 16 clusters total

Row 3 :

Change color, chain 2, cluster stitches but this time 4 stitches per cluster and chain 2 between each. Slip stitch closed

Row 4 :

Change color, chain 2 (counts as first double). 1. Double crochet 3 times into the same stitch. 2. Half double crochet 3 times into the next stitch. 3. Double crochet 3 times into the next stitch. 4. Treble crochet 3 times into the next stitch. 5. Chain 1, treble crochet 3 times into the same stitch as the first set of trebles creating a corner. Repeat 1-5 all around

Row 5 :

Change color, chain 2 (counts as first double stitch), double crochet 3 times into each stitch. Once you get to the corner double crochet 3 times, chain 1, double crochet 3 times again into the same corner stitch, continue round

— Assembly :

Step 1 :

Start with 8 of the 11 squares and lay them out in the pattern shown (2x4 grid)

Step 2 :

Using single crochet in the back stitch only of the squares, join them together. Place squares back to back to help with this process. You can use contrasting or matching color

Step 3 :

Fold the joined squares in half and stitch the bag along the sides to create 3D shape

Step 4 :

Add 2 more squares at the top corners, these will be folded in half

Step 5 :

The last square will need manipulation to add to the 3D shape. Stitch it to the back of the bag so it can be folded over the front

Step 6 :

Single crochet around the whole edge of the bag. Once you reach the point of the flap chain 8 and slip stitch back into the same stitch

Step 7 :

Continue single crochet around until you reach each corner (side corners), chain 5 and slip stitch into the same stitch

Step 8 :

Single crochet around again and add 8 stitches into the chain loop for the button hole and 5 stitches into the chain loops at the sides of the bag

Step 9 :

Choose your button and pick the best spot to place it on your bag, stitch it on

— Strap :

Foundation Row :

Using 5mm H hook, start by making a row of single crochet foundation chain. Make this row as long as you like in multiples of 2 (100 stitches recommended). Going down a hook size for the foundation row helps keep it neat and tidy

Row 1 :

Going back to 6mm J hook, chain 1, turn work, single crochet along the whole row

Row 2 :

Chain 4, turn work, skip 1 stitch and double crochet. This row is a bead stitch row so you are doing a sideways puff stitch onto the double crochet you have just made. Loop over the hook 4 times before pulling the working yarn through and chain 1, skip 1, double crochet, bead stitch, skip 1...continue. On the last stitch leave it as a double

Row 3 :

Chain 1, turn work, single crochet into each stitch along. One on top of each bead and one between. Single crochet twice into the last stitch space, chain 1 and turn work

Rows 4-6 :

Single crochet along every stitch, chain 1 and turn work, repeat for a third time. Cut and weave in your ends

Finishing :

Take a needle and length of yarn and sew your bag clips to the ends of your strap. Clip it to your bag

Assembly Instructions

  • Begin by laying out 8 squares in a 2x4 grid pattern before joining them together
  • Use single crochet in back loops only to join squares together, working with squares placed back to back
  • Fold the joined piece in half and stitch along the sides to create the bag's 3D structure
  • Attach 2 additional squares at the top corners, folding each in half before securing
  • Add the final square to the back of the bag to create the fold-over flap
  • Work single crochet edging around the entire bag opening, creating chain loops for button hole and strap attachment
  • Attach bag hardware or handles to the chain loops on the sides, or sew strap directly to bag

Important Notes

  • 💡Maintain consistent tension when crocheting squares to ensure they are all the same size
  • 💡Use stitch markers to keep track of corners and pattern repeats, especially during color changes
  • 💡Switch to the smaller 5mm hook only for the foundation chain of the strap to keep edges neat
  • 💡Test button placement before permanently sewing it on by positioning the flap where you want it
  • 💡Weave in ends as you go to avoid a large finishing task at the end
  • 💡Block squares before assembly if you want a more polished, professional finish

This beautiful boho granny square bag pattern combines timeless crochet techniques with modern style! The modular design makes it perfect for on-the-go crafting—work on individual squares wherever you are, then assemble them into your stunning finished bag. The customizable color options mean you can create a bag that perfectly matches your personal style or use up your favorite scrap yarns. With its practical button closure and comfortable strap, this isn't just a pretty project—it's a functional accessory you'll reach for again and again. 🧶 Happy crocheting! 🧵✨

You ask,

we answer.

FAQs

Can I use different yarn weights for this pattern?

While the pattern is designed for DK weight yarn with a 6mm hook, you can adapt it to other yarn weights by adjusting your hook size accordingly. Just ensure all your squares are the same size for proper assembly.

How do I make my granny squares all the same size?

Maintaining consistent tension is key. Count your stitches carefully in each round, and consider blocking your squares before assembly to ensure they're uniform in size and shape.

Can I make the strap longer or shorter?

Absolutely! The pattern suggests 100 foundation stitches, but you can make your strap any length you prefer. Just remember to work in multiples of 2 for the bead stitch pattern to work correctly.

What if I don't have bag hardware for the strap?

You have several options: sew the strap directly to the bag, purchase a ready-made handle, or create chain loops on the strap ends to button onto the bag itself.

How many colors should I use?

The pattern is designed for 1-5 colors, so it's completely up to you! You can create a coordinated look with planned colors or make it scrappy using random yarn from your stash.