🧶 Beautiful ✨ Detailed 💝 Adorable

House of Wizards Raven Crochet Applique Pattern

House of Wizards Raven Crochet Applique Pattern
4.8★ Rating
2-2.5 Hours Time Needed
2.9K Made This
✂️

Intermediate Level

Ideal for those with basic knitting experience, featuring slightly more advanced stitches and techniques to expand your skills.

⏱️

Bite-Sized Project

Complete in under 2 hours—quick, fun, and perfect for a little creative escape.

🐦

Charming Critter

Delightful animal designs with sweet details that capture the essence of your favorite woodland and farmyard friends.

About This House of Wizards Raven Crochet Applique Pattern

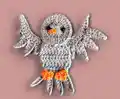
This sophisticated raven applique captures the intelligence and grace of the legendary bird house with detailed wing construction and elegant proportions. The pattern features intricate feather details created through strategic chain loops that give the wings realistic texture and movement. The graduated tail feathers add authentic bird anatomy, while the simple triangular body keeps the project manageable. Each wing is worked with individual feather segments that create beautiful dimension and make your raven look ready to take flight.

House of Wizards Raven Crochet Applique Pattern crochet pattern - detailed view of completed project

With detailed step-by-step instructions including reattachment points and visual cues, you'll create a stunning raven that showcases your growing crochet skills while celebrating wisdom and learning.

Why You'll Love This House of Wizards Raven Crochet Applique Pattern

I'm genuinely obsessed with how this raven pattern creates such realistic wing details through surprisingly straightforward techniques! The chain-loop feather construction is absolutely brilliant—each little feather segment builds on the last to create this gorgeous layered effect that looks incredibly professional. I love how you can see the pattern coming together as you work, watching those wings transform from simple chains into majestic flight-ready appendages. The satisfaction of completing those detailed wings is unmatched, and the best part is that while it looks complex and impressive, the actual stitches are quite basic—it's all about the clever construction. Every time I make one, I find myself admiring how the light grey creates such elegant depth and how those four tail feathers add the perfect finishing touch of authenticity.

House of Wizards Raven Crochet Applique Pattern step 1 - construction progress House of Wizards Raven Crochet Applique Pattern step 2 - assembly progress House of Wizards Raven Crochet Applique Pattern step 3 - details and accessories House of Wizards Raven Crochet Applique Pattern step 4 - final assembly and finishing

Switch Things Up

I absolutely love experimenting with different wing positions to create unique raven personalities and poses! Instead of the standard flight position, try angling both wings downward for a perched raven, or position one wing up and one down for a dynamic mid-flight look that adds incredible movement to your piece. You could even create folded wings by working shorter feather chains and positioning them closer to the body for a resting bird appearance.

Color variations open up a whole world of creativity beyond the traditional light grey. I've made stunning ravens in solid black with metallic thread worked through for a mystical shimmer, pure white for an arctic raven variant, or even iridescent blue-black using color-shifting yarn that catches the light like real raven feathers. For a truly magical twist, try gradient yarn that shifts from deep purple to black, creating an enchanted bird that looks like it flew straight out of a spell book.

The tail feathers are another fantastic area for customization—instead of four uniform feathers, try making them in graduated lengths for a more realistic tail profile, or add more feathers for a fuller, more dramatic tail spread. I've also experimented with adding tiny wire armatures to the wings and tail feathers, allowing you to pose and reshape your raven into different positions. Some of my favorite modifications include adding embroidered details to the wing tips for extra texture, creating a small crest of feathers on the head for added dimension, or even making a whole flock of ravens in different sizes by adjusting hook sizes. The pattern is wonderfully forgiving and encourages experimentation while still maintaining that elegant raven silhouette!

Common Mistakes & How to Fix Them

✗ Miscounting the skip stitches when reattaching yarn for wing feathers will throw off the entire feather placement and create uneven wing shapes ✗ Working the chain loops for feathers too tightly will create stiff, shortened feathers that don't have the graceful drape you want for realistic movement ✗ Missing the exact reattachment points shown in the pattern photos can result in feathers attaching in wrong positions and creating gaps in wing coverage ✗ Rushing through the individual feather sections without checking your stitch count will lead to feathers of varying lengths that look uneven and messy

House of Wizards Raven Crochet Applique Pattern

Celebrate wit and wisdom with this elegant raven crochet applique pattern! This 6-7 inch tall bird features impressive detailed wings, a sleek body, and authentic house pride colors in light grey tones. Perfect for adding a touch of intelligence and grace to blankets, bags, or clothing, this pattern combines simple stitches with strategic shaping to create a majestic bird in flight. Whether you're a wizarding world enthusiast or simply appreciate the beauty of ravens, this clever design will bring scholarly charm to any project.

Intermediate 2-2.5 Hours

Materials Needed for House of Wizards Raven Crochet Applique Pattern

— Main Fabric

  • 01
    Light Grey worsted weight yarn (Caron One Pound or similar)
  • 02
    Gold worsted weight yarn (small amount for beak and feet)
  • 03
    Navy worsted weight yarn (for optional crest)
  • 04
    Light Blue worsted weight yarn (for optional crest)
  • 05
    Charcoal worsted weight yarn (for optional crest outline)

— Tools Required

  • 01
    Crochet hook size F (3.75mm)
  • 02
    Yarn needle
  • 03
    Scissors
  • 04
    Shank buttons (6mm for eyes)
  • 05
    Glue gun and glue sticks (optional for assembly)
  • 06
    Stitch markers (highly recommended for wing construction)
  • 07
    Pins (essential for positioning wings)

Progress Tracker

0% Complete

— Head :

Round 1 :

Using light grey, make a magic circle, CH 2 and DC 16. SS to join. CH 2, do not turn.

Round 2 :

2DC in each stitch around. SS to join. Tie off.

— Wings :

Foundation :

Using light grey, CH 35. SS in 2nd from hook. SC in next. HDC in next.

Main Wing Body :

DC in the next 28.

Tapering :

HDC in next. SC in next. SS in last. Tie off.

Feather Section 1 Start :

Re-attach yarn as shown in pattern picture - Skip 13 stitches in from the left.

First Feather :

CH 5. SS in 2nd from hook, SC in next. HDC in next, DC in last, and then skip one stitch on the main wing part, and SS to join.

Second Feather :

*CH 7. SS in 2nd from hook. SC in next. HDC in next. DC in next 3. Skip one stitch on the main wing part, and SS to join.

Third Feather :

Repeat from * 1 more time.

Fourth Feather :

CH 9. SS in 2nd from hook. SC in next. HDC in next. DC in next 5. Skip one stitch on main wing part and SS to join. Tie off.

Feather Section 2 Start :

Skip 7 stitches on main wing part and re-attach yarn (as shown in picture). Then repeat Wing feather instructions above.

— Body :

Row 1 :

Using light grey, CH 8. DC in 3rd from hook and across (6). CH 2, turn.

Row 2 :

2DC in first. DC in next 4. 2DC in last. CH 2, turn.

Row 3 :

2DC in first. DC in next 6. 2DC in last. CH 2, turn.

Row 4 :

DC across. CH 2, turn.

Row 5 :

DC2TG. DC in next 6. DC2TG. CH 2, turn.

Row 6 :

DC2TG. DC in next 4. DC2TG. Tie off.

— Beak :

Construction :

Using gold, CH 3. SS in 2nd from hook. SC in last. Tie off.

— Feet :

Info :

Make 2 pieces

Foot Construction :

Using gold, CH 3. In last CH from hook, *DC, SS, CH 2, and repeat from * 2 more times, but do not CH 2 on the last one. Just SS and tie off.

— Tail Feathers :

Info :

Make 4 pieces

Feather Construction :

Using light grey, CH 9. SS in 2nd from hook, SC in next, and HDC the rest of the way down. Tie off.

— Scarf (Optional) :

Info :

Use navy and light blue colors. You can tie off after each color or carry yarn up the back.

Neck Piece Row 1 :

Using Color #1, CH 4. HDC in 2nd from hook and across (3).

Rows 2-7 :

*Attach Color 2. HDC across (3). Switch to Color 1. HDC across (3). Repeat from * 3 more times for 7 rows total. Tie off.

Hanging Piece :

Repeat above instructions but only until you have 5 rows total. Then tie off.

Fringe :

Make 6 cuts of yarn about 4 inches long. Using 2 pieces at a time, tie them around the bottom of the scarf and cut to desired length.

Assembly Instructions

  • Position the circular head piece at the top of the triangular body, with the wider part of the body at the top for proper proportion.
  • Attach button eyes to the head piece, spacing them evenly and positioning them in the upper portion for that intelligent raven expression.
  • Glue or stitch the small gold beak to the center front of the head, just below the eyes, pointing downward.
  • Attach the two wings to either side of the body, positioning them so the detailed feather sections face outward and slightly upward for a flight pose.
  • Fan out the four tail feathers and attach them to the bottom point of the triangular body, spacing them evenly for a realistic tail spread.
  • Position the two gold feet at the bottom of the body, between the body and tail feathers, angling them slightly outward.
  • If adding the optional scarf, wrap it around the neck area where the head meets the body, securing the longer piece around and letting the fringed piece hang down.

Important Notes

  • 💡Use stitch markers to mark the exact reattachment points for wing feathers—precision is key for symmetrical wings
  • 💡The wing construction requires careful attention to the pattern photos showing where to skip and reattach yarn
  • 💡Work the chain-loop feathers loosely to allow them to drape naturally and create realistic wing movement
  • 💡Pin the wings in position before permanently attaching to ensure they're symmetrical and properly angled
  • 💡The tail feathers should fan out slightly when assembled rather than laying flat for dimensional appeal
  • 💡Button eyes can be angled slightly to give your raven different expressions—straight forward for alert, angled for curious
  • 💡The body decreases create a natural taper that mimics real bird anatomy, so maintain consistent tension throughout

This elegant raven applique pattern brings intelligence and grace to any wizarding-themed project with stunning wing details and authentic bird proportions! The intricate feather construction looks impressively complex but uses simple chain techniques layered brilliantly for maximum impact. Perfect for intermediate crocheters ready to challenge themselves with detailed work that yields show-stopping results, this wise bird adds scholarly charm whether displayed solo or as part of a magical house collection. The satisfaction of completing those magnificent wings is absolutely worth every stitch! 🐦 Happy crocheting! 🧶✨

You ask,

we answer.

FAQs

How do I know where to reattach the yarn for the wing feathers?

The pattern includes specific photos showing the reattachment points. Count carefully—skip 13 stitches from the left for the first feather section, then skip 7 stitches between sections. Using stitch markers to mark these points before you start the feathers can be incredibly helpful.

Can I make the wings smaller or with fewer feathers?

Yes! You can reduce the initial chain to make smaller wings, and you can skip one of the feather sections if you want simpler wings. Just keep in mind that the detailed feathers are what make this raven special and impressive-looking.

Why do my wing feathers look stiff instead of flowing?

You're likely working the chain stitches too tightly. The feather chains should be worked loosely to allow them to drape and curve naturally. Practice making looser chains, and remember that slightly loose is better than tight for this pattern.

Do I need to make two wings or can I use one?

The pattern creates one detailed wing piece that can be positioned to show both wings. However, if you want a more three-dimensional look with wings on both sides, you can make two wing pieces following the same instructions.

How do I arrange the tail feathers so they look realistic?

Fan them out in a slight arc at the bottom of the body rather than lining them up straight. The outer two feathers should angle slightly outward, while the inner two should be more vertical, creating a natural tail spread like a real bird.