🧶 Beautiful ✨ Detailed 💝 Adorable

House of Wizards Lion Crochet Applique Pattern

House of Wizards Lion Crochet Applique Pattern
4.7★ Rating
1.5-2 Hours Time Needed
2.4K Made This
✂️

Beginner Friendly Level

Perfect for those just starting their sewing journey, with clear instructions and simple techniques

⏱️

Bite-Sized Project

Complete in under 2 hours—quick, fun, and perfect for a little creative escape.

🧸

Cute Companion

An adorable friend to cherish, handcrafted with love to bring comfort and joy for years to come.

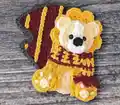
About This House of Wizards Lion Crochet Applique Pattern

This magical lion applique captures the courage and strength of the legendary house with golden yarn and burgundy accents. The pattern features a detailed mane created with textured stitches, a sweet face with embroidered details, and tiny paws that add extra charm. The striped scarf in house colors completes this noble creature, making it perfect for decorating wizard-themed projects or creating standalone ornaments that celebrate bravery and determination.

House of Wizards Lion Crochet Applique Pattern crochet pattern - detailed view of completed project

With clear row-by-row instructions and helpful assembly photos, you'll create a charming lion that's perfect for both display and functional use on bags, blankets, or clothing items.

Why You'll Love This House of Wizards Lion Crochet Applique Pattern

I absolutely love how this lion pattern brings such personality to life in just a couple of hours! The textured mane technique creates incredible dimension without complicated stitches, and watching those little details come together—from the tiny ears to the adorable paws—is so satisfying. I find myself making these in batches because they work up so quickly and make the most thoughtful gifts for any wizarding world fan. The way the gold and burgundy colors complement each other gives it that authentic house pride feel, and the optional scarf adds a cozy finishing touch that makes each lion feel like it has its own story to tell.

House of Wizards Lion Crochet Applique Pattern step 1 - construction progress House of Wizards Lion Crochet Applique Pattern step 2 - assembly progress House of Wizards Lion Crochet Applique Pattern step 3 - details and accessories House of Wizards Lion Crochet Applique Pattern step 4 - final assembly and finishing

Switch Things Up

I love experimenting with this lion pattern to create unique variations that reflect different styles and personalities! One of my favorite modifications is changing the mane texture—instead of the standard puff stitches, try using loop stitches for an ultra-fluffy, shaggy look that gives your lion serious character. You could also play with the color palette beyond the traditional gold and burgundy; imagine a white lion with silver accents for a more regal appearance, or even a rainbow mane for a whimsical, magical twist.

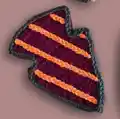
Another fun switch-up I enjoy is adjusting the facial features to give each lion its own personality. Try positioning the eyes closer together for a cute, innocent look, or space them wider for a more mature, noble expression. I've also experimented with embroidering tiny eyebrows or adding blush to the cheeks with pink yarn for extra charm. The scarf is another fantastic area for customization—try making it longer for dramatic draping, add stripes in multiple colors, or even create a tiny house crest to attach to it.

For those who want to take it further, consider adding dimensional elements like wire-framed legs that can be posed, or create a whole pride of lions in various sizes by adjusting your hook size. I've even made flat-backed versions specifically designed for sewing onto blankets or bags, which eliminates the need for stuffing and creates a perfect applique. The possibilities are truly endless with this versatile pattern!

Common Mistakes & How to Fix Them

✗ Skipping the magic circle foundation can create a visible hole in the center of the lion's head—practice your magic circle technique for a seamless start ✗ Pulling stitches too tight when creating the mane puffs will flatten them and reduce the dimensional texture effect you want to achieve ✗ Forgetting to stuff the head and body pieces firmly enough before closing will result in a floppy, misshapen lion that won't hold its adorable form ✗ Not counting stitches carefully in the mane round can throw off the entire pattern and create uneven puff placement around the face

House of Wizards Lion Crochet Applique Pattern

Bring the bravery and nobility of the lion house to life with this enchanting crochet applique pattern! Perfect for adding magical touches to blankets, bags, or clothing, this 6-7 inch tall lion features a magnificent mane, adorable details, and house pride colors. Whether you're a wizarding world enthusiast or simply love creating charming lion characters, this pattern combines beginner-friendly techniques with impressive results that will make your projects roar with personality and charm.

Beginner Friendly 1.5-2 Hours

Materials Needed for House of Wizards Lion Crochet Applique Pattern

— Main Fabric

  • 01
    Gold worsted weight yarn (Caron One Pound or similar)
  • 02
    Light yellow worsted weight yarn
  • 03
    White worsted weight yarn
  • 04
    Burgundy worsted weight yarn
  • 05
    Charcoal worsted weight yarn
  • 06
    Black worsted weight yarn

— Tools Required

  • 01
    Crochet hook size F (3.75mm)
  • 02
    Yarn needle
  • 03
    Scissors
  • 04
    Shank buttons (13mm for body, 6mm for smaller details)
  • 05
    Glue gun and glue sticks (optional for assembly)
  • 06
    Stitch markers (recommended)

Progress Tracker

0% Complete

— Head :

Round 1 :

Using gold, make a magic circle, CH 2 and DC 14. SS to join. CH 2, do not turn.

Round 2 :

2DC in each stitch around. SS to join. CH 1, do not turn.

Round 3 (Mane) :

*4HDC in next stitch, SS in next. Skip next. Repeat from * 7 more times. The last 2 stitches will be skipped. SS to join. Tie off.

Face Base :

Using light yellow, make a magic circle, CH 2, and DC 12. SS to join. CH 2, do not turn.

Round 2 :

2DC in each stitch around. SS to join. Tie off.

Muzzle :

Using white, make a magic circle, CH 1, and HDC 10. SS to join. CH 1, do not turn.

Row 2 :

HDC in first 2. CH 1, turn. HDC across (2). CH 1, turn.

Row 3 :

HDC across. Tie off.

— Nose :

Round 1 :

Using black, make a magic circle, CH 1 and SC 4. SS to join. Tie off.

— Ears :

Info :

Make 2 pieces

Round 1 :

Using light yellow, CH 3. 5HDC in last CH from hook. SS in same CH. Tie off.

— Belly :

Round 1 :

Using light yellow, make a magic circle, CH 2, and DC 12. SS to join. CH 2, do not turn.

Round 2 :

2DC around. SS to join. Tie off.

— Body :

Row 1 :

Using gold, CH 9. HDC in 2nd hook and across (8). CH 1, turn.

Row 2 :

2HDC in first. HDC in next 6. 2HDC in last. CH 1, turn.

— Legs :

Leg 1 Row 1 :

HDC in the first 4. CH 1, turn.

Row 2 :

HDC across. CH 1, turn.

Rows 3-5 :

Repeat last row 3 more times, but do not CH 1. Just tie off.

Leg 2 :

Skip 1 stitch on body and re-attach yarn to make second leg. Repeat Leg instructions. Tie off.

— Feet :

Info :

Make 2 pieces

Round 1 :

Using gold, make a magic circle, CH 2 and DC 12. SS to join. Tie off.

Toe Details :

Using white, CH 2. SC 3 times in last CH from hook and pull tight. Tie off.

Claws :

Using white, make 3 chains of 1. Tie off.

— Scarf :

Info :

Use burgundy and gold colors. You can tie off after each color or carry yarn up the back.

Neck Piece Row 1 :

Using Color #1, CH 4. HDC in 2nd from hook and across (3).

Rows 2-7 :

*Attach Color 2. HDC across (3). Switch to Color 1. HDC across (3). Repeat from * 3 more times for 7 rows total. Tie off.

Hanging Piece :

Repeat above instructions but only until you have 5 rows total. Then tie off.

Fringe :

Make 6 cuts of yarn about 4 inches long. Using 2 pieces at a time, tie them around the bottom of the scarf and cut to desired length.

Assembly Instructions

  • Glue or stitch the light yellow face piece to the center of the golden mane, ensuring the mane puffs are evenly distributed around it.
  • Attach the white muzzle piece to the lower portion of the face, then add the black nose at the top of the muzzle.
  • Position and attach button eyes on the face between the muzzle and the top of the head, typically using 6mm buttons.
  • Glue or stitch the two light yellow ears to the top of the head, spacing them evenly on either side.
  • Attach the light yellow belly piece to the center of the gold body piece.
  • Connect the completed head to the top of the body, ensuring proper alignment.
  • Attach the two feet pieces to the bottom of each leg, then add the white toe details and individual claw chains for dimension.
  • Wrap the longer scarf piece around the neck area and glue in place, then attach the shorter fringed piece to hang down the front.

Important Notes

  • 💡The magic circle technique is essential for this pattern—practice it beforehand if you're new to the technique for best results
  • 💡Work the mane puffs loosely to create maximum fluff and dimension, pulling them tight will flatten the effect
  • 💡Use stitch markers to keep track of your place, especially when creating the mane round with its repeating pattern
  • 💡Button eyes can be substituted with embroidered eyes or safety eyes depending on your preference and intended use
  • 💡If gluing pieces together, use hot glue sparingly and allow each piece to cool before handling to ensure strong bonds
  • 💡Pin all pieces in position before permanently attaching them to ensure proper placement and proportion
  • 💡The scarf colors can be customized to match your preferred house colors or personal color scheme

This adorable lion applique pattern brings courage and charm to any crochet project! With its fluffy golden mane, sweet expression, and house pride details, this noble creature works up quickly and makes the perfect addition to wizard-themed crafts. Whether you're decorating a blanket, personalizing a bag, or creating a collection of magical house mascots, this lion will add a touch of bravery and warmth. The pattern is beginner-friendly with clear instructions that make the process enjoyable from start to finish. 🦁 Happy crocheting! 🧶✨

You ask,

we answer.

FAQs

Can I make the lion larger or smaller?

Absolutely! Use a larger hook and bulkier yarn to increase the size, or try a smaller hook with fingering weight yarn for a miniature version. Just remember that changing yarn weight will affect the final dimensions and you may need to adjust button eye sizes accordingly.

What's the best way to create the fluffy mane effect?

The key is working the 4HDC stitches loosely into each designated stitch. Don't pull the stitches tight—let them puff out naturally. You can also gently brush the finished mane with a pet brush or toothbrush to create even more fluff and texture.

Can I use safety eyes instead of buttons?

Yes! Safety eyes work wonderfully for this pattern. Use 8-10mm safety eyes and insert them between rounds before stuffing and closing the head. This is especially recommended if making the lion for children.

Is the scarf necessary or can I skip it?

The scarf is completely optional! The lion looks adorable with or without it. If you want to save time or yarn, feel free to skip the scarf entirely or substitute it with a simple bow or ribbon for a different look.

How do I attach the pieces if I don't want to use a glue gun?

You can hand-stitch all pieces together using a yarn needle and matching yarn colors. Use a whip stitch around the edges of each piece, making sure to secure them firmly. This method is more time-consuming but creates a very sturdy attachment that's machine washable.