🧶 Beautiful ✨ Detailed 💝 Adorable

Mini Turtle Amigurumi Pattern

Mini Turtle Amigurumi Pattern
4.8★ Rating
1.5-2 Hours Time Needed
1.7K Made This
✂️

Intermediate Level

Ideal for those with basic knitting experience, featuring slightly more advanced stitches and techniques to expand your skills.

⏱️

Bite-Sized Project

Complete in under 2 hours—quick, fun, and perfect for a little creative escape.

🎁

Tiny Treasure

Small, sweet, and gift-worthy creations that fit perfectly in the palm of your hand with detailed charm.

About This Mini Turtle Amigurumi Pattern

Mini Turtle Amigurumi Pattern crochet pattern - detailed view of completed project

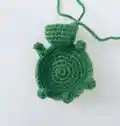
The finished turtle measures approximately 6cm long and 2.5cm tall, making it the perfect portable companion. The pattern includes detailed instructions for optional shell embroidery to add realistic texture and personality to your creation.

Why You'll Love This Mini Turtle Amigurumi Pattern

I'm completely obsessed with this mini turtle pattern because it proves that incredible detail can come in the tiniest packages! Working on such a small scale with a 1.25mm hook feels like creating miniature magic, and watching this adorable turtle take shape is absolutely mesmerizing. I love the ingenious construction method where the legs and tail are created during the joining process—it's such a clever technique that saves tons of time and creates a seamless finish. The fact that you can complete an entire turtle in under two hours means I can make a whole family in an afternoon! These little guys are perfect for gift-giving because everyone loves receiving something so intricately detailed yet impossibly cute. Plus, the optional shell embroidery lets me get creative and make each turtle unique with different patterns and textures.

Mini Turtle Amigurumi Pattern step 1 - construction progress Mini Turtle Amigurumi Pattern step 2 - assembly progress Mini Turtle Amigurumi Pattern step 3 - details and accessories Mini Turtle Amigurumi Pattern step 4 - final assembly and finishing

Switch Things Up

I absolutely love experimenting with different color combinations for these tiny turtles to create entire themed collections! While the pattern calls for green and light green, I've made ocean-themed turtles using turquoise and navy blue that look absolutely stunning. For a more whimsical approach, try pastel rainbow colors or even metallic yarns for the shell—the sparkle adds such a magical touch to these miniatures.

You can also vary the shell embroidery patterns to give each turtle unique personality. I've created geometric patterns, floral designs, and even tried simple dots or lines that look like real turtle shell markings. Some of my favorites feature spiral patterns radiating from the center of the shell, or honeycomb designs that add incredible texture.

These mini turtles are perfect for creating seasonal variations too! Make autumn turtles with orange, brown, and gold shells, or winter versions with white and silver for a frosty look. I've even made Valentine's Day turtles with pink and red shells decorated with tiny heart embroidery. The small size means you can complete a seasonal collection in just one afternoon.

Another fun variation is adjusting the yarn weight slightly—using thread creates micro turtles perfect for earrings or zipper pulls, while moving up to sport weight yarn with a 2mm hook creates slightly larger turtles that make great worry stones or fidget toys. Just remember to adjust your eye size accordingly!

Common Mistakes & How to Fix Them

✗ Using a hook that's too large for the yarn, resulting in loose stitches and visible stuffing showing through the fabric ✗ Not pulling the magic ring tight enough at the beginning of the shell and belly, leaving unsightly holes in the center ✗ Forgetting to work in back loops only when joining the shell and belly pieces, which prevents proper seam formation ✗ Rushing through the leg and tail creation during assembly, causing them to be uneven lengths or poorly shaped appendages ✗ Over-stuffing the tiny head which distorts the shape and makes it difficult to create proper facial proportions and expressions ✗ Not leaving long enough yarn tails for sculpting the eye area, making it impossible to achieve the cute facial definition

Mini Turtle Amigurumi Pattern

Create an absolutely adorable mini turtle amigurumi that fits perfectly in the palm of your hand with this detailed crochet pattern. Measuring just 6cm in length, this tiny treasure features a beautifully detailed shell, cute little legs, a tiny tail, and the sweetest expressive face. Made with Alize Cotton Gold yarn and a small hook, this pattern creates an incredibly detailed miniature that's perfect for keychains, gift toppers, desk decorations, or starting a collection of pocket-sized friends. The pattern includes options for both regular yarn and plush yarn versions, plus sculpting techniques for extra character and optional shell embroidery for added texture.

Intermediate 1.5-2 Hours

Materials Needed for Mini Turtle Amigurumi Pattern

— Main Fabric

  • 01
    Alize Cotton Gold yarn (100g-330m) in green color
  • 02
    Alize Cotton Gold yarn (100g-330m) in light green color
  • 03
    Alize Cotton Gold yarn (100g-330m) in white color for eye details
  • 04
    Alize Cotton Gold yarn (100g-330m) in black color
  • 05
    Alternative: Any cotton or plush yarn in colors of your choice

— Tools Required

  • 01
    Crochet hook size 1.25mm
  • 02
    Safety eyes 6mm OR half beads 6mm
  • 03
    Glue (if using half beads)
  • 04
    Stuffing material (fiberfill)
  • 05
    Shell embroidery needle (optional for shell decoration)
  • 06
    Tapestry needle for weaving in ends
  • 07
    Scissors

Progress Tracker

0% Complete

— SHELL :

Info :

Work in light green yarn.

R1 :

6 sc into MR

R2 :

6 inc (12)

R3 :

(1sc, inc) x 6 (18)

R4 :

(2sc, inc) x 6 (24)

R5 :

(3sc, inc) x 6 (30)

R6 :

(4sc, inc) x 6 (36)

R7-R8 (2 rounds) :

36sc (36)

Info :

Fasten off and cut yarn.

— BELLY :

Info :

Work in green yarn.

R1 :

6sc into MR

R2 :

6 inc (12)

R3 :

(1sc, inc) x 6 (18)

R4 :

(2sc, inc) x 6 (24)

R5 :

(3sc, inc) x 6 (30)

R6 :

(4sc, inc) x 6 (36)

Info :

Do not cut off yarn. Join shell and belly with it. We will crochet legs and tail during joining. Put shell and belly together facing wrong sides.

— JOINING SHELL AND BELLY (Creating legs and tail) :

Info :

Work in BLO of both shell and belly pieces.

Assembly Round :

3sc, ch4, starting in 2nd ch from hook make 3sc in chain (leg), sl st in stitch where you started ch4, 9sc, ch4, starting in 2nd ch from hook make 3sc in chain (leg), sl st in stitch where you started ch4, 5sc, ch3, starting in 2nd ch from hook make 2sc in chain (tail), sl st in stitch where you started ch3, 4sc, ch4, starting in 2nd ch from hook make 3sc in chain (leg), sl st in stitch where you started ch4, 9sc, ch4, starting in 2nd ch from hook make 3sc in chain (leg), sl st in stitch where you started ch4, 3sc (36)

— HEAD (Standard yarn version) :

Info :

Continue crocheting head across opening created at beginning of crocheting round.

R1 :

6 inc (12)

R2 :

12 inc (24)

R3-R6 (4 rounds) :

24 sc (24)

R7 :

(2sc, dec) x 6 (18)

Info :

If using safety eyes, insert them between rounds 5-6. Leave 8-9 sc between eyes. Stuff the piece.

R8 :

(1sc, dec) x 6 (12)

R9 :

6 dec (6)

Info :

Fasten off. Pull opening using front loops. Leave yarn tail for sculpting.

— SCULPTING FOR HALF BEADS :

Info :

If using half beads as eyes, make sculpting between rounds 5-6, leaving 8-9sc between eyes. Insert needle in one eye point and come out at opposite side. Insert needle 1 sc away from where you just came out and bring needle to first eye point. Pull a little, fasten off and cut thread. Weave in ends inside head. Glue on half beads.

— FINISHING TOUCHES :

Eye whites :

Embroider eye whites with white yarn.

Shell decoration (optional) :

Decorate shell with embroidery if desired.

— HEAD (Plush yarn version) :

Info :

If crocheting from plush yarn, crochet head as follows.

R1 :

6 inc (12)

R2 :

12 inc (24)

R3-R5 (3 rounds) :

24sc (24)

R6 :

(2sc, dec) x 6 (18)

Info :

If using safety eyes, insert them between rounds 4-5. Leave 8-9 sc between eyes. Use 10mm safety eyes for plush version.

R7 :

(1sc, dec) x 6 (12)

R8 :

6 dec (6)

Info :

Fasten off, pull opening using front loops. Cut off yarn, weave in ends. Your mini turtle is ready!

Assembly Instructions

  • Crochet the shell completely in light green yarn, working through round 8, then fasten off and set aside
  • Create the belly piece in green yarn through round 6, but do not cut the yarn as you'll use it for joining
  • Place shell and belly pieces together with wrong sides facing each other, then work in back loops only of both pieces simultaneously
  • During the joining round, create legs and tail by working chain stitches and crocheting back along them at designated points
  • Continue working the head directly from the opening left at the beginning of the joining round without breaking yarn
  • Insert safety eyes between rounds 5-6 (or 4-5 for plush version) with 8-9 stitches between them, or prepare for half bead sculpting
  • If using half beads, sculpt eye sockets after completing head, then glue beads in place and embroider white highlights with white yarn

Important Notes

  • 💡A 1.25mm hook creates very tight, dense fabric which is essential for preventing stuffing from showing through on such a tiny project
  • 💡The magic ring must be pulled extremely tight at the start of both shell and belly pieces to avoid visible holes
  • 💡Working in back loops only during joining is crucial for creating the proper seam and structure between shell and belly
  • 💡When creating legs and tail during assembly, keep consistent tension to ensure all appendages are the same size and shape
  • 💡Stuff the head lightly and gradually as you decrease to maintain proper shape without distorting the tiny facial features
  • 💡The finished size will vary based on yarn weight and hook size, but using the recommended materials yields approximately 6cm length

This precious Mini Turtle amigurumi pattern proves that the best things truly do come in small packages! At just 6cm long, this tiny masterpiece showcases incredible detail from its perfectly rounded shell to its adorable little legs and sweet face. The clever construction technique joins the shell and belly while simultaneously creating all four legs and the tail in one continuous round—a brilliant time-saver that also creates a beautifully seamless finish. Whether you're making a keychain charm, a gift topper, or building a collection of miniature friends, this turtle delivers maximum cuteness in minimal time. Perfect for using up yarn scraps and practicing detailed work on a small scale! 🐢🧶✨

You ask,

we answer.

FAQs

Why is such a small hook size required for this pattern?

The 1.25mm hook creates very tight, dense fabric that's essential for miniature amigurumi. This prevents stuffing from showing through and gives your turtle a professional, smooth finish. Larger hooks would create loose stitches that show gaps in such a small project.

Can I use different yarn than Alize Cotton Gold?

Yes, but choose a similar weight cotton or acrylic yarn for best results. Using heavier yarn will create a larger turtle, while lighter thread will make it even tinier. The key is maintaining tight tension with whatever yarn you choose.

How do I create the legs and tail during the joining process?

As you work around joining the shell and belly, you'll chain several stitches at specific points, then crochet back along those chains to form each appendage. After completing each leg or tail, you slip stitch back to where you started and continue the joining round. It's all done in one continuous process!

Should I use safety eyes or half beads with sculpting?

Both options work beautifully! Safety eyes are easier and faster, making them great for beginners. Half beads with sculpting create more defined facial features and expression but require additional sculpting skills. Choose based on your comfort level and desired look.

What's the difference between the standard and plush yarn head instructions?

Plush yarn is bulkier and fluffier, so the plush version has slightly fewer rounds to account for the yarn's extra bulk. If using plush yarn, also use larger 10mm eyes instead of 6mm. The standard version is for cotton or regular weight yarn.

Is shell embroidery difficult to add?

Shell embroidery is completely optional and can be as simple or detailed as you like. Basic stitches creating geometric patterns work beautifully. If you're new to embroidery, practice on a test swatch first, or skip it entirely—your turtle will still be adorable!