🧶 Beautiful ✨ Detailed 💝 Adorable

Hepatica Granny Top Crochet Pattern

Hepatica Granny Top Crochet Pattern
4.0★ Rating
5-7 Hours Time Needed
1.6K Made This
✂️

Intermediate Level

Ideal for those with basic knitting experience, featuring slightly more advanced stitches and techniques to expand your skills.

⏱️

Weekend Treat

Takes 5-7 hours, making it an enjoyable project to finish over a couple of days.

👕

Casual Chic

Relaxed style with a modern twist, perfect for everyday wear while maintaining that handcrafted uniqueness.

About This Hepatica Granny Top Crochet Pattern

The Hepatica Granny Top is a halterneck crochet top that beautifully blends classic granny square construction with a solid single crochet body. It begins with a strip of flower-motif granny squares along the hem, each featuring a delicate blue or green center that mimics the look of real hepatica blooms. From there, you work upward in rows, shaping the top with gradual decreases until you reach the neckline. The piece is finished with long chain ties that thread through the back stitches, creating an adjustable, bohemian-style fit.

Hepatica Granny Top Crochet Pattern crochet pattern - detailed view of completed project

This pattern is sized for S/M and M/L, with the size determined by how many granny squares you start with — 7 for S/M and 8 for M/L. It's a wonderfully flexible design that can be customized to suit your measurements.

Why You'll Love This Hepatica Granny Top Crochet Pattern

I absolutely love this pattern because it feels like wearing a little piece of nature — those floral granny squares at the hem are so pretty, I honestly could stare at them all day. I love how it combines two techniques: the textured, colorful squares at the bottom and the clean, structured single crochet body on top. It feels like two projects in one, and watching it come together is genuinely satisfying. The adjustable tie-back means I never have to stress about fit, and the soft cotton yarn makes it a joy to work with, especially on warm evenings when heavier yarn feels like too much. Every time I wear it I get compliments — and nothing beats saying 'I made this myself.'

Hepatica Granny Top Crochet Pattern step 1 - construction progress Hepatica Granny Top Crochet Pattern step 2 - assembly progress Hepatica Granny Top Crochet Pattern step 3 - details and accessories Hepatica Granny Top Crochet Pattern step 4 - final assembly and finishing

Switch Things Up

I'll be honest — when I first looked at this pattern, I almost set it aside because granny squares felt too 'classic' for what I wanted to make. But something about those little blue flower centers pulled me in, and I am so glad I gave it a chance. Working the squares was almost meditative — that satisfying moment when a flat circle becomes a perfect little square never gets old for me. I love how the pattern transitions from the textured, open granny square hem into the neat solid rows of the top; it's like two completely different vibes living in one piece, and they work together beautifully. I made mine in the original ecru with blue and green centers, and every time I wear it someone asks where I bought it — and I get to say I made it myself, which honestly never stops being one of the best feelings in the world. The back ties are one of my favorite details because they make the fit so forgiving and adjustable; no worrying about whether it will sit right. I've already been thinking about making a second version in terracotta and mustard for autumn, which just goes to show how versatile this pattern really is. If you've been on the fence about trying a wearable crochet project, let this be the one that convinces you.

Common Mistakes & How to Fix Them

✗ Losing stitch count during granny square rounds — always count your dc groups after each round to catch errors early. ✗ Forgetting to skip chain-spaces between dc groups in Row 1 of the top part — this throws off your total stitch count and the fabric will look uneven. ✗ Not ending with an uneven stitch count before the finishing rows — always check before proceeding or your eyelet rows won't work out correctly. ✗ Working the decreases too tightly or too loosely — maintain consistent tension in Row 4 repeats so the top tapers evenly and lies flat. ✗ Joining granny squares unevenly — take your time aligning squares before joining so the hem sits straight and the flowers line up nicely. ✗ Making the chain ties too short — stick to the recommended 90 cm for the side ties and 45 cm for the neck ties so you have enough length to tie comfortably.

Hepatica Granny Top Crochet Pattern

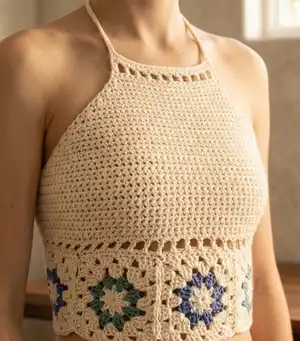
Get ready to crochet one of the most charming warm-weather tops you'll ever wear — the Hepatica Granny Top! This halterneck beauty starts with a row of stunning granny squares inspired by the delicate Anemone hepatica, a spring wildflower that blooms across Sweden and northern Europe. The blue floral centers give the squares a fresh, botanical feel that makes this top truly one of a kind. You'll work the granny square border first, then build upward with rows of single crochet, gradually shaping the top with simple decreases until it fits snugly from neck to underbust. The back ties make it adjustable and flattering on a wide range of body types. Made with soft worsted cotton, this top is as comfortable as it is beautiful — perfect for spring days, summer festivals, or any moment you want your handmade craft to shine.

Intermediate 5-7 Hours

Materials Needed for Hepatica Granny Top Crochet Pattern

— Main Fabric

  • 01
    Worsted weight cotton yarn, approximately 300 m total — main color ecru (3 skeins), plus accent colors blue and green (1 skein each)
  • 02
    Julie by Falkgarn recommended: color 10 (ecru) x3, color 14 (blue) x1, color 15 (green) x1

— Tools Required

  • 01
    Crochet hook size 4.5 mm / US size 7
  • 02
    Darning needle
  • 03
    Scissors

Progress Tracker

0% Complete

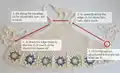
— 1. The Granny Squares :

Round 1 :

(White) Start with a magic ring, or ch4 & join with a slst to form a ring. Ch2, dc into the ring (counts as the first 2dc tog), ch1, [2dc tog, ch1] 7 times into the ring. Close with a slst in the first st. You should now have 8 'petals' (= 2dc tog), each separated by 1 ch. Fasten off.

Round 2 :

(Blue/green) Insert hook into the ch-sp in-between two 'petals' & pull up a loop, ch3 (counts as first dc), 2 dc in the same ch-sp, ch1, [3 dc in next ch-sp, ch1] 7 times, close with a slst in the first dc. You should now have 8 dc groups, each separated by 1 ch. Fasten off.

Round 3 :

(White) Insert hook into the ch-sp in-between two 'petals' (dc-groups) & pull up a loop, ch5 (counts as first dc + 2 ch), 3 dc in the same ch-sp, ch1, *3 dc in next ch-sp, ch1, [3 dc, ch2, 3 dc, ch1] in next ch-sp, repeat from * 2 more times, 3 dc in next ch-sp, ch1, 2 dc in next ch-sp (where you started), close with a slst in the first dc. Your circle will now be a square with 2 dc groups in each corner and one dc group on each side.

Round 4 :

(White) Slst to the next corner ch-sp, ch3 (counts as the first dc), [dc, ch2, 3 dc, ch1] in the same ch-sp, *3 dc in next ch-sp, ch1, 3 dc in next ch-sp, ch1, [3 dc, ch2, 3 dc, ch1] in next corner ch-sp, repeat from * 2 more times, 3 dc in next ch-sp, ch1, 3 dc in next ch-sp, ch1, dc in next ch-sp (where you started), close with a slst in the first dc. Fasten off.

Info :

Make 7 squares for size S/M, or 8 squares for size M/L. Sew or crochet together the squares to form a long strip.

— 2. The Top Part :

Row 1 :

Work a row of sc along the long top edge of your granny strip. Place the strip horizontally in front of you, right side up. Insert hook in the top right corner ch-sp (top left if left-handed), pull up a loop, ch1 (does not count as a st), 2 sc in the same ch-sp, sc into each dc along the edge, plus 1 sc into each of the joins in-between the squares. Skip the ch-sp's in-between the dc-groups. In the final corner ch-sp, work 1 sc if your strip has 7 squares; work 2 sc if your strip has 8 squares. Turn. (Total: 93 sc for 7-square strip; 107 sc for 8-square strip — exact count not critical as long as you end with an uneven number of sts.)

Row 2 :

Ch4 (counts as dc + ch1), sk next st, [dc in next st, ch1, skip next st] repeat to end of row, finish with a dc in the last st, turn.

Row 3 :

Ch1 (does not count as a st), sc in each st (dcs as well as ch-sp's) across, turn.

Row 4 :

Ch1 (does not count as a st), sk first st, sc in next st & in each st across up to the final 2 sts, 2sc tog into the final 2 sts, turn.

Info :

Repeat Row 4 approximately 35 times, or until the row has shrunk to about 12–15 cm / 5–6 inches. Make sure to have an uneven number of sts before continuing to the finishing rows.

Finishing Row 1 :

Ch4 (counts as dc + ch1), sk next st, [dc in next st, ch1, skip next st] repeat to end of row, finish with a dc in the last st, turn.

Finishing Row 2 :

Ch1 (does not count as a st), sc in each st (dcs as well as ch-sp's) across. Fasten off.

— 3. Edging Row & Ties :

Edging & Ties :

Work a 90 cm / 35 inches long chain, sc into the last st of Row 4, sc into the side of each row of the top part working upward toward the top corner. Work a 45 cm / 18 inches long chain, turn, slst into each ch all the way back to the corner, slst into each st along the top edge, work another 45 cm / 18 inches long chain, turn, slst into each ch back to the corner, sc into the side of each row of the top part working your way down along the edge, finishing in the first st from Row 4, work a second 90 cm / 35 inches long chain. Fasten off and weave in the ends.

Info :

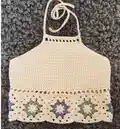
Thread the long chain ties through the stitches at the back as shown in the pattern photo. Wash and block your finished top.

Assembly Instructions

  • Sew or crochet the finished granny squares together side by side into one long horizontal strip before starting the top section.
  • Make sure all flower centers face the right side before joining squares, so the design is consistent across the hem.
  • After completing the top part, weave in all yarn ends securely on the wrong side of the work, especially at color changes in the granny squares.
  • Thread the two long 90 cm side chain ties through the back stitches of the top as shown in the photo, so they can be tied at the back.
  • The two 45 cm neck ties form the halterneck loop — make sure they are even in length before finishing so the top sits level when worn.
  • Wash and wet block the finished top to even out the stitches and open up the granny squares and eyelet rows to their full size.
  • Try the top on (or measure against your body) before blocking to check the overall length and width fit, adjusting if needed.

Important Notes

  • 💡Always check your stitch count after every round of the granny squares — an extra or missing stitch will throw off the square shape.
  • 💡The exact stitch count in Row 1 of the top part is not critical, but you must end with an uneven number of stitches for the eyelet rows to work correctly.
  • 💡Gauge matters more than you think here — swatch your granny square first to confirm it measures 10x10 cm, as the finished size depends on it.
  • 💡Use a stitch marker to track the beginning of each round in the granny squares, especially during color changes.
  • 💡When working the long edging and tie section, lay your work flat to make sure you're picking up stitches evenly along both side edges.
  • 💡Block your finished top — wet blocking cotton yarn makes a huge difference in drape, stitch definition, and overall appearance.

The Hepatica Granny Top is that rare crochet project that feels like both a creative adventure and a wearable reward. Inspired by the soft wildflowers of a Swedish spring, this halterneck top brings together the timeless charm of granny squares and the clean structure of single crochet in one beautifully balanced design. Whether you're crocheting it for a weekend getaway, a summer market, or simply because you deserve something handmade and gorgeous — this pattern delivers all the joy. Make it in the original ecru, blue, and green palette, or swap the colors to match your personal style. 🌸 Happy hookin'! 🧶✨

You ask,

we answer.

FAQs

What yarn weight should I use for this top?

The pattern calls for worsted weight cotton yarn. The designer used Julie by Falkgarn, which is a soft unmercerised worsted cotton. Any worsted weight cotton yarn will work — just make sure to swatch first to match the gauge of 10x10 cm per granny square.

How do I know which size to make?

The size is determined by how many granny squares you start with. Use 7 squares for size S/M (chest up to 90 cm / 35 inches) and 8 squares for size M/L (chest approx. 95–105 cm / 37–41 inches). The back ties also provide extra adjustability.

Can I use a different color combination for the granny squares?

Absolutely! The pattern uses ecru as the main color with blue and green for the flower centers, but you can swap these for any colors you love. Just make sure to use the same yarn weight to keep your gauge consistent.

What does 2dc tog mean in this pattern?

2dc tog means working two double crochets together as a decrease — you begin the first dc in the designated stitch, then complete both stitches together in one final pull-through. In this pattern it's used to create the 'petal' shapes in Round 1 of the granny squares.

How many times do I repeat Row 4 during the shaping section?

The pattern says to repeat Row 4 approximately 35 times, or until the row has narrowed to about 12–15 cm / 5–6 inches wide. Always end with an uneven stitch count before moving on to the finishing rows.

Do I need to block this top when finished?

Yes, blocking is highly recommended. Cotton yarn responds really well to wet blocking — it opens up the lace eyelet rows, evens out the granny squares, and gives the top a more polished, professional drape. Simply wet the finished piece, gently squeeze out excess water, and lay flat to dry.