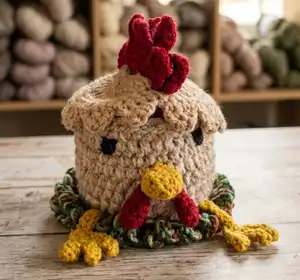
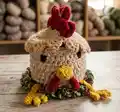
Transform your coffee table into a charming farmyard scene with this delightful chicken-themed coaster set! This creative pattern combines functionality with whimsy, featuring a adorable 3D chicken head that sits atop a textured nest mat, plus four egg-shaped coasters cleverly hidden inside crackable egg shells. Perfect for adding personality to your home décor or creating a memorable handmade gift, this set showcases your crochet skills while keeping surfaces protected. Each piece works together to create an enchanting display that's sure to spark conversation and bring smiles to everyone who sees it.
Progress Tracker
0% Complete
— CHICKEN COMB / COASTER (make 1) :
Round 1 :
Create MC, 6 sc into MC (6)
Round 2 :
2 sc into each st around (incr) (12)
Round 3 :
*Sc into next st, 2 sc into next (incr)*; repeat around (18)
Round 4 :
*Sc into next 2 sts, 2 sc into next (incr)*; repeat around (24)
Round 5 :
Sc into next 2 sts, 2 sc into next (incr), *sc into next 3 sts, 2 sc into next (incr)*; repeat around ending in 1 sc (30)
Round 6 :
*Sc into next 4 sts, 2 sc into next (incr)*; repeat around (36)
Round 7 :
Sc into next 3 sts, 2 sc into next (incr), *sc into next 5 sts, 2 sc into next (incr)*; repeat around ending in 2 sc (42)
Round 8 :
*Sc into next 6 sts, 2 sc into next (incr)*; repeat around (48)
Round 9 :
*Sc into next 5 sts, ch 1, turn. Sc into 4 sts, ch 1, turn. Sc together (decr) 2 times, ch 1, turn. Sc together (decr), ch 1, turn. 2 sc into the same st and next st. Sl st into the next 2 sts*; repeat another 2 times. Sc into the next 2 sts, 2 sc into the next st, sc into the next st; ch 1, turn. Sc into the next 4 sts, ch 1, turn. Sc together (decr) 2 times, ch 1 turn. Sc together (decr), ch 1, turn. 2 sc into the same st, 2 sc into the next st. Sl st into the next 2 sts. Sc into the next 5 sts. *Sc into the next 5 sts, ch 1, turn. Sc into the next 4 sts, ch 1, turn. Sc together (decr) 2 times, ch 1, turn. Sc together (decr), ch 1, turn. 2 sc into the same st and next st. Sl st into the next 2 sts*; repeat another 3 times. Sc into remaining sts to create the second gap. Fasten off and sew in any loose ends.
— TOP OF CHICKEN HEAD (HAIR) / COASTER (make 1) :
Round 1 :
Create MC, chain 2, 6 dc into MC (7 = 6 dc + ch 2). To make the turning chain: ch 2, insert hook into 2nd ch from hook, pull up a loop. Turn your work to continue completing a dc.
Round 2 :
Insert hook into space below your st and pull up a loop, yarn over, pull through 2 loops, yarn over, pull through 2 loops (this st now counts as your first dc). *2 dc into the next sp*; repeat to end (12 = 11 dc + 1 turning ch).
Round 3 :
Repeat the same steps as beginning of Round 2 (make a turning ch and 1 dc into the same sp). Then, *dc into next sp, 2 dc into next sp (incr)*; repeat around (17 = 16 dc + 1 turning ch)
Round 4 :
Repeat the same steps as beginning of Round 2 (make a turning ch and 1 dc into the same sp). Then: Dc into next 2 sps. Hdc into the next sp. *Sc into the next 2 sps, 2 sc into the next (incr)*; repeat 1 more time. Sc into the next 2 sps. Hdc into the next sp. Dc into the next 2 sps. 2 dc into the last sp (20 = 19 sts + 1 turning ch). Fasten off your first half circle.
Info :
Repeat Rounds 1-4 for your second half circle. After round 4 we will continue to Round 5 to join them together.
Round 5 :
Continuing the yarn from your second half circle, *Sc into the next 3 sts [on the first half circle we made], 2 sc into the next st (incr)*; repeat 4 times. Sc into the next 2 sts, 2 sc into the next. You should now be joining the opposite side of the half circle. Continue going around. *Sc into the next 3 sts, 2 sc into the next st (incr)*; repeat 4 times. Sc into the next 2 sts, 2 sc into the next (48)
Round 6 :
*Sc into the next 4 sts, ch 1, turn. Sc together (decr) 2 times, ch 1, turn. Sc together. 2 sc into the same st. Sl st into next st. Sl st into bottom of same st*; repeat around. Fasten off and sew in any loose ends.
— EGG COASTER (make 2) :
Rounds 1-8 :
Repeat steps from Chicken Comb Coaster. Change yarn colour to white at the end of Round 3 using a sl st.
Round 9 :
Sc into next 4 sts, hdc into the next st, dc into the next, 2 tc into the next st, dc into the next, hdc into the next, sc into the next 2 sts, sl st into the next st. Hdc into the next st, 2 dc into the next st, tc into the next 4 sts, dc into the next 3 sts, hdc into the next st, sc into the next st, sl st into the next st. Sc into the next 3 sts, 2 sc into the next st, sc into the next 5 sts, hdc into the next st, dc into the next 2 sts, 2 tc into the next st, dc into the next st, hdc into the next 3 sts, sl st into the next. Hdc into the next, 2 dc into the next st, dc into the next 4 sts (53)
Round 10 :
Hdc into the next st, sc into the next st, sl st into the next 2 sts, hdc into the next 2 sts, 2 dc (incr) into the next 3 sts, 2 hdc (incr) into the next st, sl st into the next 3 sts. Sc into the next, 2 sc (incr) into the next 2 sts, hdc into the next, 2 sc (incr) into the next 6 sts, sc into the next st, sl st into the next 2 sts. Sc into the next 8 sts, ch 1, turn. Sc together (decr), sc into the next 3 sts, sc together (decr), ch 1, turn. Sc into the next 5 sts, ch 1, turn. Sc together (decr), sc in next st, sc together (decr), ch 1, turn. Sc together (decr), sl st in same st, fasten off leaving ~10' tail. We will use this tail to sew the coaster into the egg shell. Sew in any other loose ends.
— EGG SHELL: BOTTOM (make 1) :
Round 1 :
Create MC, 6 sc into MC (6)
Round 2 :
2 sc into each st around (incr) (12)
Round 3 :
*Sc into next st, 2 sc into next (incr)*; repeat around (18)
Round 4 :
*Sc into next 2 sts, 2 sc into next (incr)*; repeat around (24). Flip your work inside out so you are working the rounds from the outside.
Round 5-9 :
Sc around (24)
Round 10 :
*Sc in the next 3 sts, sc together (decr)*; repeat 4 times total, ending in sc in last 4 sts (20). Fasten off and sew in any loose ends.
— EGG SHELL: TOP (make 1) :
Round 1 :
Ch 24, sl st to beg first ch to close loop (24)
Round 2-5 :
Sc in each st around (24)
Round 6 :
*Sc into next 6 sts, sc together (decr)*; repeat around (21)
Round 7 :
*Sc into next 5 sts, sc together (decr)*; repeat around (18). Flip your work inside out so you are working the rounds from the outside.
Round 8 :
*Sc into next 4 sts, sc together (decr)*; repeat around (15)
Round 9 :
*Sc into next 3 sts, sc together (decr)*; repeat around (12)
Round 10 :
Sc together 3 times. Fasten off and use tail to sew remaining top of the egg closed. Sew in any remaining loose ends.
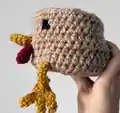
— CHICKEN HEAD :
Round 1 :
Create MC, ch 2 (counts as hdc). 9 hdc into the MC. Join with sl st into top of ch 2 to close round (10).
Round 2 :
Ch 2 (counts as hdc). Hdc into same st. 2 hdc (incr) in each st around. Join with sl st into top of ch 2 to close round (20).
Round 3 :
Ch 2 (counts as hdc). Hdc into same st. *2 hdc (incr) in next st. Hdc in next st* repeat around ending with 1 hdc. Join with sl st into top of ch 2 to close round (30).
Round 4 :
Ch 2 (counts as hdc). Hdc into same st. *2 hdc (incr) in next st. Hdc in next 2 sts* repeat around ending with 1 hdc. Join with sl st into top of ch 2 to close round (40).
Round 5-6 :
Ch 1. Hdc in each st around. Join with sl st into ch 1 to close off round (40).
Round 7 :
Ch 1. Hdc in next 36 sts, ch 1, turn.
Round 8 :
Hdc in each 36 sts, ch 1, turn.
Round 9 :
Hdc in each 36 sts, ch 1, turn.
Round 10 :
Hdc in each 36 sts (insert hook in normal st location). Ch 1, turn.
Round 11 :
Hdc in each 36 sts (insert hook below regular st location as you did in round 9). Ch 1, turn.
Round 12 :
Hdc in each st, when you get to the opening / gap, ch 1 and sc into the first st on the other side. Then sc together (dec) once. *Sc in next 2 sts, sc together (decr)*; repeat around. When you get to the opening again, sc into the ch 1 where the gap is, and another sc into the next st. Then sl st into the next st. Fasten off and sew in any loose ends.
— CHICKEN BEAK :
Round 1 :
Ch 12, sl st to first ch 1 (12)
Round 2 :
*Sc into the next 4 sts, sc together (decr)*; repeat twice (10)
Round 3 :
Sc in each st around. Turn piece inside out and work the rounds from the outside.
Round 4 :
*Sc into the next 3 sts, sc together (decr)*; repeat twice (8)
Round 5 :
*Sc into the next 2 sts, sc together (decr)*; repeat twice (6)
Round 6 :
Sc together 2 times. Fasten off.
Info :
Sew onto head directly opposite from the vertical opening
— CHICKEN WATTLES (make 2) :
Round 1 :
Create MC, 4 sc into MC (4)
Round 2 :
*Sc into the next st, 2 sc into the next*; repeat around (6)
Round 3-4 :
Sc into each st around. Turn piece inside out and work the rounds from the outside. (6)
Round 5 :
*Sc together (decr)* repeat 3 times. Fasten off leaving approximately 10' tail to sew onto head.
Info :
Sew onto head just slightly below the left & right side of the beak
— CHICKEN FEET (make 2) :
BOTTOM OF FOOT Round 1 :
Create a MC, ch 2 (counts as first dc), 3 dc into MC (4). Ch 1, turn.
Round 2 :
Sc across (4). Ch 1, turn.
Round 3 :
*Sc into next st, chain 4. Sc into second ch from hook, and into next 2 sts down the chain. Sc in bottom of chain (make sure to grab both yarns)*; repeat another 2 times to make 3 toes total.
LEG (Make 2) :
Make 6 foundation chains. Fasten off leaving ~10' tail to sew it onto the bottom of the foot.
Info :
Using a yarn needle, sew the foundation chain to the bottom of the foot using a whipstitch. Make sure the toes are facing / curling away from the leg. Sew each leg onto the bottom of the chicken head.
— EYES :
Info :
Use black embroidery thread or yarn and a yarn needle to sew on eyes to the head.
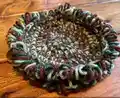
— MAT / NEST :
Round 1 :
Create MC, 6 sc into MC (6)
Round 2 :
2 sc into each st around (incr) (12)
Round 3 :
*Sc into next st, 2 sc into next (incr)*; repeat around (18)
Round 4 :
*Sc into next 2 sts, 2 sc into next (incr)*; repeat around (24)
Round 5 :
*Sc into next 3 sts, 2 sc into next (incr)*; repeat around (30)
Round 6 :
*Sc into next 4 sts, 2 sc into next (incr)*; repeat around (36)
Round 7 :
Using a loop stitch, *sc in next 5 sts, 2 sc in next st (increase)* repeat around (42)
Round 8 :
Using a loop stitch, *sc in next 6 sts, 2 sc in next st (increase)* repeat around (48)
This charming Hennifer Chicken Coaster Set pattern combines whimsical design with practical functionality, creating a conversation piece that protects your surfaces in style! The pattern showcases advanced techniques including loop stitches, scalloped edges, working with multiple yarn strands, and clever construction methods that bring this delightful barnyard scene to life. Each component works harmoniously together, from the textured nest mat to the ingenious egg shells that hide coasters inside. Perfect for farmhouse décor enthusiasts or anyone who appreciates handmade charm with a playful twist! 🐔🥚🧶