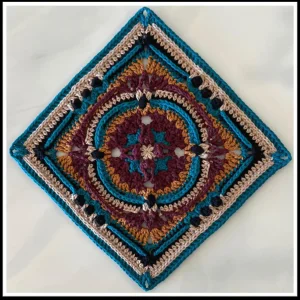
You know that feeling when you're so in love with a project that your mind spins and you just can't put your hook down? That's exactly what this square is all about. Inspired by the old 14th-century meaning of 'head over heels'—which literally meant doing a somersault—this gorgeous, texture-rich square will have you flipping with excitement. It's packed with stunning post stitches, clusters, and unique Y-stitches that create a mesmerizing mandala-like center before squaring off beautifully. Grab your favorite worsted weight cotton and let's make something amazing together!
Progress Tracker
0% Complete
— Head Over Heels Square :
Round 1 :
Begin with a double magic circle. Work a ch 5 (this counts as your first dc plus a ch-2 space). Now, work [1 dc, ch 1, 1 dc, ch 2] a total of 3 times. Finish with 1 dc and ch 1. To finish, slst into the 3rd ch of your starting chain, or use an invisible join in the 4th ch. Snip your yarn and fasten off. (Stitch count: 8 dc, 4 ch-1 sp, 4 ch-2 sp)
Round 2 :
Attach your new color in any ch-2 space (or slip stitch into it if you didn't change colors), then ch 2, which acts as the beginning of your first cluster. *Inside this same ch-2 space, work [3dc-cluster, ch 2] 3 times—make sure to put a stitch marker in only the very first ch-2 space you make here. Next, skip the dc, ch 1, and skip the next dc.* Repeat from * to * 3 more times around. Connect with a slst to the first 3dc-cluster of the round, or perform an invisible join in the first chain of the round, then fasten off. (Stitch count: 12 3dc-cluster, 12 ch-2 sp)
Round 3 :
Begin in the marked stitch from the previous round (or slip stitch to the ch-2 space and ch 3, which counts as your first dc). *Work 3 dc into the ch-2 space and take out your marker, then skip the next 3dc-cluster. Repeat this once more. In the next ch-2 space, work 2 hdc, then ch 3. Now, dropping down to work into Round 1, make a FPsc around the dc that sits right before the ch-1 space. In that ch-1 space, work (1 sc, 1 tr, 1 sc). Complete a FPsc around the following dc. Chain 3, then jump back to the Round 2 space you were working in and make 2 hdc in that ch-2 space, skipping the next 3dc-cluster.* Repeat from * to * 3 more times. Join with a slst to the 3rd starting chain or use an invisible join to the 2nd dc of the round, then fasten off. (Stitch count: 8 sc, 8 FPsc, 16 hdc, 24 dc, 4 tr, 8 ch-3 sp)
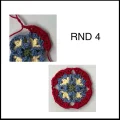
Round 4 :
Start in the first dc of the first 3-dc group, or ch 4 (which counts as a dc and ch-1 space). *In that same stitch, work [1 dc, ch 1] twice, followed by another dc. Skip the next dc, then work (1 dc, ch 1, 1 dc) in each of the next 2 stitches. Skip the next dc, and work [1 dc, ch 1] twice plus 1 dc in the next stitch. Chain 2, then skip over to the next dc.* Repeat from * to * 3 more times. To finish, slst into the 3rd starting chain and fasten off, or use an invisible join into the first chain of the round if you started with a standing stitch. (Stitch count: 40 dc, 24 ch-1 sp, 4 ch-2 sp)
Round 5 :
Join your yarn in any ch-2 space. *Work (1 dc, ch 2, 1 dc) directly into that ch-2 space. Skip the next dc, then work 2 sc in the ch-1 space. Skip the next dc, and work 2 hdc in the following ch-1 space. [Skip the next 2 dc, then work 3 dc into the next ch-1 space] twice. Skip 2 dc, work 2 hdc in the next ch-1 space, skip the dc, and finish with 2 sc in the last ch-1 space, skipping the next dc.* Repeat from * to * 3 more times around. Secure with a slst into the first dc of the round and fasten off, or use an invisible join to the first chain. (Stitch count: 16 sc, 16 hdc, 32 dc, 4 ch-2 sp)
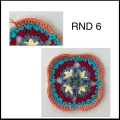
Round 6 :
Begin in the sc stitch that sits right before any (dc, ch 2, dc) group. *Work 1 hdc in that sc. Chain 2, skip over the entire (dc, ch 2, dc) group, then work 1 hdc in each of the next 2 sc. Work 1 dc in the next hdc, followed by 2 dc in the next hdc. Work 1 dc in each of the next 6 dc. Work 2 dc in the next hdc, then 1 dc in the following hdc. Finish the sequence with 1 hdc in the next sc.* Repeat from * to * 3 more times. Join with a slst to the first hdc of the round, or make an invisible join, then fasten off. (Stitch count: 16 hdc, 48 dc, 4 ch-2 sp)
Round 7 :
Join your yarn in the hdc right before any ch-2 space. *Work 1 hdc in the 3LP of that hdc. Chain 1, push the ch-2 space forward so you can work behind it, and make an EXT-puff directly into the unworked ch-2 space from Round 5. Chain 1, then work 1 hdc in the 3LP of the next 2 hdc and the next 3 dc. Work a BPhdc around each of the next 6 dc. To finish this side, work 1 hdc in the 3LP of the next 3 dc and the following hdc.* Repeat from * to * 3 more times. Slst to the first hdc or complete an invisible join, then fasten off. (Stitch count: 40 hdc, 24 BPhdc, 4 EXT-puff, 8 ch-1 sp)
Round 8 :
Note: Keep the ch-1 spaces folded back so you can easily access the ch-2 spaces from Round 6. Join yarn in any unworked ch-2 space from Round 6 that sits right before an EXT-puff from Round 7. *Work a 2dc-cluster in that ch-2 space. Skip the ch-1 space from Round 7, then work a FPhdc around the EXT-puff of Round 7. Work another 2dc-cluster back in that same ch-2 space. Chain 2, skip the ch-1 space and the next hdc. Work 1 hdc in each of the next 4 stitches (this covers hdc and BPhdc from Round 7). Work 2 hdc in the next BPhdc, then 1 hdc in each of the next 3 BPhdc. Work 2 hdc in the following BPhdc, then 1 hdc in each of the next 5 hdc. Chain 2.* Repeat from * to * 3 more times. Slst to the first 2dc-cluster or finish with an invisible join to the first FPhdc, then fasten off. (Stitch count: 68 hdc, 8 2dc-cluster, 4 FPhdc, 8 ch-2 sp)
Round 9 :
Start your round in the ch-2 space right before any cluster group. *Inside this ch-2 space, work a Y st, ch 1, then a dtr-Y st. Chain 1, then work a FPdtr2tog around the next two 2dc-clusters from Round 8, making sure to skip the FPhdc between them. Chain 1, then in the next ch-2 space, work a dtr-Y st, ch 1, and a Y st. Skip the next 3 hdc, then work 1 dc in each of the next 4 hdc. Work 1 hdc in each of the next 3 hdc, then 1 dc in each of the next 4 hdc. Skip the last 3 hdc.* Repeat from * to * 3 more times around. Slst into the tr of your first Y st or make an invisible join to the first chain of that Y st, then fasten off. (Stitch count: 12 hdc, 32 dc, 8 Y st, 8 dtr-Y st, 4 FPdtr2tog, 16 ch-1 sp)
Round 10 :
Note: When you work into the chain spaces of the Y-stitches or dtr-Y-stitches, skip the actual post stitches that form them. Start in the ch-1 space of the first Y-stitch after the 4-dc group (or slst into it and ch 2 to count as your first hdc). *Work 2 hdc in the ch-1 space of the Y-stitch, then 1 dc in the next ch-1 space. Work 2 dc in the ch-1 space of the dtr-Y-stitch, then 3 tr in the next ch-1 space. Chain 2 to create your corner, then skip the FPdtr2tog. Work 3 tr in the next ch-1 space, 2 dc in the ch-1 space of the dtr-Y-stitch, 1 dc in the ch-1 space, and 2 hdc in the ch-1 space of the Y-stitch. To finish the side, work a BPhdc around each of the next 4 dc, 3 hdc, and 4 dc.* Repeat from * to * 3 more times. Join with a slst to your 2nd starting chain or make an invisible join to the 2nd hdc, then fasten off. (Stitch count: 16 hdc, 44 BPhdc, 24 dc, 24 tr, 4 ch-2 corner sp)
Round 11 :
Join your new yarn in any ch-2 corner space. *Work (2 dc, ch 2, 2 dc) in that corner space. Work 1 dc in each of the next 3 tr, 3 dc, and 2 hdc. Chain 1, then skip 2 BPhdc. [Work (2dc-cluster, ch 1, 2dc-cluster) in the next BPhdc, then skip 2 BPhdc] twice. Work (2dc-cluster, ch 1, 2dc-cluster) in the next BPhdc. Chain 1, skip 2 BPhdc, and work 1 dc in each of the next 2 hdc, 3 dc, and 3 tr.* Repeat from * to * 3 more times. Join with a slst to the first dc of the round, or make an invisible join to the second dc, then fasten off. (Stitch count: 80 dc, 24 2dc-cluster, 20 ch-1 sp, 4 ch-2 corner sp)
Round 12 :
Start in any ch-2 corner space. *Work (2 dc, ch 2, 2 dc) in the corner. Work BPdc around each of the next 10 dc. Chain 2, then skip the ch-1 space and the first 2dc-cluster. [Work 4 hdc in the next ch-1 space, ch 2, and skip the next 2 clusters] twice. Work 4 hdc in the next ch-1 space. Chain 2, skip the last cluster and the ch-1 space, then work BPdc around the final 10 dc of the side.* Repeat from * to * 3 more times. Join with a slst to the first dc of the round or use an invisible join to the second dc, then fasten off. (Stitch count: 48 hdc, 16 dc, 80 BPdc, 16 ch-2 sp, 4 ch-2 corner sp)
Round 13 :
Join yarn in any ch-2 corner space. *Work (1 hdc, ch 2, 1 hdc) in the corner. Work 1 hdc in each of the next 2 dc and 10 BPdc. Working in front of the ch-2 spaces from Round 12, work 1 dc directly into the 2dc-cluster of Round 11. Chain 1, skip the ch-2 space from Round 12. [Work a FPhdc around all 4 hdc of the group as if they were a single stitch, ch 1, skip the 2dc-cluster from Round 11 and the ch-2 space from Round 12, then work 1 dc in the next 2dc-cluster of Round 11, ch 1] twice. Work a FPhdc around the next 4 hdc group as one. Chain 1, skip the next ch-2 space and the next cluster, then work 1 dc directly into the ch-1 stitch of Round 11 (make sure to insert into the stitch itself, not the space). Finish the side by working 1 hdc in each of the next 10 BPdc and 2 dc.* Repeat from * to * 3 more times. Slst to the first hdc of the round or use an invisible join, then fasten off. (Stitch count: 104 hdc, 12 FPhdc, 16 dc, 24 ch-1 sp, 4 ch-2 corner sp)
Round 14 :
Start in the second hdc of any side. *Work 1 sc in each of the next 12 stitches (covering hdc, dc, and the ch-1 space). Skip the FPhdc, then work 1 sc in the next ch-1 space and the following dc. Skip the ch-1 space, then work 1 sc in the FPhdc. Skip the next ch-1 space, then work 1 sc in the next dc and ch-1 space. Skip the FPhdc, and work 1 sc in each of the next ch-1 space, the dc, and the next 13 hdc. Chain 3 for the corner, skip the ch-2 corner space, and work 1 sc in the next hdc.* Repeat from * to * 3 more times. Join with a slst to the first sc or make an invisible join to the second sc, then fasten off. (Stitch count: 140 sc, 4 ch-3 corner sp)
Round 15 :
Start in any ch-3 corner space. *Work 1 dc in the ch-3 corner space of Round 14. Now work (1 tr, ch 2, 1 tr) directly into the ch-2 corner space of Round 13 (working over Round 14). Work another 1 dc in the same ch-3 corner space of Round 14. To complete the side, work 1 dc in the 3LP of each of the next 35 sc. Note: If you find working into the 3rd loop of single crochets too tricky, you can work into the back loop (BLdc) instead for a very similar look.* Repeat from * to * 3 more times around. Finish with an invisible join to the first tr of the round, then fasten off. (Stitch count: 148 dc, 8 tr, 4 ch-2 corner sp)
Once your beautiful Head Over Heels square is blocked and dry, you'll be amazed at how the intricate layers and rich textures pop! Whether you're making a single square to use as a gorgeous table trivet or crocheting a whole batch of them to join into a stunning, cozy heirloom blanket, this project is sure to bring joy to your craft space. I can't wait to see the color palettes you choose! Happy crocheting, my friends! 🧶✨