🧢 Beautiful ✨ Detailed πŸ’ Adorable

Halloween Spider Web Bunting Pattern

Halloween Spider Web Bunting Pattern
4.0β˜… Rating
6-8 Hours Time Needed
2.3K Made This
βœ‚οΈ

Intermediate Level

Ideal for those with basic knitting experience, featuring slightly more advanced stitches and techniques to expand your skills.

⏱️

Weekend Treat

Takes 5-7 hours, making it an enjoyable project to finish over a couple of days.

πŸŽ„

Holiday Cheer

Festive fun for the season, bringing handmade magic to celebrations and creating new family traditions.

About This Halloween Spider Web Bunting Pattern

Halloween Spider Web Bunting Pattern crochet pattern - detailed view of completed project

The bunting consists of one initial web followed by seven additional webs that are joined during the final row. This clever construction technique creates a seamless garland perfect for draping across mantels, doorways, or windows.

Why You'll Love This Halloween Spider Web Bunting Pattern

I absolutely love how this pattern combines simplicity with dramatic impact. The sparkly silver thread woven through black yarn creates such a magical, ethereal quality that catches the light beautifully. I find the repetitive nature of the rows meditative, yet each web grows more impressive as you work through the rounds. What really excites me is how quickly this project comes together while still looking incredibly intricate and professional. The joined construction method means you're creating one continuous piece rather than sewing multiple elements together later, which I always appreciate. Plus, there's something deeply satisfying about watching these delicate webs take shape under your hook, knowing they'll create the perfect spooky ambiance for Halloween celebrations.

Halloween Spider Web Bunting Pattern step 1 - construction progress Halloween Spider Web Bunting Pattern step 2 - assembly progress Halloween Spider Web Bunting Pattern step 3 - details and accessories Halloween Spider Web Bunting Pattern step 4 - final assembly and finishing

Switch Things Up

I love experimenting with this pattern because it's so versatile beyond just Halloween! Try working it in white and gold for an elegant winter wonderland theme, or use pastels for a whimsical fairy garden aesthetic. I've even made versions in deep burgundy and copper for autumn harvest decorations.

For a truly dramatic effect, I sometimes add tiny LED fairy lights woven through the chain spaces between webs. The sparkle yarn catches the light beautifully and creates an enchanting glow perfect for evening gatherings.

You can also vary the size by changing your hook size and yarn weight. I've created mini versions using thread and a steel hook for delicate ornaments, and super chunky versions with bulky yarn for bold statement pieces.

Consider adding dangly elements like beaded spiders, small bells, or fabric bats attached to the picot edges for extra dimension. I've even seen crafters add small pom-poms or tassels at the bottom points of each web.

The bunting doesn't have to stay flat either! I've shaped individual webs over balloons to create three-dimensional hanging decorations, or stuffed them lightly for sculptural wall art. The possibilities for customization are truly endless with this adaptable pattern.

Common Mistakes & How to Fix Them

βœ— Forgetting to hold black and silver yarns together as one strand throughout the entire pattern, which creates inconsistent texture and sparkle effect βœ— Losing track of chain count in longer chain spaces during rows four through eight, leading to misshapen webs that don't lie flat βœ— Missing the joining step on row eight for subsequent webs, resulting in separate pieces instead of connected bunting garland βœ— Not counting stitches carefully at the end of each row, causing the web to become asymmetrical and lose its balanced spider web appearance βœ— Pulling chain stitches too tight during picot formation in the final row, which prevents the decorative edge from displaying properly

Halloween Spider Web Bunting Pattern

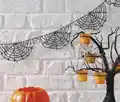
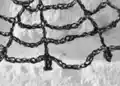
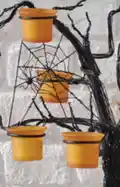
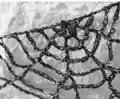
Create a hauntingly beautiful Halloween atmosphere with this elegant spider web bunting decoration. This pattern features eight intricate cobwebs worked in sparkly black and silver yarn, creating an authentic haunted house effect. Perfect for Halloween parties, home dΓ©cor, or seasonal crafting, this bunting combines eerie charm with delicate crochet artistry. Each web is worked in rows using treble crochet and chain stitches, building from a simple foundation to an elaborate final web with decorative picots.

Intermediate 6-8 Hours

Materials Needed for Halloween Spider Web Bunting Pattern

β€” Main Fabric

  • 01
    Black yarn (medium weight recommended)
  • 02
    Silver metallic yarn or sparkle yarn (medium weight recommended)
  • 03
    Both yarns held together throughout the pattern

β€” Tools Required

  • 01
    Crochet hook (size appropriate for medium weight yarn, typically 5mm/H-8)
  • 02
    Scissors
  • 03
    Yarn needle for weaving in ends

Progress Tracker

0% Complete

β€” First Web :

Setup :

Using Black and Silver held together, ch 5

Row 1 (RS) :

Tr in fifth ch from hook, (ch 3, tr in same ch) 4 times, ch 3, turn [5 tr, 5 ch-3 sps]

Row 2 (WS) :

Ch 6 (counts as tr and ch 3), (tr in next tr, ch 3) 4 times, tr in final tr (third ch of beg ch-4), turn [6 tr, 5 ch-3 sps]

Row 3 :

Ch 8 (counts as tr and ch 5), (tr in next tr, ch 5) 4 times, tr in final tr, turn [6 tr, 5 ch-5 sps]

Row 4 :

Ch 10 (counts as tr and ch 7), (tr in next tr, ch 7) 4 times, tr in final tr, turn [6 tr, 5 ch-7 sps]

Row 5 :

Ch 12 (counts as tr and ch 9), tr in next tr, ch 7, (tr, ch 2, tr) in next tr, ch 7, (tr, ch 2, tr) in next tr, ch 7, tr in next tr, ch 9, tr in final tr, turn [8 tr, 2 ch-9 sps, 3 ch-7 sps, 2 ch-2 sps]

Row 6 :

Ch 14 (counts as tr and ch 11), tr in next tr, (ch 9, tr in next tr, ch 5, tr in next tr) twice, ch 9, tr in next tr, ch 11, tr in final tr, turn [8 tr, 2 ch-11 sps, 3 ch-9 sps, 2 ch-5 sps]

Row 7 :

Ch 16 (counts as tr and ch 13), tr in next tr, ch 11, (tr in next tr, ch 7, tr in next tr, ch 11) twice, tr in next tr, ch 13, tr in final tr, turn [8 tr, 2 ch-13 sps, 3 ch-11 sps, 2 ch-7 sps]

Row 8 :

Ch 8, ss in fifth ch from hook (counts as tr and picot), ch 15, tr in next tr, picot, (ch 13, tr in next tr, picot, ch 9, tr in next tr, picot) twice, ch 13, tr in next tr, picot, ch 15, tr in final tr, picot [8 tr, 8 picots, 2 ch-15 sps, 3 ch-13 sps, 2 ch-9 sps]

Info :

Fasten off and weave in ends

β€” Next Web (Make 7) :

Setup :

Join Black and Silver held together, ch 5

Rows 1-7 :

Work as Rows 1-7 of First Web

Info :

This web will be joined to previous web made to form the bunting

Row 8 :

Ch 8, ss in fifth ch from hook (counts as tr and picot), ch 15, tr in next tr, picot, ch 13, tr in next tr, picot, (ch 9, tr in next tr, picot) twice, ch 13, tr in next tr, picot, join to previous web [8 tr, 8 picots]

Info :

Fasten off and weave in ends

Assembly Instructions

  • Complete the first web entirely through Row 8, fastening off and weaving in all ends securely.
  • For each subsequent web, work Rows 1-7 following the same pattern as the first web.
  • During Row 8 of each additional web, work the picot edge as directed until you reach the joining point.
  • Join each new web to the previous web during the final row by connecting at the designated point in the pattern.
  • Continue this process until all eight webs are completed and joined together in sequence.
  • Ensure all ends are woven in neatly on the wrong side to maintain the clean appearance of the bunting.
  • Gently block or steam the finished bunting if needed to help the webs lie flat and display their full shape.

Important Notes

  • πŸ’‘Always hold black and silver yarns together as a single strand throughout the entire pattern for consistent sparkle effect
  • πŸ’‘Use stitch markers to track your position at the beginning of each row, especially in longer rows
  • πŸ’‘Count your chain spaces carefully at the end of each row to ensure symmetrical web formation
  • πŸ’‘Keep consistent tension throughout to ensure all webs are uniform in size when joined together
  • πŸ’‘The first web is worked completely independently before subsequent webs are joined during final row
  • πŸ’‘Pay special attention to the joining technique in Row 8 of subsequent webs to create seamless bunting

This enchanting Halloween spider web bunting brings spooky elegance to any celebration. The combination of black and shimmering silver creates an authentic cobweb effect that captures light beautifully. Each web connects seamlessly to create a stunning garland that's perfect for draping across mantels, doorways, or party spaces. The progressive construction from simple chains to elaborate treble crochet formations makes this project both engaging and rewarding. 🧢 Happy haunting! πŸ•·οΈβœ¨

You ask,

we answer.

FAQs

Can I use different colors instead of black and silver?

Absolutely! While black and silver create the classic spooky spider web look, you could use any color combination. White and silver would create an elegant winter version, or try purple and orange for a more vibrant Halloween palette.

How long will the finished bunting be?

The total length depends on your yarn weight and tension, but with eight webs connected, you can expect approximately 4-6 feet of bunting. Each individual web measures roughly 6-8 inches across when using medium weight yarn.

Do I need to use metallic yarn for the silver?

Metallic or sparkle yarn creates the best shimmering cobweb effect, but you can use any silver or grey yarn. The sparkle adds that magical catching-light quality, but solid yarn will work if you prefer a matte finish.

Can I make more or fewer webs?

Yes! The pattern is designed to be flexible. Make as many webs as you need for your space. Just complete the first web independently, then join each additional web during Row 8 to create your desired length.

How do I display the finished bunting?

You can drape it across mantels, doorways, or windows using small tacks or removable adhesive hooks. The lightweight nature of the bunting makes it easy to hang. Some crafters add small loops at each end for easier hanging.