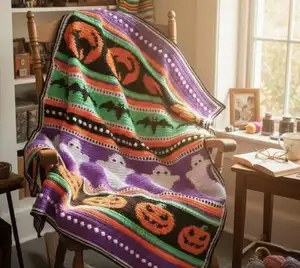
Create a spooky-cute Halloween blanket featuring charming pumpkins, friendly ghosts, flying bats, and black cats! This captivating tapestry crochet project combines colorful stripes, playful bobble rows, and detailed charted designs to bring the magic of Halloween to life. Perfect for cozy autumn nights, this blanket measures approximately 100cm x 125cm and uses DK weight yarn in festive Halloween colors. Whether you're decorating your home or creating a special gift, this pattern offers detailed instructions and helpful video tutorials to guide you through every stitch.
Progress Tracker
0% Complete
— Foundation Chain :
Starting Chain :
Using purple and a 4mm hook, 152ch
— Row 1 :
Row 1 :
1dc in 4th ch from hook. 1dc in each ch across. 2ch, turn. (150 sts)
— Rows 2-3 :
Rows 2 & 3 :
(The 2ch counts as the first stitch). Sk the first st and 1dc in each stitch across. 2ch, turn. Repeat for row 3
— Row 4 :
Row 4 :
(The 2ch counts as the first stitch). Sk the first st and 1dc in each stitch across. 1ch, turn
— Row 5 (Bobble Row) :
Row 5 :
(The 1ch does not count as a stitch). 1sc in first 3 sts. Join white in the last pull through of 3rd sc, make bobble. [3sc in purple, make bobble in white] until 2 sts remain. 1sc in each of the last 2 sts. 2ch, turn. Cut white. You will have 37 bobbles
— Row 6 :
Row 6 :
1dc in each stitch across, 2ch, turn
— Rows 7-8 :
Rows 7 & 8 :
Sk the first st and 1dc in each st across. 2ch, turn. Repeat for row 8
— Row 9 :
Row 9 :
Sk the first st and 1dc in each st across. Change to orange, 2ch, turn
— Row 10 :
Row 10 :
Sk the first st and 1dc in each st across. 2ch, turn
— Row 11 :
Row 11 :
Sk the first st and 1dc in each st across. Change to purple, 2ch, turn
— Row 12 :
Row 12 :
Sk the first st and 1dc in each st across. Change to green, 2ch, turn
— Row 13 :
Row 13 :
Sk the first st and 1hdc in each st across. Change to white, 3ch, turn
— Row 14 (Humbug Stripe) :
Row 14 :
(3ch counts as 1hdc and 1 ch). Sk 2 sts and 1 hdc in the next st, 1 ch. [sk 1 st, 1hdc in next st, 1ch] until 1 st remains. Fasten off white. Join green in last stitch, 2ch (counts as first dc), turn
— Row 15 :
Row 15 :
[1hdc, 1dc in row below] until 1 st remains. 1hdc in last st and fasten off
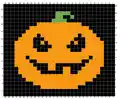
— Rows 16-40 (Pumpkins Chart) :
Chart Rows 1-25 :
Using 4.5mm hook, with RIGHT SIDE facing you, join black in the first stitch and 1 ch. Work pumpkin chart 5 times across (150 sts). Follow chart rows 1-25 using black and orange yarn. Keep black yarn to front and orange yarn to back. Cut orange at end of row 20. Join green in row 21. Cut green at end of row 23. Continue through chart row 25 (blanket row 40). 1ch, turn after each row
— Rows 41-43 (Humbug Stripe) :
Row 41 :
Using 4mm hook, change to green and 2ch. Sk the first st and 1hdc in each st across. Change to white, 3 ch, turn
Row 42 :
Sk 2 sts and 1hdc in the next st. 1 ch. [Sk 1 st, 1hdc in next st, 1ch] until 1 st remains. Join green in last st, 2 ch, turn
Row 43 :
[1hdc, 1dc in row below] until 1 st remains. 1hdc in last st. Change to purple, 2ch, turn
— Row 44 :
Row 44 :
Sk the first stitch and 1dc in each st across. Change to orange, 2ch, turn
— Row 45 :
Row 45 :
Sk the first stitch and 1dc in each st across. 2ch, turn
— Row 46 :
Row 46 :
Sk the first st and 1dc in each st across. Change to white, 2ch, turn
— Rows 47-49 (Humbug Stripe) :
Row 47 :
Sk the first st and 1hdc in each st across. Change to black, 3ch, turn
Row 48 :
(3ch counts as a 1hdc and 1ch). Sk 2 sts and 1hdc in the next st. 1 ch. [Sk 1 st, 1hdc in next st, 1 ch] until 1 st remains. Join white in last st and 2ch, turn
Row 49 :
[1hdc, 1dc in row below] until 1 st remains. 1hdc in last st. Change to purple, 1ch, turn
— Rows 50-89 (Ghosts Chart) :
Chart Rows 1-40 :
Using 4.5mm hook, work ghost chart 5 times across using purple and white yarn. Keep purple yarn to front and white yarn to back. All stitches are sc. Check stitch count is 150 after first row. 1ch, turn after each row
— Rows 90-92 (Humbug Stripe) :
Row 90 :
Using 4mm hook, change to white and 2ch. Sk the first st and 1hdc in each st across. Change to black, 3 ch, turn
Row 91 :
(3ch counts as a 1hdc and 1ch). Sk 2 sts and 1hdc in the next st. 1 ch. [Sk 1 st, 1hdc in next st, 1ch] until 1 st remains. Join white in last st and 2 ch, turn
Row 92 :
[1hdc, 1dc in row below] until 1 st remains. 1hdc in last st. Change to orange, 2ch, turn
— Rows 93-96 :
Row 93 :
Sk the first st and 1dc in each st across. 2ch, turn
Row 94 :
Sk the first st and 1dc in each st across. 2ch, turn. Change to black, 2ch, turn
Row 95 :
Sk the first st and 1dc in each st across. 2ch, turn
Row 96 :
Sk the first st and 1dc in each st across. 1ch, turn
— Row 97 (Bobble Row) :
Row 97 :
(The 1ch does not count as a stitch). 1sc in first 3 sts. Join white in the last pull through of 3rd sc, make bobble. [3sc in black, make bobble in white] until 2 sts remain. 1sc in each of the last 2 sts. 2ch, turn. Cut white. You will have 37 bobbles
— Rows 98-101 :
Row 98 :
Sk the first st and 1dc in each st across. 2ch, turn
Row 99 :
Sk the first st and 1dc in each st across. Change to orange, 2ch, turn
Row 100 :
Sk the first st and 1dc in each st across. 2ch, turn
Row 101 :
Sk the first st and 1dc in each st across. Change to white, 2ch, turn
— Rows 102-104 (Humbug Stripe) :
Row 102 :
Sk the first st and 1hdc in each st across. Change to purple, 3ch, turn
Row 103 :
(3ch counts a 1hdc and 1ch). Sk 2 sts and 1hdc in the next st. 1ch. [Sk 1 st, 1hdc in next st, 1ch] until 1 st remains. Join white in last st and 2ch, turn
Row 104 :
[1hdc, 1dc in row below] until 1 st remains. 1hdc in last st. Do not turn. Join green yarn with right side facing you, 1ch
— Rows 105-121 (Bats Chart) :
Chart Rows 1-17 :
Using 4.5mm hook, with RIGHT SIDE facing, work bat chart 5 times across using green and black yarn. Keep green yarn to front and black yarn to back. All stitches are sc. Check stitch count is 150 after first row. 1ch, turn after each row
— Rows 122-124 (Humbug Stripe) :
Row 122 :
Using 4mm hook, change to white and 2ch. Sk the first st and 1hdc in each st across. Change to purple, 3ch, turn
Row 123 :
(3ch counts as 1hdc and 1ch). Sk 2 sts and 1hdc in the next st. 1ch. [Sk 1 st, 1hdc in next st, 1ch] until 1 st remains. Join white in last st and 2ch, turn
Row 124 :
[1hdc, 1dc in row below] until 1 st remains. 1hdc in last st. Change to orange, 2 ch, turn
— Rows 125-127 :
Row 125 :
Sk the first st and 1dc in each st across. 2ch, turn
Row 126 :
Sk the first st and 1dc in each st across. Change to purple, 2ch, turn
Row 127 :
Sk the first st and 1dc in each st across. Change to green, 2ch, turn
— Rows 128-130 (Humbug Stripe) :
Row 128 :
Sk the first st and 1hdc in each st across. Change to white, 3ch, turn
Row 129 :
(3ch counts a 1hdc and 1ch). Sk 2 sts and 1hdc in the next st. 1ch. [Sk 1 st, 1hdc in next st, 1ch] until 1 st remains. Join green in last st, 2ch, turn
Row 130 :
[1hdc, 1dc in row below] until 1 st remains. 1hdc in last st. Change to black, 1ch, turn
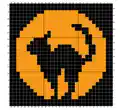
— Rows 131-160 (Cats Chart) :
Chart Rows 1-30 :
Using 4.5mm hook, with RIGHT SIDE facing, work black cats chart 5 times across using black and orange yarn. Keep black yarn to front and orange yarn to back. All stitches are sc. Check stitch count is 150 after first row. 1ch, turn after each row
— Rows 161-163 (Humbug Stripe) :
Row 161 :
Join green, 2ch, sk the first st and 1hdc in each st across. Change to white, 3ch, turn
Row 162 :
(3ch counts a 1hdc and 1ch). Sk 2 sts and 1hdc in the next st. 1ch. [Sk 1 st, 1hdc in next st, 1ch] until 1 st remains. Join green in last st and 2ch, turn
Row 163 :
[1hdc, 1dc in row below] until 1 st remains. 1hdc in last st. Change to purple, 2ch, turn
— Rows 164-166 :
Row 164 :
Sk the first st and 1dc in each st across. Change to orange, 2ch, turn
Row 165 :
Sk the first st and 1dc in each st across. 2ch, turn
Row 166 :
Sk the first st and 1dc in each st across. Do not turn
— Rows 167-170 :
Rows 167-169 :
Join purple with wrong side facing you, 2ch. Sk the first st and 1dc in each st across. 2ch, turn. Repeat for rows 168 and 169
Row 170 :
Sk the first st and 1dc in each st across. 1ch, turn
— Row 171 (Bobble Row) :
Row 171 :
1ch, 1 sc in each of the first 3 sts. Join white to make bobble. [3sc, make bobble] until 2 sts remain. 1sc in each of the last 2 sts. 2ch, turn. Cut white
— Rows 172-175 :
Rows 172-174 :
Sk the first st and 1dc in each st across. 2ch, turn. Repeat for rows 173 and 174
Row 175 :
Sk the first st and 1dc in each st across. Fasten off
— Eyes & Details :
Bat Eyes :
Using orange yarn, make simple cross stitches for eyes. Pass yarn under stitches between eyes on the back for neat finish
Cat Eyes :
Using green yarn, make simple cross stitches for eyes. Pass yarn under stitches between eyes on the back
Ghost Eyes :
Using black yarn, make 8 horizontal stitches between two double crochet posts. Don't pull too tightly for rounded eye shape. Pass yarn under stitches between eyes
— Border :
Round 1 :
Using 4mm hook, join white in top right corner. 1ch (does not count as stitch). 1sc, 2ch, 1sc in same stitch for corner. 1sc in each stitch along top edge. 1sc, 2ch, 1sc to turn corner. For long sides: make 2sc at end of each dc row, 1sc at end of each hdc or sc row. Continue around all sides. Slip stitch to join
Round 2 :
1ch (does not count as stitch), 1sc in same stitch. 1sc in each stitch around, making 1sc, 2ch, 1sc in corner spaces. Fasten off white
Round 3 :
Join black in any corner space. 1ch (does not count as stitch). 1sc, 2ch, 1sc to form corner. 1sc in each stitch around, making 1sc, 2ch, 1sc in each corner space
Round 4 :
Repeat round 3 in white
Round 5 :
Repeat round 3 in black. Fasten off and weave in all ends
This enchanting Halloween Dreams blanket pattern combines the art of tapestry crochet with playful seasonal motifs to create a truly special piece. Each character—from cheerful pumpkins to friendly ghosts, swooping bats, and mysterious black cats—is carefully charted and explained with helpful tips and video support. The combination of colorful stripes, textured bobble rows, and the unique Humbug stripe technique creates wonderful visual interest throughout this generous-sized blanket. Whether you're an experienced crocheter looking to expand your tapestry skills or someone ready to try something new, this pattern provides all the guidance you need to create a cherished Halloween heirloom. 🎃👻🦇🐈⬛ Happy crocheting! 🧶✨