🧢 Beautiful ✨ Detailed πŸ’ Adorable

Neon the Horse Amigurumi Pattern

Neon the Horse Amigurumi Pattern
4.7β˜… Rating
4-5 Hours Time Needed
2.9K Made This
βœ‚οΈ

Intermediate Level

Ideal for those with basic knitting experience, featuring slightly more advanced stitches and techniques to expand your skills.

⏱️

Weekend Treat

Takes 5-7 hours, making it an enjoyable project to finish over a couple of days.

🧸

Cute Companion

An adorable friend to cherish, handcrafted with love to bring comfort and joy for years to come.

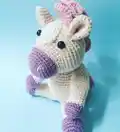
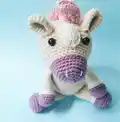
About This Neon the Horse Amigurumi Pattern

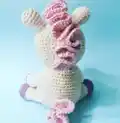
Neon the Horse is a unique and girly amigurumi designed with personality and charm. She's characterized by her dreamy nature, spending time daydreaming about pretty things like fairy floss and rainbows. This intermediate pattern uses US terminology and creates a seated horse approximately 15cm tall. The design features a beautiful color combination of beige, apricot, purple, and pink, with special details like a flowing mane and tail that give Neon her distinctive whimsical appearance.

Neon the Horse Amigurumi Pattern crochet pattern - detailed view of completed project

The pattern works in continuous rounds using a 2.0mm hook and 4ply fingering weight yarn. Each component is carefully crafted separately then assembled to create the final charming character that can be displayed as a decorative piece or given as a heartfelt gift.

Why You'll Love This Neon the Horse Amigurumi Pattern

I absolutely love this pattern because it combines simplicity with personality in the most delightful way! The color transitions between purple and apricot create such a beautiful effect, and working with the fluffy pink yarn for the mane and tail is incredibly satisfying. What I appreciate most is how Neon's character truly shines through in the finished piece - she has this dreamy, gentle quality that makes her perfect for display or cuddling. The pattern is well-structured with clear round-by-round instructions, making it enjoyable to work through without confusion. Plus, the creative freedom to choose between traditional horse colors or soft pastels means you can make each Neon uniquely yours!

Neon the Horse Amigurumi Pattern step 1 - construction progress Neon the Horse Amigurumi Pattern step 2 - assembly progress Neon the Horse Amigurumi Pattern step 3 - details and accessories Neon the Horse Amigurumi Pattern step 4 - final assembly and finishing

Switch Things Up

I love experimenting with color combinations for Neon! While the pattern suggests beautiful pastels in purple, apricot, beige, and pink, I've found that switching up the colors creates entirely different personalities. Try making her in classic brown and cream for a traditional horse look, or go bold with bright rainbow colors for a more fantasy-inspired creation.

The mane and tail offer fantastic opportunities for creativity too. Instead of the glitter gold yarn, I've experimented with ombre effects by changing colors mid-row, creating beautiful gradient manes. You could even try using a fluffy eyelash yarn for an extra soft, cloud-like texture that really emphasizes Neon's dreamy personality.

For a different size, simply adjust your hook and yarn weight - using worsted weight yarn with a 3.5mm hook creates a much larger version, perfect for hugging! Just remember that safety eye size should be adjusted proportionally. I've also tried adding small embroidered flowers or stars to the body for extra decoration, and adding a ribbon bow to the mane creates an even more girly, elegant look.

Common Mistakes & How to Fix Them

βœ— Stuffing too firmly in the head area can distort the facial features and make eye placement look uneven or bulging βœ— Not changing colors at the correct rounds between purple and apricot sections will throw off the entire color pattern design βœ— Forgetting to work in back loops only on specified rounds results in incorrect texture and shape for hooves and snout
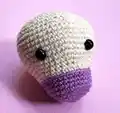
 βœ— Placing safety eyes too close together or at wrong rounds creates an unbalanced face that doesn't match the intended sweet expression βœ— Not leaving long enough tails for sewing assembly makes attaching limbs and features much more difficult and less secure

Neon the Horse Amigurumi Pattern

Create your own adorable Neon the Horse, a dreamy companion who spends her days imagining fairy floss and rainbows! This charming amigurumi pattern features a unique girly design with soft pastel colors and delicate details. Standing approximately 15cm tall when seated, Neon is perfect for gifting or adding to your handmade collection. The pattern includes detailed instructions for creating her flowing mane, cute tail, and sweet facial features that capture her whimsical personality. Whether you choose traditional horse colors or soft pastels, this delightful project will become a treasured keepsake.

Intermediate 4-5 Hours

Materials Needed for Neon the Horse Amigurumi Pattern

β€” Main Fabric

  • 01
    4ply fingering weight yarn in BEIGE (less than 50g)
  • 02
    4ply fingering weight yarn in APRICOT (less than 50g)
  • 03
    4ply fingering weight yarn in PURPLE (less than 50g)
  • 04
    4ply fingering weight yarn in PINK (less than 50g)
  • 05
    Hobbii Cotton Kings 8/4 in color 02 (Beige) recommended
  • 06
    Hobbii Rainbow Cotton 8/4 in color 89 (Apricot) recommended
  • 07
    Hobbii Rainbow Cotton 8/4 in color 39 (Purple) recommended
  • 08
    Hobbii Rainbow Glitter Gold in color 044 (Pink) recommended

β€” Tools Required

  • 01
    2.0mm crochet hook (B-1 US size)
  • 02
    8mm safety eyes
  • 03
    Scissors
  • 04
    Tapestry needle
  • 05
    Polyester toy stuffing
  • 06
    Stitch markers
  • 07
    Pins for assembly

Progress Tracker

0% Complete

β€” Ears (APRICOT, make 2) :

Round 1 :

6 sc in MR [6]

Round 2 :

inc x 6 [12]

Round 3 :

(sc, inc) x 6 [18]

Round 4-9 :

sc x 18 [18]

Info :

Fasten off, fold ears in half and half again (you should have 4 edges together) and sew across the bottom. Leave a tail for sewing.

β€” Head (PURPLE) :

Round 1 :

6 sc in MR [6]

Round 2 :

inc x 6 [12]

Round 3 :

(sc, inc) x 6 [18]

Round 4 :

(sc x 2, inc) x 6 [24]

Round 5 :

(sc x 3, inc) x 6 [30]

Round 6-9 :

sc x 30 [30]

Info :

Change to APRICOT

Round 10 :

in BLO: sc x 30 [30]

Round 11 :

sc x 30 [30]

Round 12 :

(sc x 4, inc) x 6 [36]

Round 13 :

(sc x 5, inc) x 6 [42]

Round 14 :

(sc x 6, inc) x 6 [48]

Round 15 :

(sc x 7, inc) x 6 [54]

Round 16-20 :

sc x 54 [54]

Round 21 :

(sc x 7, dec) x 6 [48]

Round 22 :

sc x 48 [48]

Round 23 :

(sc x 6, dec) x 6 [42]

Round 24 :

(sc x 5, dec) x 6 [36]

Round 25 :

(sc x 4, dec) x 6 [30]

Infos :

If using safety eyes, insert between rounds 15 and 16, 11 stitches apart. Stuff the head and continue stuffing until fastened off.

Round 26 :

(sc x 3, dec) x 6 [24]

Round 27 :

(sc x 2, dec) x 6 [18]

Round 28 :

(sc, dec) x 6 [12]

Round 29 :

dec x 6 [6]

Info :

Fasten off and weave tail through final round, pull to close.

β€” Arms (PURPLE, make 2) :

Round 1 :

6 sc in MR [6]

Round 2 :

inc x 6 [12]

Round 3 :

(sc, inc) x 6 [18]

Round 4 :

sc x 18 [18]

Round 5 :

in BLO: sc x 18 [18]

Round 6 :

(sc x 7, dec) x 2 [16]

Info :

Change to BEIGE

Round 7 :

(sc x 6, dec) x 2 [14]

Round 8 :

sc x 14 [14]

Info :

Change to APRICOT

Round 9-18 :

sc x 14 [14]

Info :

Fasten off, stuff rounds 1-8 and sc across top. Leave a tail for sewing.

β€” Legs (PURPLE, make 2) :

Round 1 :

8 sc in MR [8]

Round 2 :

inc x 8 [16]

Round 3 :

(sc, inc) x 8 [24]

Round 4-5 :

sc x 24 [24]

Round 6 :

in BLO: (sc x 6, dec) x 3 [21]

Round 7 :

(sc x 5, dec) x 3 [18]

Info :

Change to BEIGE

Round 8-9 :

sc x 18 [18]

Info :

Change to APRICOT

Round 10-18 :

sc x 18 [18]

Info :

Fasten off, stuff and sc across the top to close. Leave a tail for sewing.

β€” Body (APRICOT) :

Round 1 :

6 sc in MR [6]

Round 2 :

inc x 6 [12]

Round 3 :

(sc, inc) x 6 [18]

Round 4 :

(sc x 2, inc) x 6 [24]

Round 5 :

(sc x 3, inc) x 6 [30]

Round 6 :

(sc x 4, inc) x 6 [36]

Round 7 :

(sc x 5, inc) x 6 [42]

Round 8-15 :

sc around [42]

Round 16 :

(sc x 5, dec) x 6 [36]

Round 17-20 :

sc x 36 [36]

Round 21 :

(sc x 4, dec) x 6 [30]

Round 22 :

sc x 30 [30]

Round 23 :

(sc x 3, dec) x 6 [24]

Info :

Stuff and continue stuffing until fastened off.

Round 24 :

(sc x 2, dec) x 6 [18]

Round 25 :

(sc, dec) x 6 [12]

Info :

Fasten off, weave tail through final round and pull to close. Leave a tail for sewing.

β€” Mane (PINK) :

Info :

Leave a long tail at the beginning for sewing. You will work in rows and turn at the end of each row. Chains do not count as a stitch.

Row 1 :

ch16, sc in 2nd ch from hook, sc x 14 [15]

Row 2 :

ch2 and 3dc in same stitch, 3dc x 14 [45]

Row 3 :

ch2 and 3dc in same stitch, 3dc x 44 [135]

Info :

Fasten off and leave a tail for sewing.

β€” Tail (PINK) :

Info :

Leave a long tail at the beginning for sewing. You will work in rows and turn at the end of each row. Chains do not count as a stitch.

Row 1 :

ch9, sc in 2nd ch from hook, sc x 7 [8]

Row 2 :

ch2 and 3dc in same stitch, 3dc x 7 [24]

Row 3 :

ch2 and 3dc in same stitch 3dc x 24 [72]

Info :

Fasten off and leave a tail for sewing.

β€” Patch (BEIGE) :

Row 1 :

ch 6, sc in 2nd chain from hook, sc x 3, 3sc in the final chain, turn and work on the other side: sc x 3, inc [12]

Row 2 :

inc, sc x 3, inc, sc, inc, sc x 3, inc, sc [16]

Row 3 :

sc, inc, sc x 4, inc, sc, inc, sc x 5, inc, sc [20]

Info :

Fasten off and leave a tail for sewing.

Assembly Instructions

  • Using APRICOT yarn, sew over a stitch on the inner part of each eye and pull slightly to create an indent, then tie off and hide tails inside the head.
  • Sew the BEIGE patch to the centre of the head over rounds 12-19.
  • Attach the head to the body, going around twice to make the connection secure.
  • Sew ears to either side of the head over rounds 18-22, approximately 3 stitches from the patch.
  • Attach legs to rounds 5-7 of the body pointing outwards, positioning them 3 stitches apart.
  • Sew arms to the body over rounds 17-22 on a diagonal angle so they point slightly forward and rest on the legs.
  • Position the mane approximately 1 round after the patch and sew it down the back of the head.
  • Attach the tail to the back of the body over rounds 6-11.
  • Using APRICOT yarn, embroider nostrils by making 2 vertical lines over rounds 3-5, approximately 5 stitches apart.

Important Notes

  • πŸ’‘A yarn with no stretch works best for amigurumi - cotton or cotton blend is recommended
  • πŸ’‘Amigurumi is stitched in continuous rounds unless the pattern specifies otherwise
  • πŸ’‘Use a smaller hook than typical for crochet to keep stitches tight and prevent stuffing from showing through
  • πŸ’‘The yarn thickness and hook size will affect the finished size - this pattern creates approximately 15cm tall horse when seated
  • πŸ’‘Leave long tails when fastening off pieces as these will be used for sewing components together during assembly
  • πŸ’‘Fold ears in half twice to create proper shape before sewing across the bottom edge
  • πŸ’‘Insert safety eyes before stuffing the head completely for easier placement and adjustment

This delightful Neon the Horse pattern brings a dreamy, whimsical character to life with beautiful pastel colors and charming details. Perfect for intermediate crocheters looking to expand their amigurumi skills, this pattern combines simple increases and decreases with special techniques like working in back loops only and color changes. The flowing pink mane and tail add a magical touch that makes Neon truly special. Whether displayed on a shelf or given as a heartfelt handmade gift, this sweet horse is sure to capture hearts! 🧢✨🐴

You ask,

we answer.

FAQs

What size will my finished Neon the Horse be?

Using a 2.0mm hook and 4ply fingering weight yarn as specified, your finished Neon will be approximately 15cm (5 ΒΎ inches) tall when seated. The size may vary if you use different yarn weight or hook size.

Can I use different colors instead of the suggested pastels?

Absolutely! The pattern mentions that Neon looks great in traditional horse colors like browns and tans, or you can stick with soft pastels. Feel free to customize the colors to match your preference or yarn stash.

Do I need to know how to work in back loops only (BLO)?

Yes, this pattern uses BLO technique in several places to create texture and shape, particularly for the hooves and snout area. If you're new to this technique, practice on a small swatch first - it simply means inserting your hook through only the back loop of each stitch instead of under both loops.

Can I embroider the eyes instead of using safety eyes?

Yes, the pattern notes that you may choose to embroider eyes instead of using 8mm safety eyes. This is especially recommended if making the toy for young children to ensure there are no loose fittings that could be a choking hazard.

How do I create the fluffy mane and tail effect?

The mane and tail are worked in rows using a special stitch pattern with chain 2 and 3 double crochets in each stitch. This creates the ruffled, fluffy effect. Working with the glitter gold yarn as suggested adds extra texture and sparkle to these features.

What does it mean to fold the ears in half and half again?

After crocheting the ears flat, you fold them in half once, then fold that in half again so you have 4 layers of edges together. Then you sew across the bottom to create the proper ear shape before attaching them to the head.