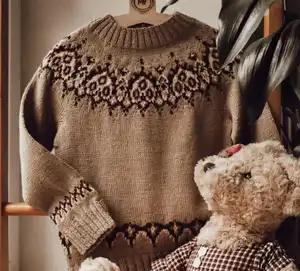
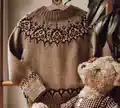
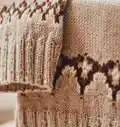
Create a stunning seamless girls' sweater worked from the top down with an elegant circular yoke featuring beautiful colorwork motifs. This timeless design combines traditional knitting techniques with modern construction methods, offering multiple size options from 12 months to 14 years. The pattern includes detailed instructions for creating a cozy, stylish sweater perfect for layering through every season, complete with ribbed edging and comfortable long sleeves that will become a wardrobe favorite.
Progress Tracker
0% Complete
— Begin of Work:
Cast On:
Using 1.5mm needles, cast on 140, 140, 140 (152, 152, 152) (152, 152, 152) sts, place BoR marker, join into round without twisting
Ribbing:
Work in k2, p2 ribbing to height of 3cm from cast-on edge
Change Needles:
Change to 2.75mm needles and continue in stockinette stitch
Increase Round (sizes 4-14 yrs only):
Slip BoR marker, RLI, k76, LLI, work in st st to end of round (increases total of 2 sts)
Info:
Work 7 rounds in stockinette stitch, then change to 3mm needles
— Circular Yoke:
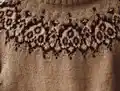
Chart #1:
Work all rows of Circular Yoke Chart #1 following chart symbols
Charts #2-8:
Continue from Chart #2, 4, 5 (3, 4, 5) (6, 7, 8) according to your size
After Charts:
Change to 2.75mm needles, work 2 rounds stockinette stitch even
Info:
Move BoR marker by specified number of stitches for your size to center colorwork motif
Distribute Stitches:
Slip BoR marker, knit specified sts for right sleeve, place marker M1, knit Front sts, place marker M2, knit left sleeve sts, place marker M3, knit remaining Back sts
— Short Row Shaping:
Setup Round:
Slip BoR marker, k24, 26, 27 (27, 28, 29) (30, 30, 31), turn work to WS, create double stitch
Row 1 (RS):
Work to marker M3, slip marker, knit to BoR marker, work to 5 sts before double stitch, turn and create double stitch
Row 2 (WS):
Work to BoR marker, slip marker, purl to marker M3, work to 5 sts before double stitch, turn and create double stitch
Info:
Repeat Rows 1 and 2 another 1, 1, 1 (1, 2, 2) (3, 3, 3) times
Row 3 (RS):
Knit to 3 sts before double stitch, turn and create double stitch
Row 4 (WS):
Purl to 3 sts before double stitch, turn and create double stitch
Info:
Repeat Rows 3 and 4 another 1, 1, 1 (1, 2, 2) (3, 3, 3) times
Row 5 (RS):
Knit to 1 st before double stitch, create double stitch
Row 6 (WS):
Purl to 1 st before double stitch, turn and create double stitch
Info:
Repeat Rows 5 and 6 another 0, 0, 0 (0, 1, 1) (1, 1, 1) times, then continue working in round, knitting both legs of double stitches together
Continue:
Work in stockinette stitch for total of 0, 0, 1 (1, 5, 8) (12, 16, 19) rounds
— Divide for Sleeves:
Division Round:
Transfer right sleeve sts to holder, cast on 10, 10, 10 (12, 12, 14) (14, 18, 18) underarm sts, work Front sts, transfer left sleeve sts to holder, cast on underarm sts, work Back sts to BoR marker
— Body:
Continue Body:
Work in stockinette stitch until piece measures 12, 14, 15 (16, 19, 21) (24, 27, 29) cm from sleeve division, or is 10cm shorter than desired length
Increase Round:
Increase 6, 9, 1 (5, 0, 0) (6, 5, 9) sts evenly distributed according to size-specific instructions
Chart #9:
Change to 3mm needles, work all rows of colorwork Chart #9
After Chart:
Change to 2.75mm needles, work 7 rounds stockinette stitch
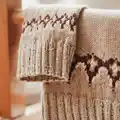
Bottom Ribbing:
Change to 1.5mm needles, work k1, (p2, k2) repeat to last 3 sts, ending p2, k1, decreasing 0, 3, 3 (2, 2, 1) (0, 2, 3) sts evenly in first round
Finish Body:
Work ribbing for 3cm, then bind off all stitches
— Right Sleeve:
Setup:
Place held sleeve sts on 2.75mm needles, RS facing, join yarn, work in st st to end, place marker M1, pick up and knit underarm sts, place BoR marker, join into round
Work Even:
Work in stockinette stitch for 21 rounds
Decrease Round:
Slip BoR marker, k2, k2tog, work to 4 sts before marker M1, ssk, k2 (2 sts decreased)
Rounds 2-20:
Work even in established pattern over unchanged stitch count
Info:
Repeat decrease rounds 1-20 another 0, 0, 0 (0, 1, 1) (1, 1, 1) times
Continue Sleeve:
Work until sleeve measures 13, 15, 18 (20, 23, 25) (27, 30, 33) cm from armhole, or is 6cm shorter than desired length
Increase/Adjust:
Increase or work even as specified for your size to achieve 55, 60, 60 (65, 65, 70) (75, 75, 75) sts
Chart #10:
Change to 3mm needles, work all rows of colorwork Chart #10
After Chart:
Change to 2.75mm needles, work 7 rounds stockinette stitch
Cuff Ribbing:
Change to 1.5mm needles, work k1, (p2, k2) repeat to last 3 sts, end p2, k1, adjusting stitch count as specified for size
Finish Sleeve:
Work ribbing for 3cm, bind off all stitches
— Left Sleeve:
Work Left Sleeve:
Work the left sleeve following the same instructions as the right sleeve
— Finishing:
Block:
Moisten sweater and block spread flat until completely dry
Weave Ends:
Hide all yarn ends securely throughout the garment
This elegant Guell Girls' Sweater pattern brings together timeless design and modern knitting techniques to create a garment that will be treasured for years. The seamless top-down construction with its stunning circular yoke colorwork makes this an impressive project that showcases your advanced knitting skills. With nine size options available, you can create this beautiful sweater for any special child in your life, knowing they'll love wearing this cozy, stylish piece through countless adventures. Happy knitting! 🧶✨