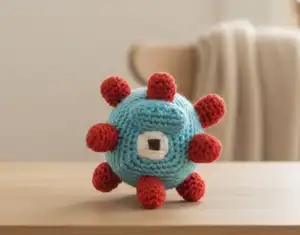
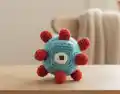
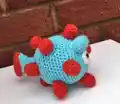
Create the formidable underwater Guardian from Minecraft with this detailed amigurumi crochet pattern! This pattern features the distinctive teal cubic body with orange spikes, a prominent eyebrow ridge, and a striking eye design plus a flowing tail. Perfect for Minecraft ocean monument enthusiasts, this pattern uses cube-shaping techniques with added dimensional elements. With step-by-step instructions for the large square body, eyebrow piece, twelve decorative spikes, detailed eye embroidery, and segmented tail, you'll craft an impressive aquatic mob!
Progress Tracker
0% Complete
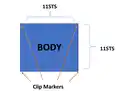
— Body :
Info :
Make with teal yarn
Round 1 :
8SC into a magic loop {8}
Round 2 :
(SC1, 3SC into the next ST) 4 times {16}
Round 3 :
SC2, 3SC into next ST, (SC3, 3SC into next ST) 3 times, SC1 {24}
Round 4 :
SC3, 3SC into next ST, (SC5, 3SC into next ST) 3 times, SC2 {32}
Round 5 :
SC4, 3SC into next ST, (SC7, 3SC into next ST) 3 times, SC3 {40}
Round 6 :
SC5, 3SC into next ST, (SC9, 3SC into next ST) 3 times, SC3 {48}
Round 7-20 :
SC around {48}
Info :
Add clip marker into 4 corners where decreases will be, with 11 stitches between every 2 stitches
Round 21 :
(SC to stitch before marker SC3TOG) 4 times, SC to end {40}
Round 22 :
(SC to stitch before marker SC3TOG) 4 times, SC to end {32}
Round 23 :
(SC to stitch before marker SC3TOG) 4 times, SC to end {24}
Round 24 :
(SC to stitch before marker SC3TOG) 4 times, SC to end {16}
Round 25 :
(SC to stitch before marker SC3TOG) 4 times, SC to end, remove markers {8}
Info :
Join and FO. With yarn tail pick up front loop only of remaining 8 stitches in order, pull tight to close
— Eyebrow :
Info :
Make with teal yarn
Round 1 :
CH8, SC in 2nd chain from hook, SC5, 3SC into last chain
Round 2 :
Working down opposite side of foundation chain, SC5, 2SC in the last ST (first ST of previous round) {16}
Round 3 :
2SC into 1st ST, SC5, 2SC into next 3 STS, SC5, 2SC into last 2 STS {22}
Round 4-5 :
SC around {22}
Info :
Join and FO. Stuff brow, pin and sew into place on face
— Spikes :
Info :
Make 12 with orange yarn
Round 1 :
CH2, 5SC into the 2nd CH from hook {5}
Round 2 :
2SC into all STS {10}
Round 3-6 :
SC around {10}
Info :
Join and FO. Sew into place on Guardian
— Face Detail :
Info :
With white and brown yarn sew on eye below eyebrow
— Tail :
Info :
Begin with orange yarn
Round 1 :
CH8, SC in 2nd chain from hook, SC5, 3SC into last chain, working down opposite side of foundation chain, SC5, 2SC in the last ST (first ST of previous round) {16}
Round 2 :
2SC into 1st ST, SC5, 2SC into next 3 STS, SC5, 2SC into last 2 STS {22}
Round 3-5 :
SC around {22}
Info :
Change to teal yarn
Round 6 :
SC2TOG, SC5, (SC2TOG) 3 times, SC5, (SC2TOG) twice {16}
Round 7-8 :
SC around {16}
Round 9 :
SC2TOG, SC2, (SC2TOG) 3 times, SC2, (SC2TOG) twice {10}
Round 10-16 :
SC around {10}
Info :
Join and FO. Pin and sew into place
This impressive Guardian amigurumi pattern brings Minecraft's ocean monument protector to life with stunning detail! Featuring a large cubic teal body, twelve orange spikes, a prominent eyebrow ridge, and a flowing segmented tail, this pattern offers wonderful texture and dimension. Perfect for intermediate crocheters ready to tackle multi-element construction and create an eye-catching underwater mob! 🐡💙 Happy crocheting! ✨