🧢 Beautiful ✨ Detailed πŸ’ Adorable

Cleo the Clam Amigurumi Pattern

Cleo the Clam Amigurumi Pattern
4.6β˜… Rating
2-3 Hours Time Needed
1.4K Made This
βœ‚οΈ

Beginner Friendly Level

Perfect for those just starting their sewing journey, with clear instructions and simple techniques

⏱️

Bite-Sized Project

Complete in under 2 hoursβ€”quick, fun, and perfect for a little creative escape.

🧸

Cute Companion

An adorable friend to cherish, handcrafted with love to bring comfort and joy for years to come.

About This Cleo the Clam Amigurumi Pattern

Cleo the Clam is a heartwarming amigurumi pattern that breaks the shy clam stereotype! This sweet design features a fully functional clamshell that opens to reveal an adorable little clam character with expressive safety eyes and a cheerful embroidered smile. The pattern uses basic crochet techniques and works up quickly, making it perfect for crafters of all skill levels who want to create something truly special.

Cleo the Clam Amigurumi Pattern crochet pattern - detailed view of completed project

The unique hinged shell design allows Cleo to peek out and greet friends, adding an interactive element that makes this pattern extra special. With detailed instructions for both the shell and the clam body, you'll enjoy every stitch of this oceanic creation.

Why You'll Love This Cleo the Clam Amigurumi Pattern

I absolutely love this pattern because it's one of those projects that makes you smile the entire time you're working on it! There's something so satisfying about watching the shell pieces come together and then creating that adorable little clam face. I appreciate how the pattern offers two options for the clam body depending on your yarn weight preference, which shows real thoughtfulness for different crafting styles. The fact that the shell actually opens and closes adds such a playful, interactive element that makes this more than just a static decoration. It's quick enough to finish in one sitting but detailed enough to feel like a real accomplishment. Plus, who can resist those tiny safety eyes and that sweet V-shaped smile?

Cleo the Clam Amigurumi Pattern step 1 - construction progress Cleo the Clam Amigurumi Pattern step 2 - assembly progress Cleo the Clam Amigurumi Pattern step 3 - details and accessories Cleo the Clam Amigurumi Pattern step 4 - final assembly and finishing

Switch Things Up

I love experimenting with this pattern to create different shell personalities! Try using variegated yarn for the outer shell to create a beautiful natural striped effect that mimics real clamshells. You could also work with different color combinations - imagine a purple and pink shell for a more whimsical, fantasy-inspired look, or use ocean blues and greens for a more realistic underwater vibe.

For the clam itself, consider adding tiny embroidered eyebrows above the eyes to give Cleo even more expression - surprised, happy, or sleepy eyebrows completely change the character's personality! I've also experimented with adding small pearl beads inside the shell for extra detail, or embroidering small patterns on the inner cream shell to make it even more special.

If you want to make Cleo part of a larger ocean scene, this pattern works beautifully alongside other sea creature amigurumi. Create a whole underwater family with different colored shells, or adjust the size by using different hook sizes and yarn weights. You could even add a small loop to the top of the shell to turn Cleo into a keychain or ornament. The possibilities are endless, and each variation brings its own charm to this already adorable design!

Common Mistakes & How to Fix Them

βœ— Forgetting to leave a yarn tail on the top shell for sewing the two halves together, which makes assembly difficult later βœ— Stuffing the clam too firmly before closing, making it hard and losing the soft squishy texture that makes it adorable βœ— Not matching up the fastened-off spots when sewing the shell halves together, causing visible seams that disrupt the finished look βœ— Placing the safety eyes too far apart or too close together, affecting the clam's overall cute expression and personality βœ— Fastening off the outer shell too early before joining it with the inner shell piece, requiring you to reattach yarn βœ— Skipping the stuffing pause before adding the face details, making it difficult to properly position and secure the features

Cleo the Clam Amigurumi Pattern

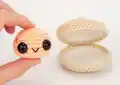
Create your own adorable Cleo the Clam with this charming amigurumi pattern! This delightful project features a sweet little clam nestled inside a beautiful hinged shell that actually opens and closes. Perfect for beginners and experienced crocheters alike, you'll craft both the tan outer shell and cream inner shell pieces, then bring Cleo to life with safety eyes and an embroidered smile. The finished shell measures just 3 inches wide with a 1.25-inch clam inside, making it a perfect pocket-sized companion or gift.

Beginner Friendly 2-3 Hours

Materials Needed for Cleo the Clam Amigurumi Pattern

β€” Main Fabric

  • 01
    Medium/worsted weight yarn in tan color for outer shell
  • 02
    Medium/worsted weight yarn in cream color for inner shell
  • 03
    Light/light worsted weight yarn in peach color for clam body

β€” Tools Required

  • 01
    Crochet hook size 3.75mm
  • 02
    Yarn needle
  • 03
    One pair of 12mm safety eyes
  • 04
    Polyester fiber fill stuffing
  • 05
    Black embroidery floss for mouth and eyebrows
  • 06
    Scissors

Progress Tracker

0% Complete

β€” Outer Shell

Round 1:

Ch 2, 6 sc in first ch (6 sts)

Round 2:

2 sc in each st around (12 sts)

Round 3:

(Sc 1, 2 sc in next st), 6 times (18 sts)

Round 4:

(Sc 2, 2 sc in next st), 6 times (24 sts)

Round 5:

(Sc 3, 2 sc in next st), 6 times (30 sts)

Round 6:

(Sc 4, 2 sc in next st), 6 times (36 sts)

Round 7:

(Sc 17, 2 sc in next st), 2 times (38 sts)

Round 8:

Sc 38 (38 sts)

Info:

Wait to fasten off until you have made the inner shell pieces. Also wait to crochet the 2nd outer shell until you have made both inner shells.

β€” Inner Shell (make 2)

Round 1:

Ch 2, 6 sc in first ch (6 sts)

Round 2:

2 sc in each st around (12 sts)

Round 3:

(Sc 1, 2 sc in next st), 6 times (18 sts)

Round 4:

(Sc 2, 2 sc in next st), 6 times (24 sts)

Round 5:

(Sc 3, 2 sc in next st), 6 times (30 sts)

Round 6:

(Sc 4, 2 sc in next st), 6 times (36 sts)

Round 7:

(Sc 17, 2 sc in next st), 2 times (38 sts)

Info:

Fasten off, leaving a yarn tail for weaving in. You will now be crocheting the shell pieces together.
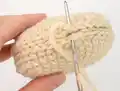
Assembly Step:

Insert your crochet hook back into the outer shell right where you left off at the end of R8. Then insert your hook through a stitch of the outer shell and a stitch of the inner shell. Single crochet all the way around the 2 shell pieces to join them. Fasten off, leaving a yarn tail for sewing.

Info:

Weave in the white yarn tail ends.

Info:

Now crochet the 2nd outer shell, wait to fasten off as before, and repeat the above steps to crochet the outer and inner shell pieces together (the only difference between the top and bottom shells is that you do not need to leave a yarn tail for sewing on the bottom shell, just for weaving in).

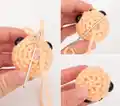
Final Shell Assembly:

Using the 1 yarn tail you have saved, sew the 2 shell pieces together. When sewing them together, match up the 2 spots on the top and bottom shell where you fastened off so that seam will be hidden when you stitch them together. With your yarn needle, make approximately 6-7 whip stitches to sew the top and bottom shell together.

β€” The Clam - Option 1 (with light/light worsted yarn)

Round 1:

Ch 2, 6 sc in first ch (6 sts)

Round 2:

2 sc in each st around (12 sts)

Round 3:

(Sc 3, 2 sc in next st), 3 times (15 sts)

Round 4:

(Sc 4, 2 sc in next st), 3 times (18 sts)

Round 5:

(Sc 5, 2 sc in next st), 3 times (21 sts)

Round 6-7:

Sc 21 (2 total rounds)

Round 8:

(Sc 6, 2 sc in next st), 3 times (24 sts)

Round 9:

Sc 24 (24 sts)

Round 10:

(Sc 2, dec 1), 6 times (18 sts)

Round 11:

(Sc 1, dec 1), 6 times (12 sts)

Infos:

Begin stuffing the clam. Then insert the safety eyes between R8-9, with 3 sts in between. Firmly press the backs onto the eyes. Cut a strand of black embroidery floss, thread it onto your yarn needle, and insert it through the opening at the bottom of the clam. Sew a horizontal stitch on the middle st between the eyes, and then bring your yarn needle up one round lower, grab the previous stitch and insert your needle back into the exact same spot, to create a V smile. Now tie the 2 ends of the embroidery floss in a knot on the inside of the shell's body so the smile cannot be pulled out.

Round 12:

Dec 6 times (6 sts)

Info:

Fasten off, leaving a yarn tail for sewing.

β€” The Clam - Option 2 (with medium/medium worsted yarn)

Round 1:

Ch 2, 6 sc in first ch (6 sts)

Round 2:

2 sc in each st around (12 sts)

Round 3:

(Sc 3, 2 sc in next st), 3 times (15 sts)

Round 4:

(Sc 4, 2 sc in next st), 3 times (18 sts)

Round 5-7:

Sc 18 (3 total rounds)

Round 8:

(Sc 1, dec 1), 6 times (12 sts)

Infos:

Here, insert the eyes between R7-8, with 3 sts in between. Then refer to the above instructions for stuffing and sewing on the smile and eyebrows.

Round 9:

Dec 6 times (6 sts)

Info:

Fasten off, leaving a yarn tail for sewing.

β€” Finishing the Clam

Final Steps:

Finish stuffing the body as needed - you want the body to hold its shape but still be squishy. Use the yarn tail and your yarn needle to weave through the 6 sts around the opening and pull tight to close. Secure with a knot and weave in your end. Place the clam inside his shell, and you are finished!

Assembly Instructions

  • After completing both inner shell pieces, join each one to an outer shell by single crocheting around the edges while holding them together.
  • Weave in all white yarn tail ends from the inner shell pieces to keep the work neat and tidy.
  • Sew the two completed shell halves together using the saved yarn tail, matching up the fastened-off spots to hide the seam.
  • Use approximately 6-7 whip stitches along one edge to create a hinge that allows the shell to open and close.
  • Insert safety eyes into the clam body between the specified rounds with 3 stitches spacing between them before fully stuffing.
  • Embroider the V-shaped smile using black embroidery floss, securing it with a knot inside the body so it cannot pull out.
  • Place the finished clam inside the shell, positioning it so it peeks out when the shell is opened.

Important Notes

  • πŸ’‘Wait to fasten off the first outer shell until both inner shells are complete for easier assembly
  • πŸ’‘Leave a yarn tail for sewing only on the top shell piece, not the bottom one
  • πŸ’‘Match up the fastened-off spots when joining shell halves to ensure the seam remains hidden
  • πŸ’‘Stuff the clam body to hold its shape but keep it squishy, not too firm or hard
  • πŸ’‘Secure the embroidered smile with a knot inside the body to prevent it from being pulled out
  • πŸ’‘You can use either light worsted or medium worsted yarn for the clam body depending on your preference

This adorable Cleo the Clam pattern brings ocean charm to life in the sweetest pocket-sized form! With its interactive hinged shell design and cheerful personality, Cleo breaks free from the shy clam stereotype to become everyone's favorite little companion. The pattern combines simple crochet techniques with thoughtful details like the V-shaped smile and opening shell mechanism. Perfect for gift-giving or keeping as your own crafting treasure! 🐚✨

You ask,

we answer.

FAQs

Can I use different yarn weights for this pattern?

Yes! The pattern includes two options for the clam body - one using light/light worsted yarn and another using medium/worsted weight yarn. Both work beautifully, so choose based on your preference and available materials.

How do I make the shell open and close?

The shell opens and closes thanks to the hinge created when you sew the two shell halves together. Use approximately 6-7 whip stitches along one edge, and make sure to match up the fastened-off spots to hide the seam for a clean finish.

What size will the finished clam be?

The completed shell measures 3 inches (7.5 cm) wide, and the little clam character inside is 1.25 inches (3.25 cm) tall - perfect pocket-sized proportions!

Do I need to use a magic circle to start?

The pattern begins with 'ch 2, 6 sc in first ch,' but you can substitute a magic circle if you're more comfortable with that method. Just work 6 sc into your magic circle instead.

When should I add the safety eyes?

Insert the safety eyes between rounds 8-9 (for Option 1) or rounds 7-8 (for Option 2) with 3 stitches between them. Add them after you begin stuffing but before you close up the body completely.

How do I create the V-shaped smile?

Use black embroidery floss to sew a horizontal stitch between the eyes, then bring your needle up one round lower, grab the previous stitch, and insert it back in the same spot. Tie the ends in a knot inside the body to secure it.