🧢 Beautiful ✨ Detailed πŸ’ Adorable

Grindstone Tote Bag Crochet Pattern

Grindstone Tote Bag Crochet Pattern
4.0β˜… Rating
8-10 Hours Time Needed
2.4K Made This
βœ‚οΈ

Intermediate Level

Ideal for those with basic knitting experience, featuring slightly more advanced stitches and techniques to expand your skills.

⏱️

All-Day Adventure

Requires 8-10 hours, ideal for a full day of immersive knitting.

🧣

Snug Essential

Everyday comfort with practical charm, designed for both functionality and style through changing seasons.

About This Grindstone Tote Bag Crochet Pattern

Grindstone Tote Bag Crochet Pattern crochet pattern - detailed view of completed project

This versatile pattern works with any bulky weight yarn, and you can easily adjust the size by using different yarn weights. The finished bag features a comfortable shoulder strap and plenty of room for all your essentials.

Why You'll Love This Grindstone Tote Bag Crochet Pattern

I absolutely love this pattern because it combines beautiful texture with incredible functionality! The crossed double crochet stitch creates such an elegant look while keeping the bag sturdy enough for everyday use. What really excites me is how customizable this pattern is - you can make it larger or smaller simply by changing your yarn weight, and the optional button closure adds that perfect handmade touch. I find the construction method brilliant because working in separate panels makes the project manageable and lets you see your progress quickly. The strap is integrated into the design, so there's no awkward sewing of handles afterward. Plus, the finished bag is genuinely useful - it's become my go-to for everything from grocery shopping to beach trips!

Grindstone Tote Bag Crochet Pattern step 1 - construction progress Grindstone Tote Bag Crochet Pattern step 2 - assembly progress Grindstone Tote Bag Crochet Pattern step 3 - details and accessories Grindstone Tote Bag Crochet Pattern step 4 - final assembly and finishing

Switch Things Up

I love experimenting with this pattern because it's so incredibly versatile! One of my favorite variations is working it in two contrasting colors - maybe a bold stripe pattern or even color-blocking the front and back panels differently from the side panels. The crossed double crochet stitch looks absolutely stunning when you use variegated or self-striping yarn, as it really shows off the texture beautifully.

I've also played around with adding pockets to the inside or outside of the bag - just work a small rectangular panel and sew it on before assembly. For a more bohemian vibe, I sometimes add fringe along the bottom edge or even crochet a decorative trim around the top opening. You could also embellish with appliquΓ©s, patches, or embroidery to make it uniquely yours.

If you want a more structured bag, I recommend adding a layer of fabric lining with interfacing - it transforms the bag into something that could easily be a high-end boutique piece. Another fun twist is making the bag in a smaller size using worsted weight yarn for a cute child's purse or even a project bag for your crochet supplies. The possibilities are truly endless!

Common Mistakes & How to Fix Them

βœ— Forgetting to maintain tight tension on side panels can result in a floppy bag that doesn't hold its shape well βœ— Not placing stitch markers at the correct rows during strap construction will make assembly confusing and misaligned βœ— Skipping the crossed double crochet technique and doing regular double crochet will eliminate the beautiful textured pattern βœ— Using hooks that are too large for both panels creates loose stitches and a bag that stretches out of shape

Grindstone Tote Bag Crochet Pattern

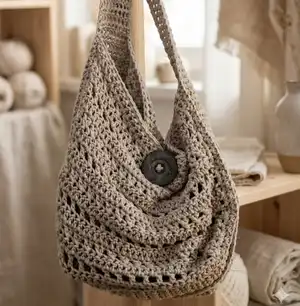
Create your own stylish and functional Grindstone Tote Bag with this versatile crochet pattern! This stunning tote features beautiful crossed double crochet stitches that create an elegant textured design, perfect for everyday use or special occasions. Whether you're heading to the farmer's market, beach, or simply need a reliable carry-all, this bag combines practicality with handmade charm. The pattern is adaptable to any bulky weight yarn, allowing you to customize the size and style to match your personal aesthetic. With clear instructions and a unique construction method, you'll love watching this beautiful bag come together stitch by stitch!

Intermediate 8-10 Hours

Materials Needed for Grindstone Tote Bag Crochet Pattern

β€” Main Fabric

  • 01
    Approximately 470 yards of Bernat Maker Home Dec bulky (5) weight yarn
  • 02
    Alternative: Any sturdy bulky (5) weight yarn of your choice
  • 03
    Worsted weight (4) yarn for a smaller bag
  • 04
    Super bulky (6) yarn for a larger bag

β€” Tools Required

  • 01
    7mm crochet hook (or larger hook for front/back panels)
  • 02
    6mm crochet hook (or 1mm smaller hook for side/strap panel)
  • 03
    6 locking stitch markers
  • 04
    Yarn needle for seaming
  • 05
    Scissors
  • 06
    Large button for closure
  • 07
    Safety pins (optional substitute for stitch markers)

Progress Tracker

0% Complete

β€” Front/Back Panels (make 2) :

Info :

Use 7mm hook (or larger hook)

Row 1 :

Ch 30, 2dc in 3rd ch from hook, dc across until 1 ch remains, 2dc in last ch (30)

Row 2 :

Ch 2, turn, 2dc in 1st st, *ch 1, sk 1, dc 1* across until 1 st remains, 2dc in last st (32)

Row 3 :

Ch 2, turn, 2dc in 1st st, dc across, placing a dc in every st and ch sp until 1 st remains, 2dc in last st (34)

Row 4 :

Ch 2, turn, 2dc in 1st st, *sk 1 st, dc 1, dc in sk st* across until 1 st remains, 2dc in last st (36)

Row 5 :

Ch 2, turn, 2dc in 1st st, dc across until 1 st remains, 2dc in last st (38)

Row 6 :

Ch 2, turn, dc in 1st st, *ch 1, sk 1, dc 1* across until 1 st remains, dc in last st (38)

Row 7 :

Ch 2, turn, dc in every st and ch sp across (38)

Row 8 :

Ch 2, turn, dc in 1st st, *sk 1, dc 1, dc in sk st* across until 1 st remains, dc in last st (38)

Row 9 :

Ch 2, turn, dc across (38)

Rows 10-17 :

Repeat rows 6-9 two more times

Front Panel Row 18 :

Ch 1, turn, sc across. Do not fasten off

Back Panel Row 18 :

Ch 1, turn, sc 19, ch 18, sc 19 (38 sc, 18 ch). Do not fasten off

Info :

Continue sc around the outside edges of the panel, placing 1sc in the end of the sc rows, 2 sc in the end of each dc row, and 1 sc in each st of the foundation chain. Fasten off

Info :

Place a stitch marker in each of the two center stitches at the bottom of each panel

β€” Side/Bottom/Strap Panel :

Info :

Switch to 6mm hook (or smaller hook)

Row 1 :

Ch 11, sc in 2nd ch from hook, sc across (10)

Row 2 :

Ch 1, turn, sc across (10)

Rows 3-50 :

Repeat row 2. Place stitch markers at both ends of row 50

Row 51 :

Ch 1, turn, sc2tog, sc in next 6 sts, sc2tog (8)

Row 52 :

Ch 1, turn, sc across (8)

Rows 53-149 :

Repeat row 52

Row 150 :

Ch 1, turn, 2sc in 1st st, sc across until 1 st remains, 2sc in last st (10). Place stitch markers at both ends of row 150

Row 151 :

Ch 1, turn, sc across (10)

Rows 152-200 :

Repeat row 151

Info :

For longer or shorter strap, add or subtract rows between rows 53 and 149

Assembly Instructions

  • With right sides facing, use the stitch markers placed at rows 50 and 150 of the strap panel to attach it to the top corners of one bag panel
  • Using the stitch markers at the bottom center of the bag panel, attach the ends of the strap panel to the bag panel
  • Starting at the bottom center, single crochet the panel and strap together, continuing around the edge of the strap and down the other side of the panel
  • Slip stitch into first stitch to join, then fasten off
  • Repeat the same assembly process for the other side panel
  • Using the yarn tail, sew the bottom of the bag closed using mattress stitch or any seaming method you prefer
  • Sew a large button onto the top center of the front panel to complete the closure

Important Notes

  • πŸ’‘Ch 2 at the beginning of rows does NOT count as a stitch throughout the pattern
  • πŸ’‘Use two different hook sizes - larger for front/back panels and smaller for side/strap to achieve proper tension
  • πŸ’‘When working crossed double crochet stitches, always cross in front of the previous stitch for consistent texture
  • πŸ’‘Place all six stitch markers accurately at the specified rows to ensure proper alignment during assembly
  • πŸ’‘The button loop is created in Row 18 of the back panel only - if you prefer no button closure, make two front panels instead
  • πŸ’‘Yardage will vary based on the yarn weight chosen - heavier yarns create larger bags and require more yardage

The Grindstone Tote Bag pattern is a beautifully designed project that combines elegant texture with everyday functionality. Created by Tara Briggs as part of the Downeast Collection, this versatile bag features stunning crossed double crochet stitches and a clever construction method that makes assembly a breeze. Whether you're crafting for yourself or making a heartfelt handmade gift, this tote is sure to become a beloved everyday essential. The customizable sizing and optional button closure make it perfect for crocheters who love practical projects with beautiful details! 🧢✨

You ask,

we answer.

FAQs

Can I use a different yarn weight for this pattern?

Absolutely! The pattern is very adaptable. Using worsted weight (4) yarn will give you a smaller bag, while super bulky (6) yarn will create a larger bag. Just remember that yardage will vary based on your yarn choice, and you may need to adjust your hook sizes accordingly to maintain proper tension.

Why do I need two different hook sizes?

The two hook sizes help create the perfect structure for your bag. The larger hook (7mm) is used for the front and back panels to create a slightly looser, more drapey fabric, while the smaller hook (6mm) creates tighter tension for the side panels and strap, ensuring they're sturdy and won't stretch out with use.

What is the crossed double crochet stitch and is it difficult?

The crossed double crochet creates the beautiful textured pattern in this bag. You skip one stitch, work a double crochet in the next stitch, then work another double crochet in the skipped stitch, crossing in front. It's an intermediate technique but becomes easy with practice and creates stunning results!

How do I make the strap longer or shorter?

The pattern includes instructions for customizing strap length! Simply add or subtract rows between rows 53 and 149 of the side/bottom/strap panel. Each row added will lengthen your strap slightly, so adjust based on your preferred carry style.

Do I have to add the button closure?

No, the button closure is completely optional! If you prefer an open tote bag, simply make two front panels instead of one front and one back panel with the button loop. This gives you a simpler, more casual tote style.