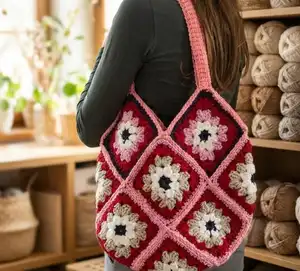
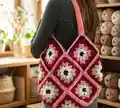
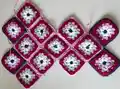
Create a stunning granny square purse that's both trendy and practical! This beautiful bag combines colorful granny squares into a functional 12x12 inch purse perfect for everyday use. The pattern features a classic flower motif center with vibrant color combinations of dark blue, white, gray, red, and pink. With detailed instructions for creating 13 squares and assembling them into a unique folded bag design, you'll craft a one-of-a-kind accessory. The sturdy handles make this purse both stylish and durable, ideal for carrying your essentials while showcasing your crochet skills.
Progress Tracker
0% Complete
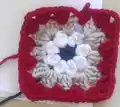
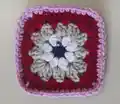
— Granny Square (Make 13) :
Step 1 :
Take dark blue yarn and hook and begin with a magic loop
Step 2 :
Place 8 sc stitches inside the magic loop, join with a slip stitch with white yarn
Step 3 :
Join white yarn in one of the sc stitches and chain 3
Step 4 - First petal :
After the ch 3, make a 3dc crochet cluster: yo, insert hook, yo, pull through, yo pull through 2 loops only, repeat 2 more times until you have 4 loops on your hook, yo and pull through all 4 loops, ch 2 (the chain 3 counted as a dc)
Step 5 - Remaining petals :
Make a 4 dc cluster in each remaining sc stitch for a total of 8 petals: yo, insert hook, yo, pull through, yo pull through 2 loops only, repeat 3 more times until you have 5 loops on your hook, yo and pull through all 5 loops, ch 2
Step 6 :
Once petals are complete, join with a slip stitch at the top of the initial ch 2 and change color
Step 7 :
Join gray color yarn and ch 3
Step 8 :
Make 3 dc stitches in the next ch 2 space
Step 9 :
In the next ch 2 space, 3 dc, ch 2, 3 dc for the first full corner
Step 10 :
Repeat steps 8 and 9 until you get back to your ch3, 2 dc in the space before the ch 3 and change color
Step 11 :
Join red color yarn and ch 3
Step 12 :
Make 3 dc stitches in the next ch 2 space
Step 13 :
In the next ch 2 space, 3 dc, ch 2, 3 dc for the first full corner
Step 14 :
Make 3 dc stitches in the next ch 2 space
Step 15 :
Repeat steps 12, 13 and 14 until you get back to your ch3, 2 dc in the space before the ch 3 and change color
Step 16 :
Join pink color yarn and sc all around and fasten off
— Flip Stitch Granny Join :
Info :
Arrange your squares according to the Assembly Chart, then connect or join them together in numerical order 1-13, all with RS facing
Step 1 :
Place the squares with the right side showing up, make a slip knot on the hook to begin, insert the hook into the back loop of the corner stitch of the first square, bring a loop out and make a slip-stitch
Step 2 :
Insert the hook into the same back-loop corner stitch from front to back
Step 3 :
Insert the hook into the back loop of the corner stitch of the second square, from front to back
Step 4 :
With yarn at the bottom of your work, hook the yarn and bring it up from the second square loop followed by the first square loop
Step 5 :
Slip stitch to the first loop on the hook
Step 6 :
Repeat the process on the second pair of stitches and continue until you reach the corner stitch right after the last double crochet stitch on this edge
Step 7 :
When joining additional squares, make a chain stitch to cross over row joints and repeat whenever you need to cross following row joints
Step 8 :
Continue with the normal flat slip-stitch until you reach the end, fasten off
— Bag Assembly :
Step 1 :
After the 13 squares have been seamed together, fold the piece upwards so that the top tips of the granny squares are lined up
Step 2 :
Fold the side granny squares in half inwards upon themselves so that the side tips are pointing towards the granny square in the middle
Step 3 :
Whip stitch the edges of the side granny squares and the diagonals of the bottom granny squares
Step 4 :
Weave in the ends
— Handles and Top Edging :
Step 1 :
Start in the right corner of the lower edge, work single crochets along all the stitches of the top edge until you reach the tip of the second granny square
Step 2 :
Chain 60 and join to the tip of the first granny square with a single crochet (be careful not to twist the chain)
Step 3 :
Insert crochet hook into back loop in top of the first granny square, work single crochets through the stitches
Step 4 :
Turn and insert hook into the 2nd chain from the hook, pull up a loop, insert hook into the next stitch, pull up a loop and insert hook into next stitch (in the chain), pull up a loop (4 loops)
Step 5 - Part 1 :
Pull through in every 2 loops until the end of the row
Step 6 - Part 2 :
Insert hook in front loops, pull up twice and insert hook into next stitch (in the chain), pull up (4 loops)
Step 7 :
Repeat Part 1 and Part 2 until the end of the chain
Step 8 :
Insert hook in front loops and the stitches of granny square, pull up twice and insert hook into next stitch (in the chain), pull up (4 loops)
Step 9 :
Pull through in every 2 loops until the end of the row
Step 10 :
Keep working single crochets along all the stitches of the top edge to the end of the second square
Step 11 :
Repeat the above process with the other side of the bag
This vibrant granny square purse pattern is perfect for crocheters looking to create a functional and fashionable accessory! The combination of classic granny square techniques with modern assembly methods results in a unique bag that's both practical and eye-catching. Whether you're using up your stash or planning a coordinated color scheme, this pattern offers endless creative possibilities. The sturdy construction and comfortable handles make it ideal for everyday use. 🧶 Happy crocheting! 🌸✨