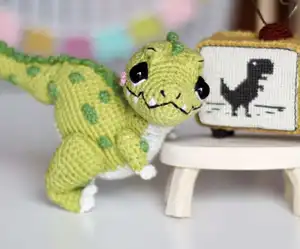
Create your own adorable Tyrannosaurus Rex with this comprehensive crochet pattern! This charming design features Oliver, a cute toothy dinosaur that's not scary at all, complete with embroidered details, movable head joint, and decorative spots. As a bonus, you'll also learn to make a retro TV set accessory! Perfect for dinosaur lovers and collectors, this pattern combines detailed construction techniques with playful character design to bring prehistoric fun into your home.
Progress Tracker
0% Complete
— HEAD (Yarn A) :
Round 1 :
7 loops, turning, 6sc (starting from the 2nd loop from the hook), 6sc (from the back of the chain) (12l)
Round 2 :
[sc, inc]x6 (18l)
Round 5 :
[2sc, inc]x6 (24l)
Round 8 :
3sc, [inc]x18, 3sc (42l)
Round 9 :
18sc, 4dc in the next loop, [dec]x4, 4dc in the next loop, 14sc (44l)
Round 10 :
19sc, [2dc in the next loop]x2, sc, 4 sl st, sc, [2dc in the next loop]x2, 15sc (48l)
Round 11-13 :
24sc, 4 sl st, 20sc (48l)
Round 14 :
18sc, [dec]x3, 4sc, [dec]x3, 14sc (42l)
Round 16 :
[5sc, dec]x6 (36l)
Round 17 :
[4sc, dec]x6 (30l)
Round 18 :
[3sc, dec]x6 (24l)
Info :
Insert safety eyes between rounds 7 and 8, approximately 10 stitches apart, don't fix yet
Info :
Embroider black pupil using loose stitch technique with black embroidery floss, create oval shape with two stitches
Info :
Add white highlight below eye using loose stitch with white embroidery floss, then secure safety eyes
Info :
Embroider nostrils and mouth with black embroidery floss (divided in half)
Info :
Embroider 6 teeth (3 on each side) with white embroidery floss in triangle shapes
Info :
Squeeze eyebrows to head with a few stitches, then embroider eyebrows with black floss segments approximately 0.5 cm long
Info :
Start stuffing the head with synthepus and continue crocheting
Info :
Insert cotter pin into shim, place cotter pin between rounds 14 and 15 at bottom of head
Round 21 :
[2sc, dec]x6 (18l)
Round 22 :
[sc, dec]x6 (12l)
Info :
Completely fill the head
Info :
Trim thread, pass through all loops using yarn needle, tighten and secure
— CHEEKS (Pink embroidery floss, make 2) :
Info :
Crochet cheeks with 1.5 mm hook
Round 1 :
2 loops, 6sc in 2nd loop from hook (amigurumi ring), sl st in 1st sc (6l)
Info :
Cut and fix thread leaving long end for sewing, sew cheeks to head with wrong side outward
— CREST on the head (Green embroidery floss) :
Info :
Crochet crest with 1.5 mm hook
Round 1 :
27 loops, turning, sl st (starting from 2nd loop from hook), [sl st; crochet in one loop {sl st, dc, sl st}; sl st]x8, sl st
Info :
Cut and fix thread leaving very long end for sewing, sew crest to head pre-fixing with needles for perfect symmetry
— NECK and BODY :
Round 1 (Yarn A) :
2 loops, 8sc in 2nd loop from hook (amigurumi ring) (8l)
Info :
Begin jacquard technique: crochet with Yarn A and Yarn B alternately without cutting threads to create white breast
Info :
Color changing: when crocheting last green sc, insert hook into loop, pull thread, finish sc with white thread
Round 3 :
[3sc, inc]x2 (Yarn B); [3sc, inc]x2 (Yarn A) (20l)
Round 4 :
Only through back loops: 10sc (Yarn B); 10sc (Yarn A) (20l)
Round 5 :
[4sc, inc]x2 (Yarn B); [4sc, inc]x2 (Yarn A) (24l)
Info :
Insert cotter pin in middle of neck, put disk on cotter pin and wrap ends in rings with round-nosed pliers
Round 6 :
12sc (Yarn B); 6sc, 4 loops, turning, 3sc starting from 2nd loop from hook, sl st in same loop, 6sc (Yarn A) (30l)
Round 7 :
12sc (Yarn B); 9sc, 4 loops, turning, 3sc starting from 2nd loop from hook, sl st in same loop, 9sc (Yarn A) (36l)
Round 8 :
[5sc, inc]x2 (Yarn B); [5sc, inc]x4 (Yarn A) (42l)
Round 9 :
14sc (Yarn B); [6sc, inc]x2, 4 loops, turning, 3sc starting from 2nd loop from hook, sl st in same loop, [6sc, inc]x2 (Yarn A) (52l)
Round 10 :
14sc (Yarn B); [7sc, inc]x2, 6sc, [7sc, inc]x2 (Yarn A) (56l)
Round 11 :
14sc (Yarn B); 21sc, 4 loops, turning, 3sc starting from 2nd loop from hook, sl st in same loop, 21sc (Yarn A) (62l)
Round 12 :
14sc (Yarn B); 24sc, 4 loops, turning, 3sc starting from 2nd loop from hook, sl st in same loop, 24sc (Yarn A) (68l)
Info :
Don't cut thread, take another end of yarn ball and crochet the tail
— TAIL (Yarn A) :
Round 1 :
2 loops, 4sc in 2nd loop from hook (amigurumi ring) (4l)
Round 2 :
[inc]x2, dec (5l)
Round 3 :
sc, [inc]x2, dec (6l)
Round 4 :
sc, [inc]x2, sc, dec (7l)
Round 5 :
sc, [inc]x3, sc, dec (9l)
Round 6 :
2sc, inc, sc, inc, 2sc, dec (10l)
Round 8 :
3sc, [inc]x3, 2sc, dec (12l)
Round 10 :
3sc, [inc]x5, 2sc, dec (16l)
Round 12 :
dec, 4sc, [inc]x4, 4sc, dec (18l)
Round 14 :
dec, 5sc, [inc]x4, 5sc, dec (20l)
Info :
Cut and fix thread, stuff tail with synthepus, mark with pin where tail connects to back (12th loop from beginning)
Info :
Connect body with tail: insert hook into tail (inside to outside), then into body (outside to inside)
Round 13 (incomplete) :
14sc (Yarn B); crochet 26sc along body, crochet 2sc of body together with 2sc of tail, then 26sc along body (Yarn A)
Round 14 :
15sc (Yarn B); crochet 25sc on body, 18sc on tail, 26sc on body (Yarn A) (84l)
Info :
Sew holes between body and tail using extra thread
Round 15 :
15sc (Yarn B); 19sc, [dec]x3, 18sc, [dec]x3, 20sc (Yarn A) (78l)
Round 16 :
16sc (Yarn B); 15sc, [dec]x3, 18sc, [dec]x3, 17sc (Yarn A) (72l)
Round 17 :
16sc (Yarn B); 12sc, [dec]x3, 18sc, [dec]x3, 14sc (Yarn A) (66l)
Round 18 :
17sc (Yarn B); 14sc, [sc, dec]x6, 17sc (Yarn A) (60l)
Round 19 :
17sc (Yarn B); 14sc, [dec]x6, 17sc (Yarn A) (54l)
Info :
Cut Yarn A and continue crocheting with Yarn B only, start stuffing body with synthepus
Round 20 :
[7sc, dec]x6 (48l)
Round 21 :
[6sc, dec]x6 (42l)
Round 22 :
[5sc, dec]x6 (36l)
Round 23 :
[4sc, dec]x6 (30l)
Round 24 :
[3sc, dec]x6 (24l)
Info :
Continue stuffing body
Round 25 :
[2sc, dec]x6 (18l)
Round 26 :
[sc, dec]x6 (12l)
Info :
Completely fill body, optional: cut white felt circle slightly larger than hole and insert to prevent stuffing from catching on hook
Info :
Trim thread, pass through all loops using yarn needle, tighten and secure
— LEGS (Yarn A, make 2) :
Round 1 :
9 loops, turning, 8 sl st (starting from 2nd loop from hook), 8 sl st (from back of chain) (16l)
Round 2 :
[7sc, inc]x2 (18l)
Round 7 :
3sc, dec, 8sc, dec, 3sc (16l)
Round 8 :
3sc, dec, 6sc, dec, 3sc (14l)
Round 9 :
2sc, dec, 6sc, dec, 2sc (12l)
Info :
Start stuffing leg with synthepus
Round 12 :
sc, [dec]x2, 2sc, [dec]x2, sc (8l)
Round 13 :
sc, dec, 2sc, dec, sc (6l)
Info :
Completely fill leg, don't stuff further
Round 14 :
6sc only through back loops (6l)
Round 15 :
4sc, [inc]x2 (8l)
Round 16 :
4sc, [inc]x4 (12l)
Round 18 :
7sc, [inc]x4, sc (16l)
Info :
Change to Yarn B (leave long end of Yarn A), remove beginning marker, fold 16 loops in half
Round 20 :
1 loop, turning, 8 sl st crocheting both halves together (8l)
Round 21 :
1 loop, turning, [bobble, sl st]x2, bobble
Info :
Bobble stitch: yo, insert hook in loop, pull thread (3 loops on hook), crochet first 2 loops, repeat in next loop, crochet all 3 loops together, then crochet 3 loops and sl st in same loop
Info :
Squeeze foot to leg with few stitches using left Yarn A thread
— HANDS (Yarn A, make 2) :
Round 1 :
2 loops, 6sc in 2nd loop from hook (amigurumi ring) (6l)
Round 2 :
[inc, sc]x3 (9l)
Round 4 :
[inc]x3, [dec]x3 (9l)
Round 6 :
[dec]x3, [inc]x3 (9l)
Info :
Stuff hand with synthepus
Round 7 :
[sc, dec]x3 (6l)
Info :
Change to Yarn B, cut Yarn A, remove beginning marker, fold 6 loops in half
Round 8 :
1 loop, turning, 3 sl st crocheting both halves together (3l)
Round 9 :
1 loop, turning, crochet in 1 loop {sc, 2 loops, sl st}; sl st; crochet in 1 loop {sc, 2 loops, sl st}
— CREST on the body (Green embroidery floss) :
Info :
Crochet crest with 1.5 mm hook
Round 1 :
45 loops, turning, sl st (starting from 2nd loop from hook), [sl st; crochet in one loop {sl st, dc, sl st}; sl st]x14, sl st
Info :
Cut and fix thread leaving very long end for sewing, sew crest to body pre-fixing with needles for perfect symmetry
— SPOTS (Green embroidery floss) :
Info :
Crochet spots with 1.5 mm hook
SMALL (make 8) :
3 loops, turning, 2sc (starting from 2nd loop from hook), 2sc (from back of chain) sl st in 1st sc (4l)
MIDDLE (make 6) :
4 loops, turning, 3sc (starting from 2nd loop from hook), 3sc (from back of chain) sl st in 1st sc (6l)
BIG (make 4) :
5 loops, turning, 4sc (starting from 2nd loop from hook), 4sc (from back of chain) sl st in 1st sc (8l)
Info :
Cut and fix threads leaving long ends for sewing, sew spots on hands, legs, back and tail
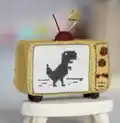
— BONUS TV SET :
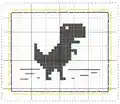
— TV Screen Embroidery :
Info :
Divide grey embroidery floss in half, embroider dinosaur with cross-stitch using pattern provided
Info :
Embroider frame with grey floss using back needle seam, step back 1 cell and embroider frame with yellow yarn
Info :
Cut out embroidery leaving free space on sides
— SIDE PANEL (Yellow yarn) :
Info :
Crochet panel with 1.75 mm hook, leave long end at beginning for sewing
Round 1 :
15 loops, turning, 14sc (starting from 2nd loop from hook) (14l)
Round 2-6 :
1 loop, turning, 14sc (14l)
Info :
Don't cut thread, sew side panel and screen together using left thread end
Round 7 :
Crochet around side panel with screen counter-clockwise: 6sc, 19sc straight, 14sc down, 19sc, 6sc straight, 14sc up (78l)
Info :
Don't cut thread, decorate side panel
— BIG BUTTONS (Brown embroidery floss, make 2) :
Info :
Crochet buttons with 1.5 mm hook
Round 1 :
2 loops, 6sc in 2nd loop from hook (amigurumi ring), sl st in 1st sc (6l)
Info :
Cut and fix thread leaving long end, sew buttons to panel with wrong side outward
Info :
Embroider 3 little buttons with French knots, divide grey floss in half and embroider diagonal lines on buttons
Info :
Embroider frame with back needle seam, continue crocheting
Round 8 :
78sc only through back loops (78l)
Info :
Cut and fix thread, cut styrofoam same size as TV (approximately 7.5 x 4.2 x 3 cm) and place inside
— BACK PANEL (Yellow yarn) :
Round 1 :
15 loops, turning, 14sc (starting from 2nd loop from hook) (14l)
Round 2-25 :
1 loop, turning, 14sc (14l)
Info :
Cut and fix thread leaving very long end for sewing, sew panel to TV set
— ANTENNA (Brown embroidery floss) :
Info :
Crochet antenna with 1.5 mm hook
Round 1 :
2 loops, 6sc in 2nd loop from hook (amigurumi ring) (6l)
Round 3 :
[sc, inc]x6 (18l)
Info :
Cut and fix thread leaving long end, cut 10 cm wire and insert into antenna, twist wire from wrong side
Info :
Bend right antenna into lightning bolt shape, cut excess wire, sew antenna to TV set
— FEET (Grey embroidery floss, make 4) :
Info :
Crochet feet with 1.5 mm hook
Round 1 :
2 loops, 6sc in 2nd loop from hook (amigurumi ring) (6l)
Round 2 :
8sc only through back loops (8l)
Info :
Cut and fix thread leaving long end for sewing, sew feet to TV set
This charming Tyrannosaurus Oliver pattern combines advanced amigurumi techniques with intricate embroidery details to create a truly special handmade treasure. From the movable cotter pin head joint to the jacquard color-changing technique for the white belly, every element has been thoughtfully designed. The bonus retro TV set adds a whimsical touch that makes this pattern extra special—it's not just a toy, it's a complete scene! Perfect for challenging yourself with new skills while creating an adorable prehistoric companion. Get ready to bring Oliver to life! 🦖📺🧶