🧶 Beautiful ✨ Detailed 💝 Adorable

The Carissa Blanket Crochet Pattern

The Carissa Blanket Crochet Pattern
4.7★ Rating
10-12 Hours Time Needed
2.4K Made This
✂️

Beginner Friendly Level

Perfect for those just starting their sewing journey, with clear instructions and simple techniques

⏱️

Slow & Steady

A 10-12 hour project—great for savoring the process over several sessions.

🏡

Cozy Accent

A warm touch for your space that transforms ordinary corners into inviting nooks filled with handmade charm.

About This The Carissa Blanket Crochet Pattern

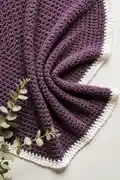
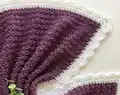
The Carissa Blanket is a delightful beginner-friendly pattern that teaches you the beautiful Suzette stitch technique. This pattern creates a textured, elegant blanket measuring 26.5 by 37 inches, perfect for babies or as a lap blanket. The design features a stunning shell stitch border that adds a professional, finished look to your handmade creation. With simple row repeats and clear instructions, you'll build confidence while creating something truly special.

The Carissa Blanket Crochet Pattern crochet pattern - detailed view of completed project

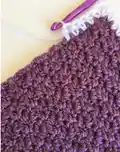
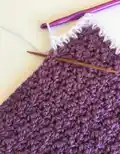
This pattern includes helpful visual guides for stitch placement and detailed notes for working the decorative border. The chunky weight yarn makes this project work up quickly, keeping you motivated from start to finish.

Why You'll Love This The Carissa Blanket Crochet Pattern

I absolutely love this pattern because it strikes the perfect balance between simplicity and elegance. The repetitive nature of the Suzette stitch makes it incredibly relaxing to work on—you can easily crochet while watching your favorite shows or chatting with friends. What really makes this pattern special is how the simple stitch pattern transforms into such a beautiful, textured fabric. The shell stitch border adds that extra touch of sophistication that makes it look like you spent far more effort than you actually did. I also appreciate how forgiving chunky yarn is for beginners, and the fact that you can easily customize the size by adjusting your starting chain makes this pattern versatile for any project you have in mind.

The Carissa Blanket Crochet Pattern step 1 - construction progress The Carissa Blanket Crochet Pattern step 2 - assembly progress The Carissa Blanket Crochet Pattern step 3 - details and accessories The Carissa Blanket Crochet Pattern step 4 - final assembly and finishing

Switch Things Up

I love experimenting with color combinations when making the Carissa Blanket! While the pattern shows a classic plum and white combo, I've found that soft pastels like mint green with cream or dusty rose with ivory create gorgeous baby blankets. For a more modern look, try charcoal gray with mustard yellow, or navy blue with coral.

You can also play with the border color to create different effects—a contrasting bright border makes the blanket pop, while a tonal border gives it a subtle, elegant finish. I've even made versions using variegated yarn for the main body, which creates beautiful color shifts throughout without any extra effort.

If you want to add extra texture, consider working some rows in back loop only during the main blanket body. This creates subtle ribbing that looks fantastic! Another fun variation is to make the blanket in stripes by changing colors every 6-8 rows—just make sure to carry your yarn up the side rather than cutting and rejoining.

For a completely different look, try using cotton yarn instead of acrylic or wool. Cotton creates a drapier, more breathable blanket that's perfect for warmer climates or summer babies. Just remember that cotton has less stretch, so maintain consistent tension throughout your work.

Common Mistakes & How to Fix Them

✗ Forgetting to count your starting chain correctly - always double-check you have the right multiple of stitches plus one before beginning ✗ Missing the chain 1 turn at the end of rows which counts as a stitch throughout the pattern ✗ Placing half double crochet stitches incorrectly along the sides during border rounds - refer to the placement photos provided ✗ Not working enough stitches into corner spaces during the border, resulting in blanket edges that curl or pucker instead of lying flat

The Carissa Blanket Crochet Pattern

Create a beautiful and cozy blanket with the Carissa pattern, designed specifically for beginners who want to practice their crochet skills. This charming blanket combines the elegant Suzette stitch with a decorative shell stitch border, resulting in a timeless piece perfect for baby showers, nursery décor, or as a thoughtful handmade gift. The pattern uses chunky weight yarn for quick progress and includes detailed instructions for achieving a professional-looking finish. With clear step-by-step guidance and helpful placement photos, you'll enjoy every moment of bringing this lovely blanket to life.

Beginner Friendly 10-12 Hours

Materials Needed for The Carissa Blanket Crochet Pattern

— Main Fabric

  • 01
    200 grams (334 yards/304 metres) of Chunky weight yarn for main blanket
  • 02
    100 grams (149 yards/136 metres) of Chunky weight yarn for border
  • 03
    King Cole Value Chunky in shade Plum recommended for main color
  • 04
    Paintbox Simply Chunky in shade Paper White recommended for border color

— Tools Required

  • 01
    8mm crochet hook
  • 02
    Scissors
  • 03
    Darning needle for weaving in ends
  • 04
    Stitch markers (optional but helpful)

Progress Tracker

0% Complete

— Main Blanket Body :

Starting Chain :

With 8mm hook CH 52+1 (53)

Row 1 :

SC into the second CH from the hook, DC into the same CH, SK 1 CH, *SC,DC into the next CH, SK 1 CH. Repeat from * until you have 1 CH remaining, 1 SC into this CH, CH 1 and turn work

Row 2 :

SK 1 ST, SC,DC into the next ST, SK the next ST, *SC,DC into the next ST, SK the next ST. Repeat from * until you have 1 ST remaining, SC into the last remaining ST, CH 1 and turn work

Rows 3-69 :

Repeat Row 2

Info :

After row 69 FO and sew in your ends

— Border :

Info :

Attach border color to top right corner with right side facing you (short side of blanket where you fastened off)

Round 1 :

CH 4 (counts as HDC and CH 2), HDC into the same space, *HDC into each ST until you reach the second corner, HDC, CH 2, HDC into the corner ST. Working along the first long side, HDC into each CH 1 post and SC post of each row until you reach the third corner, HDC, CH 2, HDC. Working the second short side repeat from * until you have reached the CH 4 from the beginning, SS into top of the 2nd CH (246 HDC total around blanket including corners)

Round 2 :

CH 2, HDC, CH 2, HDC into the CH 2 space creating your first corner, *HDC into every ST until you reach the second corner, HDC, CH 2, HDC into the CH 2 space. Repeat from * until you reach the CH 2 at the beginning, SS into the top of the CH 2 (256 HDC total around blanket including corners)

Round 3 :

CH 1 (does not count as ST), SK a ST, 8 DC into the 2 CH corner space, *SK a ST, SC into the next ST, SK a ST, 5 DC into the next ST. Repeat from * until you have 3 STs remaining before the corner, SK a ST, SC into the next ST, SK a ST, 8 DC into the CH 2 corner space (13 scallops between corners). Repeat from * until you have 3 STs remaining before the corner, SK a ST, SC into the next ST, SK a ST, 8 DC into the CH 2 corner space (17 scallops between corners). Repeat from * until you have 3 STs remaining before the corner, SK a ST, SC into the next ST, SK a ST, 8 DC into the CH 2 corner space (13 scallops between corners). Repeat from * until you have 1 ST remaining and your starting CH 1, SC into the base of the CH 1, SS to the CH 1 and FO (17 scallops between final corners)

Finishing :

Sew in all remaining ends and your blanket is complete

Assembly Instructions

  • After completing Row 69, fasten off and weave in the yarn ends from the main blanket body securely
  • Attach your border color yarn to the top right corner of the blanket with the right side facing you
  • When working Round 1 of the border, pay special attention to stitch placement along the long sides, placing HDC into each chain 1 post and single crochet post
  • Take extra care when working into the foundation chain on the second short side, ensuring you place HDC stitches into the skipped chains
  • Work the shell stitch border in Round 3 carefully, counting scallops between corners to ensure even distribution (13 scallops on short sides, 17 on long sides)
  • Fasten off after completing all border rounds and weave in all remaining ends on the wrong side of the blanket
  • Block the finished blanket gently if desired to help the shell stitch border lay flat and showcase the stitch definition

Important Notes

  • 💡The chain 1 at the beginning of each row counts as a stitch throughout the main blanket body
  • 💡You can easily adjust the blanket size by changing your starting chain in multiples of 2+1
  • 💡Using different yarn weights will change both the finished size and the amount of yarn required
  • 💡Refer to the placement photos provided in the pattern for correct stitch placement during border rounds
  • 💡Make sure to work 8 double crochet stitches into corner spaces (not 5) for proper corner shaping
  • 💡Count your half double crochet stitches after Round 1 and Round 2 of the border to ensure accuracy

The Carissa Blanket pattern is a wonderful beginner-friendly project that teaches essential crochet techniques while creating a beautiful, functional piece. The combination of the textured Suzette stitch and elegant shell stitch border results in a blanket that looks impressive but is surprisingly simple to make. Whether you're making it as a baby gift, nursery décor, or just want a cozy lap blanket for yourself, this pattern will guide you through every step with clear instructions and helpful photos. Get ready to fall in love with the rhythmic, relaxing nature of this pattern! 🧶✨

You ask,

we answer.

FAQs

Can I make this blanket larger or smaller than the pattern size?

Yes! Simply adjust your starting chain using multiples of 2+1. For example, for a larger blanket, chain 72+1 (73) or 92+1 (93). Remember that changing the size will also change the amount of yarn needed.

What if I want to use a different weight of yarn?

You can absolutely use different yarn weights, but this will change your finished blanket size and yarn requirements. Use the appropriate hook size for your chosen yarn weight and work a gauge swatch first to estimate your final dimensions.

How do I know where to place my stitches along the sides during the border?

The pattern includes helpful placement photos showing exactly where to work your half double crochet stitches. On the long sides, work into each chain 1 post and single crochet post from the rows. On the foundation chain side, make sure to work into the skipped chains as well.

Why does my border curl instead of lying flat?

This usually happens when not enough stitches are worked into the corner spaces. Make sure you're working 8 double crochet stitches into each corner space as specified in Round 3, not just 5 like in the regular shell stitches.

Can I use the same color for both the blanket body and border?

Absolutely! A single-color blanket looks beautiful too. You'll need approximately 300 grams (483 yards/441 metres) of chunky weight yarn total for a same-color version.