🧶 Beautiful ✨ Detailed 💝 Adorable

Granny Square Clutch Pattern

Granny Square Clutch Pattern
4.2★ Rating
4-6 Hours Time Needed
3.1K Made This
✂️

Intermediate Level

Ideal for those with basic knitting experience, featuring slightly more advanced stitches and techniques to expand your skills.

⏱️

Weekend Treat

Takes 5-7 hours, making it an enjoyable project to finish over a couple of days.

Stylish Touch

An elegant detail to elevate any look, combining traditional techniques with contemporary design sensibilities.

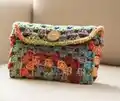
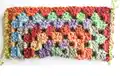
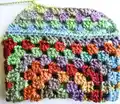
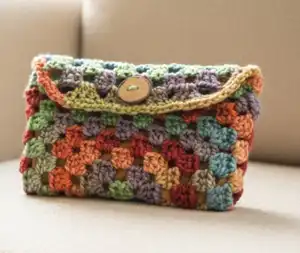
About This Granny Square Clutch Pattern

Granny Square Clutch Pattern crochet pattern - detailed view of completed project

The optional fabric lining instructions ensure your clutch is practical for carrying small items like phones, cards, and cosmetics. With clear round-by-round guidance and helpful visual cues, you'll create a polished accessory that showcases your crochet skills beautifully.

Why You'll Love This Granny Square Clutch Pattern

I absolutely love this pattern because it takes something as simple as a granny square and transforms it into a genuinely useful accessory. The beauty lies in its versatility—you can customize the size to fit your needs, choose any color combination that matches your style, and the button closure is brilliantly simple yet elegant. I appreciate how the pattern thoughtfully includes both the basic clutch instructions and optional lining guidance, giving you the flexibility to make it as simple or refined as you want. The fact that you don't need to create a buttonhole is genius—using the natural spaces in the granny square keeps the design clean and authentic.

Granny Square Clutch Pattern step 1 - construction progress Granny Square Clutch Pattern step 2 - assembly progress Granny Square Clutch Pattern step 3 - details and accessories Granny Square Clutch Pattern step 4 - final assembly and finishing

Switch Things Up

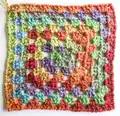
I love how adaptable this granny square clutch pattern truly is—it's like having a blank canvas for your creativity! Try experimenting with different color combinations to match your personal style or create seasonal variations. A monochromatic palette gives an elegant sophisticated look, while bright contrasting colors make a bold festival-ready statement.

Consider using variegated or self-striping yarn for an entirely different effect without any color changes. You could also add embellishments like beads, sequins, or embroidered details to the flap for extra personality. For a boho vibe, attach tassels or fringe to the bottom edge.

If you're feeling adventurous, try working the granny square in different stitch patterns—puff stitches, popcorn stitches, or even a solid granny square variation. You might also explore adding a detachable chain strap to convert your clutch into a crossbody bag for hands-free convenience. The button choice alone can dramatically change the look—try vintage buttons, wooden toggles, or decorative shank buttons. Don't be afraid to make this pattern your own!

Common Mistakes & How to Fix Them

✗ Forgetting to maintain consistent tension throughout rounds can result in an uneven or warped granny square that won't fold properly into a clutch shape ✗ Skipping the step to fold the square with good side in before seaming will leave your seams visible on the outside of the finished clutch ✗ Not counting stitches carefully at corners can throw off the entire square structure causing it to not lie flat or fold correctly ✗ Pulling slip stitches too tightly when joining the sides together can create puckering and distort the shape of your finished clutch

Granny Square Clutch Pattern

Create your own stylish granny square clutch perfect for concerts, festivals, or everyday use. This charming accessory combines classic granny square techniques with modern functionality, resulting in a beautiful handmade clutch that measures approximately 9 inches wide by 5 inches tall. Using bulky yarn and a simple granny square foundation, you'll craft a versatile piece that's both practical and eye-catching. Optional fabric lining ensures your small items stay secure while adding a professional finish to your handmade creation.

Intermediate 4-6 Hours

Materials Needed for Granny Square Clutch Pattern

— Main Fabric

  • 01
    Bulky weight yarn in your choice of color
  • 02
    Sutton by Fair Isle in the color Gummi Bear (or similar bulky yarn)

— Tools Required

  • 01
    Crochet hook J/10 - 6mm
  • 02
    One button suitable for granny square gaps
  • 03
    Tapestry needle
  • 04
    Scissors
  • 05
    Fabric for lining (optional)
  • 06
    Sewing needle (optional)
  • 07
    Sewing thread in matching color (optional)

Progress Tracker

0% Complete

— Granny Square

Info :

Create a magic ring or adjustable ring

Round 1 :

Ch 3, 2 dc + ch 2 + 3 dc + ch 2 + 3 dc + ch 2 + 3 dc + ch 2. Join round with a sl st

Round 2 :

Ch 3, 2 dc into the same place you chained 3 + [ch 1 + (3 dc + ch 2 + 3 dc) into the ch 2 space from the previous round] repeat 3 times + ch 1 + 3 dc into the last ch-2 space from the previous round + ch 2. Join with a sl st

Round 3 :

Ch 3, 2 dc into the same place you chained 3 + ch 1. Crochet 3 dc into each ch-1 space from the previous round, followed by a ch 1, and (3dc + ch 2 + 3 dc + ch 1) into each corner (a total of 3 times), 3 dc + ch 2 into the last space. Join round with a sl st

Round 4 to 7 :

You can make the granny square as big as you wish, I made mine 7 rounds big. Crochet 3 dc into each ch-1 space, separate the 3-dc clusters with a chain 1 (unless you are working a corner), crochet [3 dc + ch 2 + 3 dc] into each corner. The chain 2 is what creates the corners and makes granny square

Info :

Once you reach the desired size fold the granny square in half (good side in). Slip stitch or sew the shorter sides of the clutch together. Finish off. Weave in ends. Turn clutch inside out

— Clutch Body

Round 8 :

For this round, we are going to crochet [3 dc + ch 1] into each ch-1 space from the round below. Start the round with a ch 3 and dc into the same space, ch 1, [3 dc into the next space, ch 1]. Repeat until you reach the corner/seam. Crochet 1 dc into the next 3 stitches, ch 1, [3 dc + ch 1] repeat until the end of the round. Finish round with a dc. Join with a sl st

Round 9 :

Ch 1, sc into each stitch. Join round with a slip stitch. Do not finish off

— Flap

Row 1 :

Slip stitch into the next stitch, ch 3 + dc into the next 2 stitches + ch 1 + 3 dc into the gap from the round below + ch 1. Continue crocheting 3-dc clusters + ch 1 (in my case a total of 7 times) until you reach the end of the row. Double crochet into the last 3 stitches

Row 2 :

Ch 4, turn, [3 dc + ch 1] repeat 5 times, 3 dc, trc into the beginning of row 1

Row 3 :

Ch 4, turn, [3 dc + ch 1] repeat 4 times, 3 dc, trc into the beginning of row 2

Row 4 :

Ch 4, turn, [3 dc + ch 1] repeat 3 times, 3 dc, trc into the beginning of row 3

Row 5 (Optional) :

Single crochet all around the clutch opening and flap. Finish off. Weave in ends

Info :

With yarn and a tapestry needle sew on a button. You don't need to create a hole for the button. Choose a button size that fits the space between the 3-dc clusters

— Lining (Optional)

Step 1 :

Fold a piece of fabric in half (good side in), measure and cut a piece as big as your finished clutch. Sew the shorter sides of the fabric by hand or using a sewing machine

Step 2 :

Fold over and sew the top edge (opening) to give the lining a finished look

Step 3 :

Insert the lining inside of the clutch. Sew the top edge of the lining onto the bag using an invisible stitch

Assembly Instructions

  • Fold your completed granny square in half with the good side facing inward before beginning any seaming work
  • Use slip stitch or hand sewing to join the two shorter sides of the folded square creating the clutch pouch
  • Weave in all yarn ends securely before turning the clutch right side out to ensure a clean finish
  • Work Round 8 carefully around the opening paying special attention to the edges and folds where the construction differs slightly
  • Complete the flap rows ensuring consistent tension to maintain the decorative pattern that gradually decreases in width
  • Sew your chosen button securely to the clutch body positioning it to align naturally with the gaps in the flap stitches
  • If adding lining insert it carefully and use invisible stitches to attach it to the inside opening for a professional look

Important Notes

  • 💡Gauge is important for this project as it affects the final size of your clutch so make a test swatch if size matters
  • 💡The edges and folds are worked differently in Round 8 so pay close attention to the instructions and reference images provided
  • 💡Choose a button that fits comfortably through the natural gaps between your 3-dc clusters to avoid creating buttonholes
  • 💡You can customize the size by working more or fewer rounds in your initial granny square foundation
  • 💡Adding fabric lining is optional but highly recommended if you plan to carry small items like phones or cosmetics
  • 💡Working the optional Row 5 single crochet border around the opening and flap gives a more polished professional finish

This charming granny square clutch pattern brings together timeless crochet techniques with modern functionality. Perfect for crafters who love transforming classic motifs into wearable accessories, this design celebrates the versatility of the beloved granny square. The clever construction method and optional lining instructions ensure you create a practical piece that's as useful as it is beautiful. Whether you're heading to a festival or just want a handmade accent for everyday outings, this clutch delivers style and substance. Happy crocheting and enjoy showing off your beautiful handmade creation!

You ask,

we answer.

FAQs

Can I use a different weight of yarn for this clutch?

Yes, you can use any weight of yarn, but keep in mind that your finished clutch size will vary. Use a hook size appropriate for your chosen yarn weight and adjust the number of rounds to achieve your desired clutch dimensions.

How do I make my clutch bigger or smaller?

Simply work more rounds for a larger clutch or fewer rounds for a smaller one. The pattern is designed to be flexible—just continue the granny square pattern until you reach your preferred size before folding and seaming.

Do I really not need to make a buttonhole?

Correct! The natural gaps between the 3-dc clusters in your granny square work perfectly as buttonholes. Just choose a button size that fits comfortably through these spaces for a seamless closure.

Is the fabric lining difficult to add?

Not at all! The lining is optional but adds a professional finish. Basic hand sewing skills are all you need. Simply cut fabric to match your clutch size, sew the sides, and attach it to the inside opening with invisible stitches.

What if my granny square isn't perfectly square?

Check that you're maintaining consistent tension and placing the correct number of stitches in each corner (3 dc + ch 2 + 3 dc). Blocking your finished square before assembly can also help even out any irregularities.