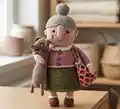
Create an adorable grandma amigurumi complete with her sweet dachshund companion and charming accessories! This delightful crochet pattern brings to life a lovable grandmother character standing 21 cm tall, dressed in a cozy cardigan, green skirt, and white collar. She comes with her faithful little dachshund friend tucked under her arm and a decorative bag filled with tiny tangerines on her shoulder. Perfect for gift-giving or as a special handmade treasure, this pattern combines multiple techniques to create a character full of personality and warmth.
Progress Tracker
0% Complete
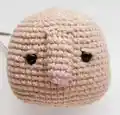
— Head :
Round 1 :
ch 12, from second ch from hook 10 sc, 3 sc into 1 ch, continue along second side of chain 9 sc, inc (24)
Round 2 :
inc, 9 sc, 3 inc, 9 sc, 2 inc (30)
Round 3 :
1 sc, inc, 9 sc, (1 sc, inc) x 3, 9 sc, (1 sc, inc) x 2 (36)
Round 4 :
(5 sc, inc) x 6 (42)
Round 5 :
(6 sc, inc) x 6 (48)
Info :
Insert safety eyes between rounds 12 and 13, with 9 stitches distance between them
Round 18 :
(6 sc, dec) x 6 (42)
Info :
Stuff the piece firmly as you go
Round 19 :
(5 sc, dec) x 6 (36)
Round 20 :
(4 sc, dec) x 6 (30)
Round 21 :
(3 sc, dec) x 6 (24)
Round 22 :
(2 sc, dec) x 6 (18)
Round 23 :
(1 sc, dec) x 6 (12)
Info :
Cut thread, fasten off, pull opening closed using front loops only, weave in end
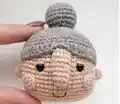
— Hair :
Round 3 :
(1 sc, inc) x 6 (18)
Round 4 :
(2 sc, inc) x 6 (24)
Round 5 :
(3 sc, inc) x 6 (30)
Round 6 :
(4 sc, inc) x 6 (36)
Round 7 :
(5 sc, inc) x 6 (42)
Round 8 :
(6 sc, inc) x 6 (48)
Round 9 :
(7 sc, inc) x 6 (54)
Round 13 :
ch 1, 14 dc, 1 hdc, 1 sc, 1 hdc, 10 dc, 1 hdc, 2 sl st, 1 hdc, 10 dc, 1 hdc, 1 sc, 1 hdc, 10 dc, sl st (54)
Info :
Fasten off, leaving long tail for sewing. The 2 sl st section will be positioned above the nose
— Bun :
Round 3 :
(1 sc, inc) x 6 (18)
Round 4 :
(2 sc, inc) x 6 (24)
Round 8 :
(2 sc, dec) x 6 (18)
Round 9 :
(1 sc, dec) x 6 (12)
Info :
Stuff firmly, fasten off leaving long tail for sewing
— Nose :
Round 1 :
6 sc in MR, sl st
Info :
Fasten off leaving long tail for sewing
— Cheeks (Make 2) :
Info :
Pull opening closed, fasten off leaving long tail for sewing
— Ears (Make 2) :
Round 1 :
In powder color: 8 sc in MR
Round 3-7 :
Change to beige: 8 sc
Info :
Don't stuff. Fold in half and work 4 sc through both layers, fasten off leaving long tail
— Arms (Make 2) :
Round 1 :
In beige: 6 sc in MR
Round 2 :
(1 sc, inc) x 3 (9)
Round 4 :
4 sc, puff stitch consisting of three dc, 4 sc (9)
Info :
Stuff hand slightly, don't stuff rest of arm
Round 6 :
Change to blueberry, into back loops only: 9 sc
Info :
Fasten off, cut thread, weave in end
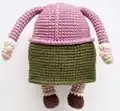
— Legs and Body :
Leg Round 1 :
In brown: ch 6, from second ch from hook 4 sc, 3 sc into 1 ch, continue along second side 3 sc, inc (12)
Round 2 :
inc, 3 sc, 3 inc, 3 sc, 2 inc (18)
Round 3 :
Into back loops only: 18 sc
Info :
Cut cardboard or plastic oval shapes to fit sole, insert into boot
Round 6 :
3 sc, 6 dec, 3 sc (12)
Round 7 :
Change to beige, into back loops only: 12 sc
Info :
Stuff firmly as you go
Round 16 :
Change to white: (3 sc, inc) x 3 (15)
Round 17 (First Leg) :
13 sc (leave 2 stitches unworked so toes face forward)
Info :
Fasten off first leg leaving long tail. For second leg, work Round 17 as: 15 sc + 6 sc additional, don't cut thread
Body Round 1 :
Ch 9, join with first leg: 15 sc across first leg, 9 sc along chain, 15 sc across second leg, 9 sc along second side of chain (48)
Round 2 :
(7 sc, inc) x 6 (54)
Round 4 :
(8 sc, inc) x 6 (60)
Round 11 :
Change to green: 60 sc
Round 12 :
Change to blueberry, into back loops only: 60 sc
Round 19 :
(8 sc, dec) x 6 (54)
Round 21 :
(7 sc, dec) x 6 (48)
Round 23 :
(6 sc, dec) x 6 (42)
Round 24 :
6 sc, 4 sc together with first arm, 16 sc, 4 sc together with second arm, 12 sc (42)
Round 25 :
6 sc, across arm stitches: 2 sc, dec, 1 sc, 16 sc across body, across second arm: 1 sc, dec, 2 sc, 12 sc across body (42)
Info :
Insert wire frame: cut two 17-18cm wire pieces, wrap one end with adhesive tape, insert into arms with wrapped end inside hand, twist other ends together, wrap with tape, bend into body
Round 26 :
(5 sc, dec) x 6 (36)
Round 27 :
(4 sc, dec) x 6 (30)
Round 28 :
(3 sc, dec) x 6 (24)
Round 29 :
(2 sc, dec) x 6 (18)
Round 30 :
(1 sc, dec) x 6 (12)
Info :
Fasten off, pull opening closed, weave in end
— Sock Details :
Info :
In white, crochet 12 sc into free front loops of leg Round 7, fasten off and weave in ends
— Arm Cuffs :
Info :
In white, work 9 dc into free front loops of arm Round 6, fasten off and weave in ends
— Skirt :
Info :
Hold toy with legs facing up, in green color work into free front loops of body Round 12
Round 1 :
(9 sc, inc) x 6 (66)
Info :
Crochet 1 sl st, fasten off, weave in end on wrong side
— Cardigan Details :
Vertical Chain :
Mark vertical line slightly left of center, insert hook under stitch of first round, pull up loop and crochet chain of sl st upward, inserting hook under stitch in every round to top, fasten off
Lower Edge :
Turn toy upside down, insert hook under stitch on first round, pull up loop, ch 1, then crochet 60 hdc in round inserting hook under each stitch, fasten off
— Collar :
Row 2 :
From third ch from hook: (1 dc, dc inc) x 7, dc inc, ch 2, 2 sl st, ch 2, dc inc, (dc inc, 1 dc) x 7
Info :
Fasten off leaving long tail for sewing
— Dachshund Head :
Round 1 :
In brown melange: 6 sc in MR
Round 3 :
(1 sc, inc) x 3 (9)
Round 5 :
(2 sc, inc) x 3 (12)
Round 7 :
(1 sc, inc) x 6 (18)
Round 9 :
(2 sc, inc) x 6 (24)
Round 13 :
(2 sc, dec) x 6 (18)
Info :
Stuff piece slightly
Round 14 :
(1 sc, dec) x 6 (12)
— Dachshund Ears (Make 2) :
Info :
Ch 6, from second ch from hook: 4 sc, 3 sc into 1 ch, 3 sc, inc, sl st into first chain, fasten off leaving long tail
— Dachshund Body :
Round 3 :
(1 sc, inc) x 6 (18)
Round 4 :
(2 sc, inc) x 6 (24)
Round 13 :
dec, 22 sc (23)
Round 15 :
dec, 21 sc (22)
Round 16 :
dec, 20 sc (21)
Round 17 :
dec, 19 sc (20)
Round 18 :
dec, 18 sc (19)
Round 19 :
dec, 17 sc (18)
Round 20 :
dec, 16 sc (17)
Info :
Stuff firmly as you go
Round 22 :
dec, 15 sc (16)
Round 24 :
dec, 14 sc (15)
Round 26 :
dec, 13 sc (14)
Info :
Fasten off leaving long tail for sewing
— Dachshund Forelegs (Make 2) :
Info :
Don't stuff, fasten off leaving long tail for sewing
— Dachshund Hind Legs (Make 2) :
Info :
Fasten off leaving long tail for sewing
— Dachshund Tail :
Info :
Ch 7, from second ch from hook work 6 hdc, fasten off leaving long tail for sewing
— Bag :
Round 1 :
In Pion PNK Kirova 3302: 6 sc in MR
Info :
Crochet all next rounds into back loops only
Round 3 :
(ch 3, sc) x 11 (skip last 12th stitch)
Round 4 :
(ch 5, sc) x 11 (work sc into second ch of every arc from previous round)
Round 5 :
(ch 7, sc) x 11 (work sc into third chain of arc from previous round)
Round 6-9 :
(ch 7, sc) x 11 (work sc into fourth chain of every arc from previous round)
Round 10 :
(ch 3, sc) x 11 (work sc into fourth chain of arc from previous round)
Handles :
Each handle consists of ch 23, attach at appropriate positions shown in photos
— Tangerines (Make 5) :
Round 1 :
In orange: 6 sc in MR
Round 3 :
(1 sc, inc) x 6 (18)
Round 6 :
(1 sc, dec) x 6 (12)
Info :
Fasten off, pull opening closed, weave in end
This heartwarming Grandma amigurumi pattern brings together advanced crochet techniques to create a truly special handmade treasure complete with her loyal dachshund companion. The attention to detail in her embroidered features, poseable wire-framed arms, layered clothing, and miniature accessories makes this a stunning display piece or cherished gift. Whether you're creating her for yourself or someone special, this grandmother character radiates warmth and personality that will bring smiles for years to come. Happy crocheting, and enjoy watching this sweet scene come to life stitch by stitch! 🧶✨