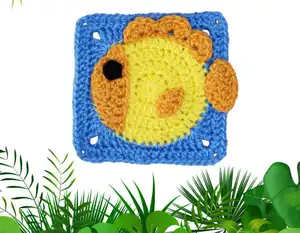
Transform your crochet skills into an adorable underwater masterpiece with this charming Fish Granny Square pattern. Perfect for creating blankets, pillows, or decorative pieces, this delightful square combines classic granny square techniques with playful fish elements. Each stitch brings your aquatic friend to life with vibrant colors and whimsical details that will make any project swim with personality and charm.
Progress Tracker
0% Complete
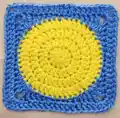
— Square :
Info :
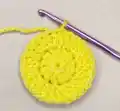
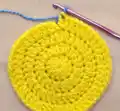
Using the yellow yarn
Round 1 :
MR, ch2, 12dc inside MR (12)
Info :
Tighten the MR by pulling on the tail and then sl st in the 1st dc (skip the ch2)
Round 2 :
ch2, *dc inc* all around (24)
Round 3 :
ch2, *dc, dc inc* all around (36)
Round 4 :
ch2, *2dc, dc inc* all around (48)
Info :
Color Change: at the end of Round 4, you will need to do a color change using Method 1 (change color at the last dc of Round 4) or Method 2 (finish off with invisible stitch and attach new color)
Round 5 :
ch1, *3sc, 2hdc, 2dc, [2tc + ch2 + 2tc] in the same stitch, 2dc, 2hdc* all around (68)
Info :
Sl st in the first sc that you did at the beginning of Round 5
Round 6 :
ch2, *dc* all around and [2dc + ch2 + 2dc] in the ch2 space (84)
Info :
At the end of the round, finish off and weave in any excess yarn. You can finish off using the invisible stitch method or sl st in the 1st dc and then yarn over and pull the yarn all the way through
— Top Fin :
Info :
Using the orange yarn
Row 1 :
sl knot, ch14, sc in the 2nd ch away from the hook, [skip a st, 5dc in the same st, skip a st, sc]x3 (19)
Info :
Finish off and leave a long tail for stitching
— Side Fin :
Info :
Using the orange yarn
Round 1 :
MR, ch3 (counts as a dc), 5dc in MR (6)
Round 2 :
ch3 (counts as a dc), turn, dc in the same st, 4dc, dc inc (8)
Info :
Finish off and leave a long tail for stitching
— Tail :
Info :
Using the orange yarn
Round 1 :
MR, ch3 (counts as a dc), 4dc in MR (5)
Round 2 :
ch3 (counts as a dc), turn, dc in the same st, 4dc, dc inc (8)
Round 3 :
ch3, turn, dc in the same st, 6dc, dc inc (10)
Info :
Finish off and leave a long tail for stitching
— Face :
Info :
Using the orange yarn
Round 1 :
MR, ch3 (counts as a dc), 5dc in MR (6)
Round 2 :
ch3 (counts as a dc), turn, dc in the same st, 4dc, dc inc (8)
Round 3 :
ch3, turn, dc in the same st, 6dc, dc inc (10)
Info :
Finish off and leave a long tail for stitching
— Eye :
Info :
Using the black yarn
Round 1 :
MR, ch1, 5sc in MR (5)
Info :
Tighten the MR. Finish off and leave a long tail for stitching
— Assembly :
Info :
Place the face components on the square. Use the tails for stitching. Align the elements to the circular base similar to the photo, stitch them, and weave in the ends
This delightful Fish Granny Square pattern brings together the timeless charm of granny squares with playful aquatic whimsy. Whether you're creating a single square as a coaster or joining multiples for a cheerful ocean-themed blanket, this pattern offers endless creative possibilities. The combination of simple techniques and vibrant colors makes it perfect for crocheters of all skill levels. 🐠 Dive in and let your creativity swim free! 🧶✨