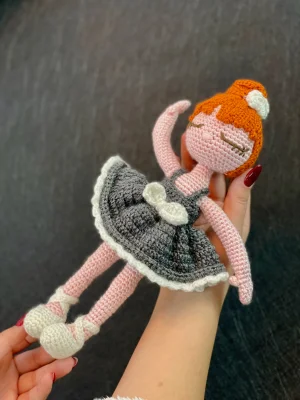
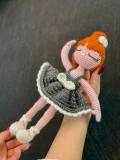
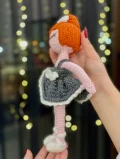
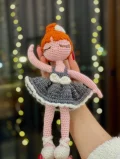
About This Graceful Ballerina Doll Amigurumi Pattern
This doll makes a wonderful recital gift for a young dancer, a beautiful addition to a nursery shelf, or a comforting companion for imaginative play.
Ideal for those with basic crocheting experience, featuring slightly more advanced stitches and techniques to expand your skills.
Takes 5-7 hours, making it an enjoyable project to finish over a couple of days.
An adorable friend to cherish, handcrafted with love to bring comfort and joy for years to come.
This doll makes a wonderful recital gift for a young dancer, a beautiful addition to a nursery shelf, or a comforting companion for imaginative play.
I absolutely adore how the skirt flares out using simple increases, and making the hair strands is surprisingly therapeutic. It's one of those projects where every little detail—from the tiny bow to the ballet shoe straps—makes you smile.
I remember the first time I designed a doll with hair strands like this—it felt a bit daunting, but there is something so incredibly satisfying about watching the hairstyle take shape! If you want to customize your ballerina, you can easily change the hair color to match a special little dancer in your life.
Another fun idea is to add a bit of sparkle to her outfit! You could use a metallic thread carried along with your white yarn for the skirt border and shoes, giving her that extra stage-ready shimmer. For a softer look, try using a pastel pink or lavender for the dress instead of gray.
No matter what colors you choose, the key to this project is enjoying the quiet rhythm of the stitches. Take your time with the assembly—pinning everything first makes a world of difference. I hope she brings a little bit of dance-floor magic to your crafting corner!
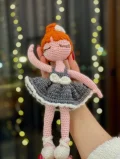
Bring a touch of handmade magic to life with this darling ballerina doll! Perfect for dancers, dreamers, and anyone who loves a classic amigurumi project, this pattern guides you through creating a graceful dancer complete with a tutu, delicate ballet slippers, and a gorgeous high bun. You'll love watching her come together stitch by stitch!
ch 10, join with sl st to form a ring, work 20 sc into the ring (20)
sc in each st around (20)
sc in each st around (20)
sc in each st around (20)
sc in each st around (20)
sc in next 6 st, dec, sc in next 7 st, dec (14)
sc in each st around (14)
sc in next 4 st, dec, sc in next 5 st, dec (10)
sc in each st around (10)
sc in next 2 st, dec, sc in next 4 st, dec (8)
sc in each st around (8)
sc in each st around (8)
sc in each st around (8)
sc in each st around (8)
sc in each st around (8)
sc in each st around (8)
sc in each st around (8)
sc in each st around (8)
sc in each st around (8)
sc in next 2 st, inc, sc in remaining sts (10)
sc in each st around (10)
sc in each st around (10)
sc in each st around (10)
sc in each st around (10)
sc in next 2 st, inc, sc in remaining sts (12)
sc in each st around (12)
sc in each st around (12)
sc in each st around (12)
sc in each st around (12)
sc in each st around (12)
sc in each st around (12)
sc in each st around (12)
sc in each st around (12)
sc in next 2 st, inc, sc in remaining sts (14)
sc in each st around (14)
sc in each st around (14)
sc in each st around (14)
sc in each st around (14)
Fasten off the first leg. For the second leg, do not fasten off; continue to the body joining round.
Bring both legs together, ch 2 between them. Work 14 sc around the first leg, 2 sc along one side of the chains, 14 sc around the second leg, and 2 sc along the opposite side of the chains (30)
sc in each st around (30)
sc in each st around (30)
sc in each st around (30)
sc in each st around (30)
sc in each st around (30)
sc in each st around (30)
sc in each st around (30)
[sc in next 3 st, dec] repeat 6 times (24)
sc in each st around (24)
[sc in next 3 st, inc] repeat 6 times (30)
Begin stuffing the body firmly with fiberfill and continue stuffing as you crochet.
sc in each st around (30)
sc in each st around (30)
sc in each st around (30)
sc in each st around (30)
sc in each st around (30)
sc in each st around (30)
sc in each st around (30)
sc in next 5 st, join the first arm by working through both the arm and body stitches for the next 5 sc, sc in next 10 st, join the second arm with 5 sc, sc in next 5 st (30)
[sc in next 3 st, dec] repeat 6 times (24)
[sc in next 2 st, dec] repeat 6 times (18)
sc in each st around (18)
[sc in next 1 st, dec] repeat 6 times (12)
sc in each st around (12)
sc in each st around (12)
sc in each st around (12)
sc in each st around (12)
Fasten off, leaving a very long tail for sewing the body to the head later.
Work 6 sc into a mr (6)
sc in each st around (6)
sc in each st around (6)
sc in each st around (6)
sc in each st around (6)
sc in each st around (6)
ch 3, turn, work 3 sc back along the chain, then sc in each of the 6 stitches of the round to form the hand
[sc, inc] repeat 4 times, sc in remaining sts (10)
sc in each st around (10)
sc in each st around (10)
sc in each st around (10)
sc in each st around (10)
sc in each st around (10)
sc in each st around (10)
sc in each st around (10)
sc in each st around (10)
sc in each st around (10)
sc in each st around (10)
sc in each st around (10)
sc in each st around (10)
sc in each st around (10)
sc in each st around (10)
sc in each st around (10)
sc in each st around (10)
sc in each st around (10)
sc in each st around (10)
sc in each st around (10)
sc in each st around (10)
Fasten off and lightly stuff the arm sleeves.
ch 18
[ch 1, 3 hdc in next st, ch 1, sc in next st] repeat 6 times
[ch 1, 3 sc in next st, ch 1, sc in next st] repeat 6 times
Fasten off, leaving a long tail for sewing.
ch 35
Work 35 sc across, turn (35)
sc in each st across, turn (35)
sc in each st across, turn (35)
sc in each st across, turn (35)
sc in each st across, turn (35)
sc in each st across, turn (35)
sc in each st across, turn (35)
sc in each st across, turn (35)
Work 3 sc into each of the 35 stitches (105)
sc in each st around (105)
sc in each st around (105)
sc in each st around (105)
sc in each st around (105)
sc in each st around (105)
In blo, hdc in each st around (105)
Change to White yarn. In flo of the previous round, work [sc in next st, 3 hdc in next st] repeating around. Fasten off.
Using White yarn, ch 10
Work 10 sc across, turn (10)
Work 10 sc across (10)
Fasten off. Wrap yarn around the center to shape it into a bow, then sew it to the dress waist.
Make 2: ch 21
Work 21 sc across. Fasten off, leaving a long tail for sewing.
Work 6 sc into a mr (6)
inc in each of the 6 sts (12)
[sc, inc] repeat 6 times (18)
[2 sc, inc] repeat 6 times (24)
[3 sc, inc] repeat 6 times (30)
[4 sc, inc] repeat 6 times (36)
[5 sc, inc] repeat 6 times (42)
sc in each st around (42)
sc in each st around (42)
sc in each st around (42)
sc in each st around (42)
sc in each st around (42)
sc in each st around (42)
sc in each st around (42)
sc in each st around (42)
sc in each st around (42)
sc in each st around (42)
[5 sc, dec] repeat 6 times (36)
[4 sc, dec] repeat 6 times (30)
[3 sc, dec] repeat 6 times (24)
[2 sc, dec] repeat 6 times (18)
[sc, dec] repeat 6 times (12)
Work 6 dec (6)
Fasten off and leave a long tail. Stuff the head firmly with fiberfill.
Using Mustard/Orange yarn, work 6 sc into a mr (6)
inc in each of the 6 sts (12)
[sc, inc] repeat 6 times (18)
First Layer: [ch 20, work 20 sc back along chain, sl st to next st] repeat 12 times to make 12 hair strands
[ch 13, work 12 sc back along chain, sl st to next st] repeat 10 times to make 10 hair strands
Top Layer: [ch 50, work 50 sc back along chain, sl st to next st] repeat 5 times to make 5 hair strands
Gather the top strands together, wrap into a bun, and sew to secure.
Using White yarn, ch 12
Work 2 sc in each of the 12 chains (24)
sc in each st around (24)
sc in each st around (24)
sc in each st around (24)
sc in each st around (24)
Work [4 sc, dec] twice, then sc in next 8 sts, dec (20)
sc in each st around (20)
sc in next 6 sts, ch 14 to make the first strap, turn and work 14 sc back along the chain, sl st to the next shoe stitch
sc in remaining sts to the opposite side, ch 14 to make the second strap, turn and work 14 sc back along the chain, sl st to secure. Fasten off with a long tail.
I hope you have the absolute best time making your own little ballerina doll! She's such a joy to crochet, and seeing her dress and little bun come together is pure magic. Don't forget to share your finished dancer with our community—I cannot wait to see the beautiful colors you choose! Happy stitching, friend! 🧶✨
Absolutely! If you prefer safety eyes, insert 8mm or 10mm eyes between Rounds 12 and 13 of the head, leaving about 6 stitches of space between them before closing the head.
I highly recommend a sport weight cotton or cotton-acrylic blend. It gives excellent stitch definition, doesn't pill easily, and helps the ballerina maintain her elegant shape.
Cross the two crocheted straps over the front of the ankle, wrap them around the back, and bring them back to the front. Secure them with a tiny stitch of white thread to keep them in place permanently.
To prevent a floppy head, stuff the neck area extra firmly. You can also insert a rolled-up piece of felt or a plastic fabric-safe support inside the neck to keep it upright.
