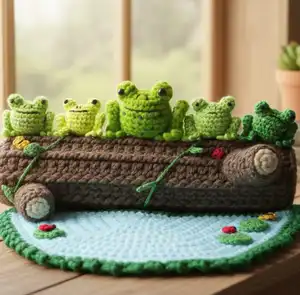
Create an enchanting interactive play experience with this delightful Frog Play Set pattern! This comprehensive design includes five adorable crocheted frogs in varying shades of green, a charming blue pond decorated with lily pads and whimsical bugs, and a realistic brown log that cleverly opens to store all your frogs and pond mat. Perfect for imaginative play or as a unique handmade gift, this pattern combines practical storage with creative fun. Each element is thoughtfully designed to work together, creating a complete woodland scene that children will treasure for years to come.
Progress Tracker
0% Complete
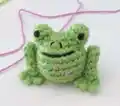
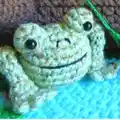
— Frog Body :
Round 1 :
Magic circle with 6 scs (6)
Round 2 :
Inc in each st (12)
Round 3 :
(Sc, inc) x6 (18)
Round 4 :
(Sc x2, inc) x6 (24)
Round 5-9 :
Sc in each st for 5 rows (24)
Round 10 :
(Sc x2, dec) x6 (18)
Round 11 :
(Sc, dec) x6 (12)
Info :
Sl st in next st, finish off with long tail to sew hole closed
— Frog Eyes (Make 2) :
Round 1 :
Magic circle with 6 scs (6)
Round 2 :
(Sc, inc) x3 (9)
Round 3 :
Sc in each st (9)
Info :
Sl st in next st and finish off with long tail for sewing
Infos :
Using black embroidery floss, sew a French knot or embroider a circle for eye. Stuff eyes and pin to top of head. Sew in place with whip stitches. Finish off and hide ends inside body.
— Frog Feet and Legs (Make 2) :
Row 1 :
(Ch 3, sl st in the 2nd ch from hook and next ch) x3 to create 3 toes
Row 2 :
Ch 1, sc in the base of each toe (3)
Row 3 :
Ch 1, turn. Sc in the front loops of each st. Turn and sc in the 3 back loops on the other side (6)
Round 4 :
Begin working in continuous rounds. Sc x4, dec (5)
Round 5-12 :
Sc in each st for 8 rows (5)
Infos :
No need to stuff. Sl st in next st and finish off with long tail. Thread tail onto yarn needle and sew top of leg opening closed. Fold leg in half and sew top of leg to back of ankle. Position on sides of body, pin in place, and sew leg to body at ankle, hip, and halfway up leg on front and back.
— Frog Face :
Infos :
Using black embroidery floss, secure yarn inside body. Embroider mouth using simple straight stitches. Add couple of tiny vertical straight stitches for nostrils. Secure thread by sewing back and forth inside body.
— Log Hinged End Inside :
Round 1 :
With tan yarn, magic circle with 6 scs (6)
Round 2 :
Inc in each st (12)
Round 3 :
(Sc, inc) x6 (18)
Round 4 :
(Sc x2, inc) x6 (24)
Info :
Finish off and weave in ends, set aside
— Log Hinged End Outside :
Round 1 :
With brown yarn, magic circle with 6 scs. Join with sl st to first st. Join tan yarn (6)
Round 2 :
With tan yarn, inc in each st. Join with sl st to first st. Join brown yarn (12)
Round 3 :
With brown yarn, (sc, inc) x6. Join with sl st to first st. Join tan yarn (18)
Round 4 :
With tan yarn, (sc x2, inc) x6. Join with sl st to first st, finish off and weave in ends (24)
Infos :
Optional: Cut circle from scrap plastic canvas to fit between 2 disks. Place two disks together with wrong sides facing and optional plastic sandwiched between. With brown yarn, work through both layers into corresponding stitches.
Round 5 :
(Sc x3, inc) x6 (30)
Round 6 :
Sl st in each st (30)
Info :
Join with sl st, finish off and weave in ends, set aside
— Log Closed End Inside :
Round 1 :
With tan yarn, magic circle with 6 scs (6)
Round 2 :
Inc in each st (12)
Round 3 :
(Sc, inc) x6 (18)
Round 4 :
(Sc x2, inc) x6 (24)
Info :
Sl st in next st and finish off, weave in tails, set aside
— Log Closed End Outside :
Round 1 :
With tan yarn, magic circle with 6 scs. Join with sl st to first st. Join brown yarn (6)
Round 2 :
With brown yarn, inc in each st. Join with sl st to first st. Join tan yarn (12)
Round 3 :
With tan yarn, (sc, inc) x6. Join with sl st to first st. Join brown yarn (18)
Round 4 :
With brown yarn, (sc x2, inc) x6. Join with sl st to first st, finish off, weave in ends (24)
Infos :
Optional: Cut circle from scrap plastic canvas to fit between 2 disks. Place two disks together with wrong sides facing and optional plastic sandwiched between. With tan yarn, work through both layers into corresponding stitches.
Round 5 :
(Sc x3, inc) x6 (30)
Info :
Join with sl st and finish off, weave in ends, set aside
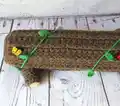
— Main Trunk of Log :
Info :
With brown yarn, ch 33. Join with sl st in first ch to form ring
Round 1 :
Ch 3 and dc in each ch across. Join with sl st in top of beginning ch-3 (33)
Round 2-27 :
Ch 3, dc in next st, fpdc, (dc x2, fpdc) x10. Join with sl st for 26 rows (33)
Round 28 :
Ch 1, beginning in same st, (sc x2, fpsc) x11. Join with sl st (33)
Info :
Do not finish off. Place safety pin in loop. Check length by lining up frogs along log and adjust rows as needed.
— Branch Stumps (Make 3) :
Round 1 :
With tan yarn, magic circle with 6 scs. Join with sl st (6)
Round 2 :
Ch 1, inc in each st (12)
Info :
Join with sl st and finish off, change to brown
Round 3 :
Sl st loosely in each st. Sl st in BLO of first st, ch 1 (12)
Round 4 :
In BLO: sc in same st as joining and each st around (12)
Round 5-8 :
Begin continuous rounds. Sc in each st for 4 rows (12)
Round 9 :
Sl st in next st, ch 1, turn. Beginning in next st: sc x6, sl st. Leave remaining sts unworked
Round 10 :
Ch 1, turn. Beginning in next st: (sc, inc) x2, sc, sl st (6)
Info :
Finish off with long tail for sewing, stuff
— Pond/Pool :
Round 1 :
With blue yarn, magic circle with 3 scs (3)
Round 2 :
Inc in each st (6)
Round 3 :
(Sc, inc) x3 (9)
Round 4 :
(Sc x2, inc) x3 (12)
Round 5 :
(Sc x3, inc) x3 (15)
Round 6 :
Sc x2, inc, (sc x4, inc) x2, sc x2 (18)
Round 7 :
(Inc, sc x5) x3 (21)
Round 8 :
Sc x3, inc, (sc x6, inc) x2, sc x3 (24)
Round 9 :
(Sc x7, inc) x3 (27)
Round 10 :
Sc x4, inc, (sc x8, inc) x2, sc x4 (30)
Round 11 :
(Inc, sc x9) x3 (33)
Round 12 :
Sc x5, inc, (sc x10, inc) x2, sc x5 (36)
Round 13 :
(Sc x11, inc) x3 (39)
Round 14 :
Sc x6, inc, (sc x12, inc) x2, sc x6 (42)
Round 15 :
(Inc, sc x13) x3 (45)
Round 16 :
Sc x7, inc, (sc x14, inc) x2, sc x7 (48)
Round 17 :
(Sc x15, inc) x3 (51)
Round 18 :
Sc x8, inc, (sc x16, inc) x2, sc x8 (54)
Round 19 :
(Inc, sc x17) x3 (57)
Round 20 :
Sc x9, inc, (sc x18, inc) x2, sc x9. Ch 1, rotate mat clockwise and work along flat edge. Sc in same st and in sides of each row across. Ch 1 and sl st in first st made. Finish off (about 80 sts)
Info :
Turn mat over and join green with sc in same corner
Round 21 :
Sc across flat edge. At corner, sc, ch 1, sc in same st. Rotate mat clockwise and work following around curved edge: (ch 3, sc x2) all around curve until corner. Sl st to join
Info :
Finish off and weave in all ends
— Butterflies (Make 2) :
Round 1 :
With yellow, magic circle with: sc, dc, sc, sl st, (sc, tr x2, sc, sl st) x2, sc, dc, sc, sl st
Info :
Sl st in first st and finish off with long tail for sewing. Pull circle closed, weave in starting tail
Infos :
With black thread, feed down through top center of butterfly wings toward back. Sew small straight stitches or French knots on wings. Come back up at top center. Wrap black tightly around center of wings from top to bottom 2-3 times leaving starting and ending tails at top. Pull body tightly so wings cinch. Tie ends tightly in square knot. Tie overhand knots evenly on both ends and trim.
— Ladybugs (Make 3) :
Round 1 :
With red, magic circle with 6 scs. Join with sl st to first st
Info :
Keep long red tail for sewing and change to black
Round 2 :
Ch 1, sc in same st and next st
Infos :
Finish off with long tail for sewing. Thread tail onto yarn needle and sew through base of 2nd black st from front to back. Use tail to make dots on ladybug with tiny straight stitches or French knots. Weave in tail and clip.
— Lily Pads (Make 3) :
Round 1 :
With green, magic circle with 6 scs. Do not join. Ch 1, turn (6)
Round 2 :
Increase in each st. Do not join. Ch 1, turn (12)
Round 3 :
(Sc, inc) x6. Do not join. Ch 1, turn (18)
Info :
Finish off with long end for sewing. Pull magic circle closed and weave starting tail into back
— Vine :
Info :
With green, begin with long starting tail. Ch 15. Sl st in 2nd ch from hook. In next chains: sc, hdc x2, sc, sl st
Infos :
Rotate piece and work on opposite side of leaf in free loops of foundation chain. Sl st, sc, hdc x2, sc, sl st in end and in BLO in first st on other side. Ch 1. Surface crochet with sl sts down center spine of leaf, then sl st in first unworked chain below leaf. Ch 15. Repeat until vine is desired length (about 18 inches with 17 leaves)
Info :
Finish off with long tail and tack down beginning and end of vine on back or underside of log
This enchanting Frog Play Set pattern was lovingly designed to create a complete interactive woodland experience that sparks imagination and provides hours of creative play! The combination of adorable amigurumi frogs with their unique expressions, a decorative pond mat with charming bugs and lily pads, and a functional storage log creates a truly special handmade toy. Each element works together beautifully while teaching multiple crochet techniques from basic amigurumi to front post stitches and applique work. The versatility in customization and the practical storage solution make this pattern perfect for gift-giving or personal enjoyment. 🐸🌿 Happy crocheting! 🧶✨