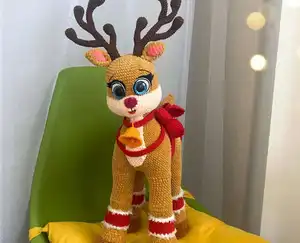
Create your very own enchanting forest deer with this comprehensive crochet pattern! This stunning stuffed toy stands 42 cm tall without horns and features beautiful velvet yarn textures, intricate wire-frame antlers, and adorable festive ribbons and bell accessories. Perfect for woodland-themed décor or as a cherished handmade gift, this deer combines luxurious materials with detailed construction techniques. You'll love working with soft velvet yarns in honey and powder tones to craft this majestic forest companion that brings warmth and charm to any space.
Progress Tracker
0% Complete
— Forelegs (Make 2):
Materials:
Dolphin Fine Himalaya yarn color 37 brown, crochet hook 2.5mm
Round 1:
Make foundation ch8, work 2 sc into the second ch from the hook, 5 sc, work 4 sc into one stitch, turn, along other side of foundation chain crochet 5 sc, 2 sc into one stitch (18)
Round 2:
2 inc, 5 sc, 4 inc, 5 sc, 2 inc (26)
Round 3:
(1 sc, 1 inc) x 2, 5 sc, (1 sc, 1 inc) x 4, 5 sc, (1 sc, 1 inc) x 2 (34)
Round 5:
34 sc - crochet in back loops only (34)
Info:
Pay attention where the working thread is located, ensure it's positioned correctly for joining
Round 6:
16 sc, 1 dec, 15 sc, 1 inc (34)
Round 7:
15 sc, 1 dec, 16 sc, 1 inc (34)
Round 8:
14 sc, 1 dec, 17 sc, 1 inc (34)
Info:
Switch to LaVita Velurex yarn color 1038 honey
Round 9:
(15 sc, 1 dec) x 2 (32) - crochet in back loops only
Round 11:
(14 sc, 1 dec) x 2 (30)
Round 12:
(13 sc, 1 dec) x 2 (28)
Round 13:
(12 sc, 1 dec) x 2 (26)
Round 14:
(11 sc, 1 dec) x 2 (24)
Info:
Return to round 4. Crochet reverse sc along this round. Fasten off, cut off and weave in
Round 15-23:
24 sc (24) - repeat 9 times. Stuff the toy as you go. Ensure working thread is positioned towards back and center
Round 24:
9 sc, 7 inc, 8 sc (31) - position inc towards center and front
Round 26:
9 sc, 7 dec, 8 sc (24) - decs should be located towards center and front
Round 27-35:
24 sc (24) - repeat 9 times
Round 36:
(11 sc, 1 inc) x 2 (26)
Round 37:
(12 sc, 1 inc) x 2 (28)
Round 38:
(13 sc, 1 inc) x 2 (30)
Info:
Fasten off, cut off. Stuff it. First front leg is completed, crochet second leg in same manner
— Hind Legs (Make 2):
Round 1-23:
Crochet similarly to forelegs rounds 1-23. Ensure working thread is positioned towards back and center
Round 24:
10 sc, 3 inc, 11 sc (27)
Round 25:
10 sc, (1 sc, 1 inc) x 3, 9 sc, 1 dec (29)
Round 26:
1 dec, 8 sc, (2 sc, 1 inc) x 3, 8 sc, 1 dec (30)
Round 27:
1 dec, 26 sc, 1 dec (28)
Round 28:
1 dec, 26 sc (27)
Round 29-33:
27 sc (27) - repeat 5 times
Round 34:
1 inc, 26 sc (28)
Round 35:
1 sc, 1 inc, 26 sc (29)
Round 36:
2 sc, 1 inc, 26 sc (30)
Round 37-38:
30 sc (30) - repeat 2 times
Info:
Fasten off, cut off. Initial hind leg is completed, crochet second leg in similar fashion
— Connecting Part for Legs:
Materials:
LaVita Velurex yarn color 1038, crochet hook 2.5mm
Round 1:
Make foundation ch8, work 2 sc into second ch from hook, 5 sc, work 4 sc into one stitch, turn, crochet along other side of foundation chain 5 sc, work 2 sc into one stitch (18)
Round 2:
2 inc, 5 sc, 4 inc, 5 sc, 2 inc (26)
Round 3:
(1 sc, 1 inc) x 2, 5 sc, (1 sc, 1 inc) x 4, 5 sc, (1 sc, 1 inc) x 2 (34)
Round 4:
(2 sc, 1 inc) x 2, 5 sc, (2 sc, 1 inc) x 4, 5 sc, (2 sc, 1 inc) x 2 (42)
Round 5:
(3 sc, 1 inc) x 2, 5 sc, (3 sc, 1 inc) x 4, 5 sc, (3 sc, 1 inc) x 2 (50)
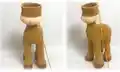
— Legs Joining:
Info:
Use brown Kamtex thread and 8 markers. Place legs uniformly close to joining piece and position markers where legs will be joined. Link 6 stitches on each leg
Round 6:
On back 4 sc, on hind left leg 24 sc, on left side 7 sc, on left foreleg 24 sc, on chest 6 sc, on right foreleg 24 sc, on right side 7 sc, on hind right leg 24 sc, on back 2 sc (122)
Round 7:
(59 sc, 1 dec) x 2 (120)
Round 8:
(18 sc, 1 dec) x 6 (114)
Round 9-20:
114 sc (114) - repeat 12 times
Info:
Note location of working thread. Use markers to divide body into 60 stitches and 54 stitches sections
Round 21:
37 sc, ch20 and join with stitch on opposite side with slip stitch, 23 sc (80)
Info:
Body is now divided into 2 sections - one for head and one for back/bottom. Continue crocheting back/bottom with 80 stitches circle
Round 22:
(8 sc, 1 dec) x 8 (72)
Round 23:
(7 sc, 1 dec) x 8 (64)
Round 24:
(6 sc, 1 dec) x 8 (56)
Round 25:
(5 sc, 1 dec) x 8 (48)
Round 26:
(4 sc, 1 dec) x 8 (40)
Round 27:
(3 sc, 1 dec) x 8 (32)
Round 28:
(2 sc, 1 dec) x 8 (24)
Round 29:
(1 sc, 1 dec) x 8 (16)
Info:
Draw thread tightly, cut off, and weave in tail end
— Neck and Head:
Info:
Return to round 21. Crochet neck and head along opening formed (74 stitches). Start round 22. Stuff toy as you go
Round 22:
(35 sc, 1 dec) x 2 (72)
Round 23:
(16 sc, 1 dec) x 4 (68)
Round 24:
(15 sc, 1 dec) x 4 (64)
Round 25:
(14 sc, 1 dec) x 4 (60)
Round 26:
(13 sc, 1 dec) x 4 (56)
Round 27:
(12 sc, 1 dec) x 4 (52)
Round 28:
(11 sc, 1 dec) x 4 (48)
Round 29:
(10 sc, 1 dec) x 4 (44)
Round 30:
(9 sc, 1 dec) x 4 (40)
Round 31:
(8 sc, 1 dec) x 4 (36)
Round 32-38:
36 sc (36) - repeat 7 times
Info:
Switch to Dolphin Fine Himalaya yarn color 33 for head muzzle area
Round 39:
(8 sc, 1 inc) x 4 (40)
Round 40:
(4 sc, 1 inc) x 8 (48)
Round 41:
(5 sc, 1 inc) x 8 (56)
Round 42:
(6 sc, 1 inc) x 8 (64)
Round 43:
(7 sc, 1 inc) x 8 (72)
Round 44:
(8 sc, 1 inc) x 8 (80)
Round 45-49:
80 sc (80) - repeat 5 times. Make sure working thread is at middle of back
Round 50:
22 sc, (1 sc, 1 dec) x 12, 22 sc (68)
Round 51-61:
Switch to LaVita Velurex yarn color 1038, 68 sc (68) - repeat 11 times
Info:
Set toy aside temporarily and crochet eyes before continuing
— Eyes (Make 2):
Materials:
YarnArt Jeans yarn color 62 white, crochet hook 1.75mm
Round 3:
(1 sc, 1 inc) x 8 (24)
Round 4:
(2 sc, 1 inc) x 8 (32)
Round 5:
Using YarnArt Jeans black color, crochet into front loops only 32 sl sts (32)
Info:
Fasten off, cut off. Shape eyes into two pieces positioning them along outline not center. Don't fasten eyes too tightly
Info:
Cut felt pieces for eyelashes. When stitching eyes, position felt under eye and sew through them
Info:
Sew eyes between rounds 52-59 with 3 sc distance between them. Position at least one division apart, then melt plastic slightly using lighter
— Continue Head:
Round 62:
(15 sc, 1 dec) x 4 (64)
Round 63:
(6 sc, 1 dec) x 8 (56)
Round 64:
(5 sc, 1 dec) x 8 (48)
Round 65:
(4 sc, 1 dec) x 8 (40)
Round 66:
(3 sc, 1 dec) x 8 (32)
Round 67:
(2 sc, 1 dec) x 8 (24)
Round 68:
(1 sc, 1 dec) x 8 (16)
Info:
Draw thread tightly, cut off, and weave in tail end
— Muzzle:
Materials:
Dolphin Fine Himalaya yarn color 33, crochet hook 2.5mm
Round 1:
Make foundation ch8, work 2 sc into second ch from hook, work 5 sc, work 4 sc into one stitch, turn, crochet along other side of foundation chain 5 sc, 2 sc into one stitch (18)
Round 2:
2 inc, 5 sc, 4 inc, 5 sc, 2 inc (26)
Round 3:
(1 sc, 1 inc) x 2, 5 sc, (1 sc, 1 inc) x 4, 5 sc, (1 sc, 1 inc) x 2 (34)
Info:
Fasten off, cut off. Sew with Kamtex threads in yarn color, stuffing lightly
— Nose:
Materials:
Dolphin Fine Himalaya yarn color 38 burgundy, crochet hook 2.5mm
Round 1:
Make foundation ch4, work 2 sc into second ch from hook, work 1 sc, 4 sc into one stitch, turn, crochet along other side of foundation chain 1 sc, 2 sc into one stitch (10)
Info:
Fasten off, cut off. Using Kamtex thread matching yarn color, sew nose without stuffing
— Needle Sculpting:
Info:
Arrows indicate needle direction. Pull thread slightly. Red arrow indicates thread passes above yarn, blue arrows indicate thread passes under yarn. Pull thread as shown in photo for left and right parts using brown Kamtex threads
— Mouth:
Info:
Using Kamtex black thread and YarnArt Jeans red thread, embroider mouth
— Horns (Make 2 Complete Sets):
Materials:
YarnArt Jeans yarn color 70 brown, crochet hook 1.75mm
Round 3-4:
16 sc (16) - repeat 2 times
Round 5:
(6 sc, 1 dec) x 2 (14)
Round 6:
(5 sc, 1 dec) x 2 (12)
Round 7:
(4 sc, 1 dec) x 2 (10)
Round 8:
(3 sc, 1 dec) x 2 (8)
Round 9-13:
8 sc (8) - repeat 5 times. Fasten off, cut off
Round 3-4:
16 sc (16) - repeat 2 times
Round 5:
(6 sc, 1 dec) x 2 (14)
Round 6:
(5 sc, 1 dec) x 2 (12)
Round 7:
(4 sc, 1 dec) x 2 (10)
Round 8:
(3 sc, 1 dec) x 2 (8)
Round 9-19:
8 sc (8) - repeat 11 times. Fasten off, cut off
Round 3:
(1 sc, 1 inc) x 8 (24)
Round 4-5:
24 sc (24) - repeat 2 times
Round 6:
(10 sc, 1 dec) x 2 (22)
Round 7:
(9 sc, 1 dec) x 2 (20)
Round 8:
(8 sc, 1 dec) x 2 (18)
Round 9:
(7 sc, 1 dec) x 2 (16)
Round 10:
(6 sc, 1 dec) x 2 (14)
Round 11:
(5 sc, 1 dec) x 2 (12)
Round 12:
(4 sc, 1 dec) x 2 (10)
Round 13:
(3 sc, 1 dec) x 2 (8)
Round 14-20:
8 sc (8) - repeat 7 times. Do not cut working thread. Fill parts lightly for shaping
— Assembling Horns Step 1:
Round 1:
Take parts 1 and 3. With working thread on part 3, crochet 8 sc along first part. Without cutting thread, crochet 8 sc on part 3 (16)
Round 2:
(6 sc, 1 dec) x 2 (14)
Round 3:
(5 sc, 1 dec) x 2 (12)
Round 4:
(4 sc, 1 dec) x 2 (10)
Round 5:
(3 sc, 1 dec) x 2 (8)
Round 6-10:
8 sc (8) - repeat 5 times
Info:
Do not cut thread. Cut two wire segments 40cm each, fold in half. Wrap ends with tape, insert into horns, shape according to photo
— Assembling Horns Step 2:
Round 1:
Take resulting part and second part. Without cutting thread, crochet 8 sc on second part, then 8 sc on resulting part (16)
Round 2:
(6 sc, 1 dec) x 2 (14)
Round 3:
(5 sc, 1 dec) x 2 (12)
Round 4:
(4 sc, 1 dec) x 2 (10)
Round 5:
(3 sc, 1 dec) x 2 (8)
Round 6-7:
8 sc (8) - repeat 2 times
Info:
Do not cut thread. Cut 40cm wire piece, fold in half, wrap end with tape. Insert into horn and shape according to photo
— Assembling Horns Step 3:
Round 1:
Connect to first part. Without cutting thread, crochet 8 sc on first part, then 8 sc on resulting part (16)
Round 2:
(6 sc, 1 dec) x 2 (14)
Round 3:
(5 sc, 1 dec) x 2 (12)
Round 4-7:
12 sc (12) - repeat 4 times
Round 8:
(5 sc, 1 inc) x 2 (14)
Round 9:
(4 sc, 1 inc) x 2 (16)
Info:
Fasten off, cut off. Cut 40cm wire, twist in half. Wrap end with tape, insert into horn. Shape as shown. Fill base firmly, sew to head with Kamtex threads
— Ears (Make 2):
Materials:
LaVita Velurex yarn color 1038 honey and Dolphin Baby Himalaya color 80332 coral, crochet hook 2.5mm
Round 1:
4 sc in MR with honey color (4)
Round 2:
4 inc with honey color (8)
Round 3:
(1 sc, 1 inc) x 4 with honey color (12)
Round 4:
Honey 2 sc, coral 1 inc, honey (2 sc, 1 inc) x 3 (16)
Round 5:
Honey 2 sc, coral 2 sc, honey 12 sc (16)
Round 6-8:
Honey 1 sc, coral 4 sc, honey 11 sc (16) - repeat 3 times
Round 9:
Honey 1 sc, coral 2 dec, honey 11 sc (14)
Info:
Crochet 7 sc to sew edges together. Fold ear and sew edges again with 3-4 sc. Finish off, cut off. Sew with Kamtex thread. Embroider eyebrows with black Kamtex threads, two stitches
— Breast:
Materials:
Dolphin Fine Himalaya yarn color 33, crochet hook 2.5mm
Row 1:
Make foundation ch6, crochet 1 sc into second ch from hook, work 4 sc (5)
Row 2-9:
Turn work, ch1, 4 sc (5) - repeat 8 times
Row 10:
Turn work, ch1, 1 inc, 1 sc, 1 inc, 1 sc (7)
Row 11-12:
Turn work, ch1, 6 sc (7) - repeat 2 times
Row 13:
Turn work, ch1, 1 inc, 3 sc, 1 inc, 1 sc (9)
Row 14-16:
Turn work, ch1, 8 sc (9) - repeat 3 times
Row 17:
Turn work, ch1, 1 dec, 3 sc, 1 dec, 1 sc (7)
Row 18-19:
Turn work, ch1, 6 sc (7) - repeat 2 times
Row 20:
Turn work, ch1, 1 dec, 1 sc, 1 dec, 1 sc (5)
Row 21:
Turn work, ch1, 2 dec (3)
Info:
Fasten off, cut off. Sew with Kamtex threads in yarn color
— Tail:
Materials:
LaVita Velurex yarn color 1038 honey, crochet hook 2.5mm
Round 3:
(1 sc, 1 inc) x 6 (18)
Round 4:
(2 sc, 1 inc) x 6 (24)
Round 5:
(3 sc, 1 inc) x 6 (30)
Round 6:
(4 sc, 1 inc) x 6 (36)
Round 7-9:
36 sc (36) - repeat 3 times
Round 10:
(10 sc, 1 dec) x 3 (33)
Round 11:
(9 sc, 1 dec) x 3 (30)
Round 12:
(8 sc, 1 dec) x 3 (27)
Round 13:
(7 sc, 1 dec) x 3 (24)
Round 14:
(6 sc, 1 dec) x 3 (21)
Round 15:
(5 sc, 1 dec) x 3 (18). Stuff piece lightly
Round 16:
(4 sc, 1 dec) x 3 (15)
Round 17:
(3 sc, 1 dec) x 3 (12)
Round 18:
(2 sc, 1 dec) x 3 (9)
Round 19:
(1 sc, 1 dec) x 3 (6)
Info:
Fasten off, cut off. Fold wider base in half, stitch together with Kamtex threads
— Leg Ribbons (Make 4):
Materials:
YarnArt Jeans yarn color 90 red, crochet hook 1.75mm
Row 1:
Make foundation ch9, crochet 1 sc into second ch from hook, then work 7 sc (8)
Row 2-44:
Turn work, ch1, 7 sc (8) - repeat 43 times
Info:
Fasten off, cut off. Edges are crocheted with YarnArt Mink milky color. Glue Velcro
— Body Ribbons:
Piece 1:
Materials: YarnArt Jeans color 90 red, crochet hook 1.75mm
Row 1:
Make foundation ch4, crochet 1 sc into second ch from hook, then work 2 sc (3)
Row 2-61:
Turn work, ch1, 2 sc (3) - repeat 60 times. Fasten off, cut off. Glue Velcro
Row 1:
Make foundation ch4, crochet 1 sc into second ch from hook, then work 2 sc (3)
Row 2-83:
Turn work, ch1, 2 sc (3) - repeat 82 times. Fasten off, cut off. Glue Velcro
Row 1:
Make foundation ch4, crochet 1 sc into second ch from hook, then work 2 sc (3)
Row 2-96:
Turn work, ch1, 2 sc (3) - repeat 95 times. Fasten off, cut off. Glue Velcro
Row 1:
Make foundation ch6, crochet 1 sc into second ch from hook, then work 4 sc (5)
Row 2-98:
Turn work, ch1, 4 sc (5) - repeat 97 times. Fasten off, cut off. Glue Velcro
Row 1:
Make foundation ch9, crochet 1 sc into second ch from hook, then work 7 sc (8)
Row 2-103:
Turn work, ch1, 7 sc (8) - repeat 102 times. Fasten off, cut off
Info:
Form bow by folding and wrapping middle with yarn as shown in photo. Sew onto piece 4
— Bell Piece 6:
Materials:
Gazzal Baby Cotton yarn color 3416 orange, crochet hook 1.75mm
Round 3:
(1 sc, 1 inc) x 8 (24)
Round 4:
24 sc (24) - repeat 5 times
Round 5:
(5 sc, 1 inc) x 4 (28)
Round 6:
(6 sc, 1 inc) x 4 (32)
Round 7:
(7 sc, 1 inc) x 4 (36)
Round 8:
Crochet reverse sc along edge. Fasten off, cut off
Round 2:
Make ch23. Fasten off, cut off
Info:
Insert chain through bell base, form loop. Knot tips inside bell. Bell required for one piece only
This magnificent Forest Deer pattern brings woodland magic into your home with stunning detail and craftsmanship! The combination of luxurious velvet yarns, wire-frame antlers that you can pose, and charming festive accessories makes this project truly special. With 39 pages of detailed instructions and 114 photos guiding every step, you'll create a majestic companion that stands proudly on display. The attention to detail in the needle-sculpted face, the layered construction, and the adorable ribbons and bell make this deer an unforgettable creation. 🦌 Happy crocheting and enjoy bringing this forest friend to life! 🧶✨