About This Fishing Cat Amigurumi Pattern
This sweet little kitty makes a wonderful gift for the outdoor lovers in your life, or a whimsical addition to your own bookshelf display that is sure to spark smiles.
Ideal for those with basic crocheting experience, featuring slightly more advanced stitches and techniques to expand your skills.
Takes 5-7 hours, making it an enjoyable project to finish over a couple of days.
An adorable friend to cherish, handcrafted with love to bring comfort and joy for years to come.
This sweet little kitty makes a wonderful gift for the outdoor lovers in your life, or a whimsical addition to your own bookshelf display that is sure to spark smiles.
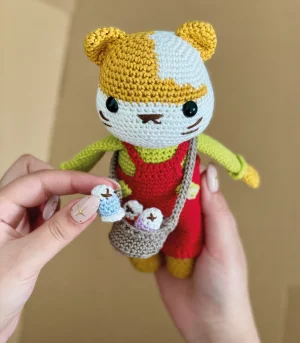
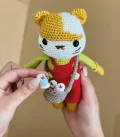
I absolutely adore how much character is packed into this project. Crocheting the tiny fish and sliding them into the little handmade basket feels incredibly satisfying, and the clever color-switching on the head gives the cat such a unique, crafty look that you will be proud to show off.

There is something so incredibly comforting about sitting down with a warm cup of tea and a fresh basket of colorful yarn, ready to bring a new character to life. When I first designed this little fishing cat, I wanted to capture the cozy, nostalgic feeling of quiet mornings spent by the water. The way the little mustard-colored patches break up the clean white of the face gives this kitty so much retro charm.
If you want to put your own spin on this project, try playing around with the sweater colors! A classic navy and white striped sweater would look absolutely darling, giving our little fisherman an extra touch of nautical flair. You could also swap out the red overalls for a soft forest green or a classic denim blue.
When it comes to assembling the face, don't rush the embroidery. Taking an extra ten minutes to pin the nose and whiskers in different positions before sewing makes a world of difference. It is amazing how moving a stitch just one row over can completely change your cat's expression from curious to sleepy. Enjoy the process!
Meet your next favorite crafting project, a charming little feline angler ready to head out to the riverbank. This pattern brings together delightful textures and lovely colorwork to create a keepsake toy that is packed with personality. You will love watching this sweet character come to life, from its tiny boots to its custom-stitched fishing basket filled with colorful catches.
Using White (Main Color), work 6 sc into a magic ring (6)
Using White (Main Color), [sc, inc] 3 times; switch to Mustard (Color A), [sc, inc] 3 times (12)
Using White (Main Color), [2 sc, inc] 3 times; switch to Mustard (Color A), [2 sc, inc] 3 times (18)
Using White (Main Color), [3 sc, inc] 3 times; switch to Mustard (Color A), [3 sc, inc] 3 times (24)
Using White (Main Color), [4 sc, inc] 3 times; switch to Mustard (Color A), [4 sc, inc] 3 times (30)
Using White (Main Color), [5 sc, inc] 3 times; switch to Mustard (Color A), [5 sc, inc] 3 times (36)
Using White (Main Color), [6 sc, inc] 3 times; switch to Mustard (Color A), [6 sc, inc] 3 times (42)
Using White (Main Color), [7 sc, inc] 3 times; switch to Mustard (Color A), [7 sc, inc] 3 times (48)
Using White (Main Color), sc 24; switch to Mustard (Color A), sc 24 (48)
Using White (Main Color), sc 21; switch to Mustard (Color A), sc 27 (48)
Using White (Main Color), sc 18; switch to Mustard (Color A), sc 30 (48)
Using White (Main Color), sc 15; switch to Mustard (Color A), sc 33 (48)
Using Mustard (Color A), sc in each of the 48 st around (48)
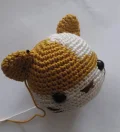
Insert the 10 mm safety eyes between Rounds 15 and 16, leaving a space of 9 stitches between them.
Using Mustard (Color A), sc in each of the 48 st around (48)
Using Mustard (Color A), [7 sc, inc] 6 times (54)
Using Mustard (Color A), sc in each of the 54 st around (54)
Using Mustard (Color A), [7 sc, dec] 6 times (48)
Using Mustard (Color A), [6 sc, dec] 6 times (42)
Using Mustard (Color A), [5 sc, dec] 6 times (36)
Using Mustard (Color A), [4 sc, dec] 6 times (30)
Using Mustard (Color A), [3 sc, dec] 6 times (24)
Stuff the head firmly with fiberfill, shaping it as you go to maintain a smooth rounded form.
Using Mustard (Color A), [2 sc, dec] 6 times (18)
Using Mustard (Color A), [sc, dec] 6 times (12)
Using Mustard (Color A), dec 6 times (6)
Fasten off, leaving a long yarn tail for sewing the head to the body later.
Make two ears using Mustard (Color A).
Using Mustard (Color A), work 6 sc into a magic ring (6)
Using Mustard (Color A), inc in each of the 6 st around (12)
Using Mustard (Color A), sc in each of the 12 st around (12)
Using Mustard (Color A), [sc, inc] 6 times (18)
Using Mustard (Color A), sc in each of the 18 st around (18)
Using Mustard (Color A), sc in each of the 18 st around (18)
Fasten off, leaving a long tail for stitching the ears onto the head.
Make two arms starting with Mustard (Color A).
Using Mustard (Color A), work 6 sc into a magic ring (6)
Using Mustard (Color A), inc in each of the 6 st around (12)
Using Mustard (Color A), sc in each of the 12 st around (12)
Switch to Light Green (Color B) for the sweater sleeves.
Using Light Green (Color B) and working in flo, sc in each of the 12 st around (12)
Using Light Green (Color B), [5 sc, inc] 2 times (14)
Using Light Green (Color B), sc in each of the 14 st around (14)
Fasten off and leave a long tail for sewing. Now, attach Mustard yarn to the unworked back loops of Round 7 to create the cuff detail.
Working in the unworked blo of Round 7, sc in each of the 12 st around, then fasten off (12)
Make two legs starting with Mustard (Color A).
Using Mustard (Color A), work 6 sc into a magic ring (6)
Using Mustard (Color A), inc in each of the 6 st around (12)
Using Mustard (Color A), sc in each of the 12 st around (12)
Using Mustard (Color A) and working in flo, sc in each of the 12 st around (12)
Using Mustard (Color A), sc in each of the 12 st around (12)
Switch to White (Main Color) for the lower body.
Using White (Main Color), [5 sc, inc] 2 times (14)
Using White (Main Color), sc in each of the 14 st around (14)
Do not fasten off the second leg. We will now connect them to form the body.
From the second leg, ch 5, join to the first leg with a sc, sc 13 around the first leg, sc 5 along one side of the ch, sc 14 around the second leg, sc 5 along the opposite side of the ch (38)
Sc in each of the 38 st around (38)
Sc in each of the 38 st around (38)
Switch to Light Green (Color B) to start the sweater.
Using Light Green (Color B), sc in each of the 38 st around (38)
Using Light Green (Color B), [4 sc, dec] 6 times, sc 2 (32)
Using Light Green (Color B), [3 sc, dec] 6 times, sc 2 (26)
Using Light Green (Color B), [2 sc, dec] 6 times, sc 2 (20)
Fasten off, leaving a yarn tail. Stuff the legs and body firmly with fiberfill.
Make two pant legs using Red (Color C).
Using Red (Color C), ch 20, slst to first ch to form a ring (20)
Sc in each of the 20 ch around (20)
Sc in each of the 20 st around (20)
Fold the piece in half. Insert hook through both layers, working sc across to join them (20)
Sc in each of the 20 st around (20)
Bring both legs together, sc around both pieces to join into a single large round (40)
Sc in each of the 40 st around (40)
Sc 34, ch 6, skip 6 st to create a leg opening (40)
Sc in each of the 40 st around (40)
Fasten off. Now we will add the bib portion of the overalls.
Find the center front of the overalls, attach Red (Color C) yarn, and sc 8 (8)
Turn, ch 1, sc 8. Turn, ch 18 for the strap, then fasten off. Repeat on the other side of the bib to create the second strap.
Using Brown/Tan yarn, work 6 sc into a magic ring (6)
Inc in each of the 6 st around (12)
[sc, inc] 6 times (18)
[2 sc, inc] 6 times (24)
[3 sc, inc] 6 times (30)
Working in flo, sc in each of the 30 st around (30)
Sc in each of the 30 st around (30)
Ch 1, skip 1 st, sc 2, hdc 15, ch 15 for the strap, hdc 15, slst to join (15 hdc)
Ch 40 to extend strap, straighten the basket shape, join across, then sc 40 along the strap and fasten off.
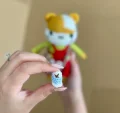
Make four fish using different contrast colors (Red, Purple, Blue, Orange).
Using White yarn, work 6 sc into a magic ring (6)
[inc, sc] 3 times (9)
Sc in each of the 9 st around (9)
Switch to your chosen contrast color, sc 3, inc, sc 4, inc (11)
Sc in each of the 11 st around (11)
Sc 3, dec, sc 4, dec (9)
Add a small pinch of fiberfill stuffing inside the fish body.
[dec, sc] 3 times (6)
Switch back to White yarn, inc in each of the 6 st around to make the tail fin, then fasten off (12)
I hope you have the absolute best time bringing this little fishing cat to life! There is something so incredibly magical about seeing all the tiny pieces—the little overalls, the woven basket, and those sweet colorful fish—come together into a finished friend. Don't forget to take your time, enjoy every stitch, and share your beautiful creations with your crafting circle. Happy crocheting, and may your hooks always glide smoothly! 🧶✨🐱🐟
Yes, you can certainly use worsted weight yarn! Just keep in mind that your finished cat will turn out about 30% larger, and you will need to scale up your hook size to a 3.5 mm or 4.0 mm and use larger safety eyes (around 12 mm or 14 mm) to keep the proportions correct.
To get perfectly clean color transitions, always complete the very last slip of the previous stitch with your new color. This prevents the old color from bleeding into the next stitch and keeps your color patches looking sharp and professional.
If the overalls feel too snug, your tension might be a bit tight. You can easily fix this by switching to a 0.5 mm larger hook specifically for the overalls, or by adding 2 extra chains to your starting loop and adjusting your stitch counts slightly.
Only use a tiny pinch of stuffing for the fish! If you stuff them too tightly, they will lose their flat, realistic fish shape and might not fit nicely inside the small shoulder basket.
