🧶 Beautiful ✨ Detailed 💝 Adorable

Houses of Wizardry Badger Crochet Applique Pattern

Houses of Wizardry Badger Crochet Applique Pattern
4.6★ Rating
2-3 Hours Time Needed
2.1K Made This
✂️

Beginner Friendly Level

Perfect for those just starting their sewing journey, with clear instructions and simple techniques

⏱️

Weekend Treat

Takes 5-7 hours, making it an enjoyable project to finish over a couple of days.

🧸

Cute Companion

An adorable handcrafted friend to cherish, made with love to bring warmth and joy for years to come.

About This Houses of Wizardry Badger Crochet Applique Pattern

This Badger applique pattern is part of the Houses of Wizardry crochet collection, featuring four iconic house animals. The badger is worked in pieces — head, body, arms, feet, ears, and a striped scarf — then assembled into one cohesive and charming design. With a soft white and grey color palette accented by gold, this little creature is full of personality and house pride.

Houses of Wizardry Badger Crochet Applique Pattern crochet pattern - detailed view of completed project

Each component is simple to work up individually, making this a relaxing and rewarding project from start to finish. The striped scarf adds the perfect pop of color and house spirit.

Why You'll Love This Houses of Wizardry Badger Crochet Applique Pattern

I absolutely love this pattern because it breaks everything down into small, manageable pieces that never feel overwhelming. I love how the striped scarf comes together so quickly and adds so much character. Every little detail — the tiny nose chain, the button eyes, the little round feet — makes the finished badger feel genuinely handmade and full of heart. It's the kind of project I find myself wanting to make over and over for gifts!

Houses of Wizardry Badger Crochet Applique Pattern step 1 - construction progress Houses of Wizardry Badger Crochet Applique Pattern step 2 - assembly progress Houses of Wizardry Badger Crochet Applique Pattern step 3 - details and accessories Houses of Wizardry Badger Crochet Applique Pattern step 4 - final assembly and finishing

Switch Things Up

I've always believed that the best crochet projects are the ones that feel like a little story unfolding stitch by stitch. When I first made this Badger, I remember being surprised by how quickly each small piece came together — the round little body, those stubby charcoal arms, the striped scarf in gold and grey. It felt less like following a pattern and more like assembling a tiny character with its own personality. I love that this project doesn't demand hours of intense concentration. You can pick it up, work on a piece or two, put it down, and come back feeling refreshed. The modular construction — making everything separately and assembling at the end — is something I find incredibly satisfying. There's a real moment of magic when you glue or stitch the last piece on and suddenly it *looks* like a badger. I also love how versatile this applique is. I've stitched mine onto tote bags, sewn it to a child's cardigan, and even framed one as a little fiber art piece. The possibilities honestly feel endless. If you're new to crochet, this is one of those patterns that gives you a big, satisfying result without asking too much of you technically. And if you're more experienced, the detail work on the crest and scarf gives you something fun to sink into. Either way, I think you're going to love making this little guy.

Common Mistakes & How to Fix Them

✗ Starting the magic circle too loosely — pull the tail tightly before joining to avoid a visible hole in the center. ✗ Miscounting DC stitches in the body or head rounds — always count after each row to stay on track. ✗ Forgetting that CH 2 at the end of rows does NOT count as the first DC — this will throw off your stitch count. ✗ Attaching the scarf pieces in the wrong order — lay all pieces out and dry-fit them before gluing or stitching. ✗ Using too much glue when assembling — a small dot holds well; excess glue can seep through yarn fibers and harden visibly. ✗ Skipping the charcoal outline chain on the crest — it frames the whole piece and makes a big visual difference.

Houses of Wizardry Badger Crochet Applique Pattern

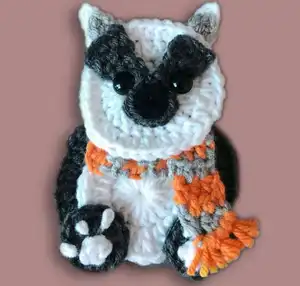
Bring a little magic to your crafting table with this charming Badger applique crochet pattern, inspired by the beloved world of wizarding houses! Whether you're decorating a tote bag, a baby blanket, or a cozy sweater, this adorable badger is the perfect handmade touch. The pattern walks you through every piece — from the round little body and expressive face to the striped scarf and tiny feet — with clear, beginner-friendly instructions. With classic gold, grey, and white tones, this little guy stitches up quickly and looks absolutely magical when finished. Grab your hook and let's create something truly special together!

Beginner Friendly 2-3 Hours

Materials Needed for Houses of Wizardry Badger Crochet Applique Pattern

— Main Fabric

  • 01
    Worsted weight yarn in Gold (main body and crest accent)
  • 02
    Worsted weight yarn in Light Grey (body detail and outline)
  • 03
    Worsted weight yarn in White (head, body, ears, feet detail)
  • 04
    Worsted weight yarn in Charcoal (arms, eyes, crest outline, nose detail chain)
  • 05
    Worsted weight yarn in Black (nose)

— Tools Required

  • 01
    Crochet hook size F (3.75mm)
  • 02
    Yarn needle
  • 03
    Scissors
  • 04
    Buttons (13mm for body, 6mm for smaller details)
  • 05
    Hot glue gun and glue sticks (optional, for assembly)
  • 06
    Stitch markers (recommended)

Progress Tracker

0% Complete

— Crest :

Info :

Use this same crest pattern for all 4 houses. For Badger, use Gold and Light Grey with a Charcoal outline.

Row 1 :

CH 18. DC in 3rd from hook and across (16). CH 2, turn.

Row 2 :

DC2TG. DC in next 12. DC2TG. (14). CH 2, turn.

Row 3 :

DC2TG. DC in next 10. DC2TG. (12). CH 2, turn.

Row 4 :

DC2TG. DC in next 8. DC2TG. (10). CH 2, turn.

Row 5 :

DC2TG. DC in next 6. DC2TG. (8). CH 2, turn.

Row 6 :

DC2TG. DC in next 4. DC2TG. (6). CH 2, turn.

Row 7 :

DC2TG. DC in next 2. DC2TG. (4). CH 2, turn.

Row 8 :

DC2TG twice. (2). Tie off.

Info :

Reattach yarn at bottom of original chain, skipping 3 stitches in.

Row 9 :

DC in 10. CH 2, turn.

Row 10 :

2DC in first 2. DC in next 6. 2DC in last 2. (14). CH 2, turn.

Row 11 :

2DC in first. DC in next 12. 2DC in last. (16). CH 1, turn.

Row 12 :

SC in first 2, HDC in next 2, DC in next 3, TC in next 2, DC in next 3, HDC in next 2, SC in last 2. SS in same stitch. Tie off.

Outline :

Using Charcoal, make a chain of 85. Tie off. Attach it all the way around the crest.

Stripe Chains :

Using your stripe color, make the following chains and tie off: CH 15, CH 21, CH 16, CH 1, CH 4. Arrange them on the crest as shown.

— Badger Head :

Round 1 :

Using white, make a magic circle, CH 2, then DC 12. SS to join. CH 2, do not turn.

Round 2 :

2DC in each stitch around. SS to join. CH 2, do not turn.

Round 3 :

*2HDC in first. 1HDC in next. Repeat from * all the way around. SS to join. Tie off.

— Eyes (Make 2) :

Row 1 :

Using charcoal, CH 5. HDC in 2nd from hook and across (4). CH 1, turn.

Row 2 :

HDC2TG twice. (2). CH 1, turn.

Row 3 :

HDC across (2). CH 1, turn.

Row 4 :

HDC across (2). Tie off.

— Nose :

Round 1 :

Using black, make a magic circle, CH 1, and SC 4. SS to join. Tie off.

Outline :

Using charcoal, make a CH of 10. This is the outline on the bottom of the nose.

— Ears (Make 2) :

White Piece :

Using white, CH 5. SC in 2nd from hook. HDC in next. DC in next. TC in last. Tie off.

Light Grey Piece :

Using light grey, CH 3. SC in 2nd from hook, and HDC in last. Tie off.

— Body :

Round 1 :

Using white, make a magic circle, CH 2, and DC 16. SS to join. CH 2, do not turn.

Round 2 :

2DC in each stitch around. SS to join. Tie off.

— Arms (Make 2) :

Row 1 :

Using charcoal, CH 12. DC in 3rd from hook and in next 3. 2DC in next. DC in remaining 5. Tie off.

— Scarf :

Info :

Use Gold as Color 1 and Light Grey as Color 2 for the Badger scarf. You can tie off between colors or carry yarn up the back.

Neck Piece :

Using Color 1, CH 4. HDC in 2nd from hook and across (3). *Attach Color 2. HDC across (3). Switch to Color 1. HDC across (3). Repeat from * 3 more times, or until you have 7 rows total. Tie off.

Drape Piece :

Repeat scarf instructions above but work only until you have 5 rows total. Tie off.

Fringe :

Make 6 cuts of yarn, about 4 inches long. Using 2 pieces at a time, tie them around the bottom of the drape piece and trim to desired length.

— Feet (Make 2) :

Base :

Using charcoal, make a magic circle, CH 2 and DC 12. SS to join. Tie off.

Toe Detail :

Using white, CH 2. SC 3 times in last CH from hook and pull tight. Tie off.

Claw Chains :

Using white, make 3 CH's of 1. Tie off each separately.

Assembly Instructions

  • Position the head centered on top of the body and glue or stitch securely in place.
  • Attach the two eyes onto the head, placing them symmetrically on either side of the face.
  • Glue or sew the nose to the center-lower area of the face, then attach the charcoal chain outline below it.
  • Position both ears at the top of the head and secure them with glue or a few stitches.
  • Attach both arms to the sides of the body, angling them slightly downward for a natural look.
  • Secure the feet to the bottom of the body, side by side, adding the white toe detail and claw chains on top.
  • Wrap the neck scarf piece around the base of the head and drape the second scarf piece downward, securing both in place.

Important Notes

  • 💡The CH 2 at the end of rows never counts as the first DC — always begin your DC into the first actual stitch.
  • 💡When working the head, keep your magic circle tight so no gap shows at the center.
  • 💡Dry-fit all pieces before gluing — positioning makes a big difference in the final look.
  • 💡Hot glue holds well through washing, but do your own test on your yarn brand before washing a finished item.
  • 💡For the scarf, carrying yarn up the back saves time and reduces yarn ends to weave in.

This little Badger applique is pure handmade magic — a tiny, round-faced creature stitched with house pride and a whole lot of heart. From his charcoal arms to his gold-and-grey scarf, every detail comes together to create something genuinely special. Whether you're gifting it to a fellow fan or adding it to your own project, this pattern is one you'll come back to again and again. 🦡🧶 Happy crocheting! ✨

You ask,

we answer.

FAQs

Can I use a different yarn weight for this pattern?

Yes! The pattern is written for worsted weight yarn with a size F hook, but you can adjust both to suit your preferred yarn. Just note that a different weight will change the finished size of your applique.

Can I stitch the pieces together instead of using a glue gun?

Absolutely. The designer uses a hot glue gun for speed and convenience, but stitching all pieces together with a yarn needle is a completely valid option and may be preferable for items that will be washed frequently.

What size buttons should I use for the eyes?

The pattern recommends 13mm shank buttons for the larger animal pieces. You can find these at most craft stores. Feel free to swap in safety eyes if you prefer a more amigurumi-style look.

How do I keep the scarf stripes even?

Work each row carefully and count your HDC stitches — you should always have 3 per row. Carrying your yarn up the back rather than cutting between colors can also help keep things tidy and even.

Can I make all four house animals from this pattern pack?

Yes! This Badger is part of a set of four — Raven, Lion, Snake, and Badger — all sharing the same crest base pattern. Only the colors and animal-specific pieces change between them.

Is this pattern suitable for a beginner crocheter?

The Badger is one of the more beginner-friendly animals in this pack. As long as you're comfortable with basic stitches like DC, HDC, SC, and magic circles, you should have no trouble following along.