🧶 Beautiful ✨ Detailed 💝 Adorable

Elwen Heart Granny Square Crochet Pattern

Elwen Heart Granny Square Crochet Pattern
4.0★ Rating
2-3 Hours Time Needed
1.5K Made This
✂️

Intermediate Level

Ideal for those with basic knitting experience, featuring slightly more advanced stitches and techniques to expand your skills.

⏱️

Weekend Treat

Takes 5-7 hours, making it an enjoyable project to finish over a couple of days.

Stylish Touch

An elegant detail to elevate any look, combining traditional techniques with contemporary design sensibilities.

About This Elwen Heart Granny Square Crochet Pattern

The Elwen Granny Square is a heart-centered crochet motif designed by Krisztina Anna Matejcsok-Edomer of K.A.M.E. Crochet. It measures 4.75" x 4.75" (12x12 cm) when finished and works up in 7 carefully crafted rounds. The heart motif at the center is built using front post double crochets and treble clusters, giving it that gorgeous raised, sculptural quality that makes it stand out from ordinary granny squares. Three shades of pink cotton yarn blend seamlessly from the heart outward to the outer border, creating a soft and romantic color story that looks stunning whether you use the suggested Paintbox Cotton DK or your own favorite yarn.

Elwen Heart Granny Square Crochet Pattern crochet pattern - detailed view of completed project

This pattern uses US crochet terms and includes a full photo tutorial for every step, so even if you're newer to post stitches or back loop techniques, you'll have plenty of visual guidance. Blocking is strongly recommended at the end to really let those crisp edges and even stitches shine through.

Why You'll Love This Elwen Heart Granny Square Crochet Pattern

I genuinely fell in love with this square the moment I saw how that heart just pops right out of the center — it's like magic watching it come together round by round. I love how the three pink shades feel warm and romantic without being overly sweet, and the mix of stitches keeps things interesting rather than repetitive. Every time I pick this up, I feel like I'm making something truly special, not just another square. I especially love how versatile it is — I've used mine as coasters, stitched a few together for a mini wall hanging, and even added one to a tote bag. It's one of those patterns I keep coming back to because it always impresses, and it always feels like a little act of love to make.

Elwen Heart Granny Square Crochet Pattern step 1 - construction progress Elwen Heart Granny Square Crochet Pattern step 2 - assembly progress Elwen Heart Granny Square Crochet Pattern step 3 - details and accessories Elwen Heart Granny Square Crochet Pattern step 4 - final assembly and finishing

Switch Things Up

I've made my fair share of granny squares over the years, but I have to be honest — the Elwen Square stopped me in my tracks the first time I saw it. That little sculpted heart sitting right in the center just does something to me. I love that it isn't just flat and predictable like so many motifs out there; it has dimension, it has texture, and it genuinely looks like something you'd find in a boutique shop rather than something you crocheted yourself on a quiet afternoon. I find myself making these in every color combination I can dream up — soft pinks for a romantic nursery blanket, deep burgundy and cream for a cozy winter throw, even bright sunflower yellow with terracotta for a boho wall hanging. The pattern is satisfying in that perfectly meditative way where your hands just know what to do, and your mind gets to drift. I love reaching Round 6 when the outer square border starts to take shape, because that's the moment the whole design clicks together and you suddenly see the finished piece in front of you. I've gifted these as coasters, made them into cushion covers, incorporated them into bags, and stitched rows of them into table runners. Every single person who receives something made from this pattern asks me where I found it — and I always smile when I tell them I made the pattern work myself. That's the feeling I want you to have too. Try it once, and I promise you'll be casting on your second one before the first one is even off the hook. 🧶

Common Mistakes & How to Fix Them

✗ Missing the hidden stitch under corner stitches — always check for the first stitch of the previous row hiding beneath your corner cluster before moving on. ✗ Forgetting that CH 1 and CH 2 do NOT count as a stitch in this pattern — miscounting these will throw off your stitch count every round. ✗ Working into both loops when the pattern calls for back loop only (BLO) — this flattens the dimensional texture and ruins the heart shape. ✗ Skipping the stitch marker placement at Round 5 — without that marker, you'll struggle to find the correct starting stitch for Round 6's corner. ✗ Not blocking the finished square — unblocked, the edges can look wavy and uneven; blocking is essential to achieving crisp, straight sides. ✗ Losing track of FPDC placement in Round 2 — the front post stitches can hide the next working stitch; always look carefully before inserting your hook.

Elwen Heart Granny Square Crochet Pattern

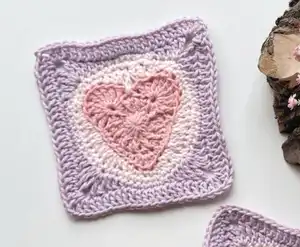
Welcome to one of the most charming little crochet projects you'll ever make — the Elwen Granny Square! This gorgeous 4.75" x 4.75" square features a beautifully sculpted heart at its center, surrounded by delicate rounds that build into a classic granny square frame. Whether you're making a single square as a coaster, joining multiples into a blanket, or incorporating it into a bag, this pattern is as versatile as it is beautiful. You'll work through a satisfying mix of stitches — from front post double crochets that give the heart its lovely raised texture, to extended double crochets and back loop techniques that create that signature dimensional look. Three coordinating pink shades come together in perfect harmony, making each finished square feel like a little piece of handmade art. Grab your hook, pick your favorite cotton yarn, and let's make something you'll be proud to display or gift!

Intermediate 2-3 Hours

Materials Needed for Elwen Heart Granny Square Crochet Pattern

— Main Fabric

  • 01
    Paintbox Yarns Cotton DK — approximately 10 grams total across 3 colors: Blush Pink (C1), Candyfloss Pink (C2), Dusty Rose (C3)
  • 02
    Any DK weight cotton yarn in 3 coordinating colors is suitable as a substitute

— Tools Required

  • 01
    Crochet hook size 3.75mm (F)
  • 02
    Yarn needle for weaving in ends
  • 03
    Scissors
  • 04
    Stitch markers

Progress Tracker

0% Complete

— Special Stitches :

FPDC (Front Post Double Crochet) :

Yarn over, insert your hook from front to back around the post of the given stitch from right to left, yarn over and finish your double crochet as usual.

ExtDC (Extended Double Crochet) :

Yarn over, insert your hook into given stitch, yarn over, pull through 1 loop, yarn over, pull through 2 loops, yarn over, pull through 2 loops.

— Granny Square :

To Start :

With C1 (Blush Pink), make a magic ring (MR).

Round 1 :

CH 1, 12 DC into the ring, then tighten it, join with a SLST to first DC. (12 DC)

Round 2 :

CH 2 (doesn't count as a ST), 1 DC in same ST, 1 FPDC around the same ST you just put a DC into, [1 DC in next ST (note: the FPDC might hide the next ST you have to work into), 1 FPDC around same ST] 11 times, join with a SLST to first DC. (12 FPDC, 12 DC)

Round 3 :

CH 1, 1 SC in same ST, SK 2 STS, 9 TR in next ST (FPDC), SK 2 STS, 1 SC in next ST, SK 2 STS, 9 TR in next ST (FPDC), SK 2 STS, 1 SC in next 6 STS, {2 HDC, 1 DC, 2 HDC} in next ST, 1 SC in next 5 STS, join with an invisible join to first SC (or alternatively with a SLST to first SC). Fasten off. (13 SC, 4 HDC, 1 DC, 18 TR)

Round 4 :

Join C2 (Candyfloss Pink) with a standing DC to the BLO of last TR on the right (if left-handed, start in the BLO of last TR on the left), 1 DCBLO in same ST, 1 ExtDC into the DC ST from Round 2 (it has a SC in it already, just work over it), 2 DCBLO in next ST, 1 HDCBLO in next ST, 2 SCBLO in next ST, {1 SCBLO in next ST, 2 SCBLO in next ST} twice, 1 HDCBLO in next ST, 2 DCBLO in next ST, {1 DCBLO in next ST, 2 DCBLO in next ST} twice, 1 HDCBLO in next ST, 2 HDCBLO in next ST, 1 SCBLO in next ST, {2 SCBLO in next ST, 1 SCBLO in next ST} twice, 2 HDCBLO in next ST, 1 HDCBLO in next ST, 2 DCBLO in next ST, {1 DCBLO in next ST, 2 DCBLO in next ST} twice, 1 HDCBLO in next ST, 2 SCBLO in next ST, {1 SCBLO in next ST, 2 SCBLO in next ST} twice, 1 HDCBLO in next ST, join with a SLST to first DC. (23 SCBLO, 10 HDCBLO, 1 ExtDC, 20 DCBLO)

Round 5 :

CH 1, 1 SC in same ST, 1 SC in next ST, 2 SC in next ST, 1 SC in next 26 STS, 2 SC in next ST, 1 SC in next 24 STS, join with a SLST to first SC. Note: Put a SM in the 4th last ST. Fasten off. (56 SC)

Round 6 :

Join C3 (Dusty Rose) with a standing TR to the ST marked with a SM, CH 2, 2 TR in same ST (corner), 1 DC in next 2 STS, 1 HDC in next ST, 1 SC in next 7 STS, 1 HDC in next ST, 1 DC in next 2 STS, [{2 TR, CH 2, 2 TR} in next ST (corner), 1 DC in next 2 STS, 1 HDC in next ST, 1 SC in next 7 STS, 1 HDC in next ST, 1 DC in next 2 STS] 3 times, 1 TR in first corner, join with a SLST to first TR. (28 SC, 8 HDC, 16 DC, 16 TR, 4 x CH 2 SP)

Round 7 :

SLST to CH 2 corner SP, CH 1, {1 DC, CH 2, 2 DC} in CH 2 corner SP (corner), 1 DC in each ST on side, [{2 DC, CH 2, 2 DC} in CH 2 corner SP (corner), 1 DC in each ST on side] 3 times, 1 DC in first corner, join with a SLST to first DC. Fasten off, weave in all ends, block the finished square. (84 DC, 4 x CH 2 SP)

Assembly Instructions

  • Fasten off all yarn ends after completing Round 7 and use your yarn needle to weave them in securely on the wrong side of the square.
  • Wet block the finished square by soaking it in cool water, gently squeezing out excess moisture, then pinning it to your blocking mat to the exact dimensions (4.75" x 4.75") and allowing it to dry completely.
  • If joining multiple Elwen squares into a larger project, align the squares right sides together and use a flat slip stitch join or your preferred joining method through the corner CH 2 spaces first, then along the sides.
  • When joining squares into rows or a grid, always start at a corner CH 2 space and work consistently from the same direction to keep your joins neat and uniform.
  • After joining, lightly re-block the assembled piece to even out any tension differences between squares.

Important Notes

  • 💡Slip stitches do not count as stitches anywhere in this pattern — never work into them as a regular stitch.
  • 💡CH 1 and CH 2 do NOT count as a stitch unless the pattern explicitly states otherwise — this is critical for getting the correct stitch counts.
  • 💡When working corners in Round 6 and 7, always check for a hidden stitch tucked underneath the corner cluster — it belongs to the first stitch of the previous row.
  • 💡Blocking is not optional for this pattern — it is essential to achieve straight, even edges and to fully open up the stitches to their proper shape.
  • 💡Place your stitch marker carefully in the 4th last stitch of Round 5 — this marker is your guide for where to begin Round 6's first corner.
  • 💡In Round 4, when you work the ExtDC into the DC stitch from Round 2, there will already be a SC sitting in that stitch — simply work right over it as instructed.

The Elwen Granny Square is one of those patterns that feels like a quiet little love letter to the craft of crochet. From the delicate raised heart center to those dreamy pink rounds fanning outward, every stitch in this design has a purpose — and a personality. Whether you make just one to frame and admire, or stitch dozens together into a sweeping blanket you'll reach for every chilly evening, this square has a way of making you slow down and really enjoy the process. It's the kind of project that turns yarn and hook into something genuinely meaningful. 🧶 Happy crocheting! 🧵✨

You ask,

we answer.

FAQs

What yarn weight should I use for this pattern?

The pattern is designed for DK weight cotton yarn. The designer used Paintbox Yarns Cotton DK, but any DK weight cotton or cotton-blend yarn will work well. Avoid very fluffy or textured yarns as they may obscure the stitch detail in the heart motif.

Can I use a different hook size?

The pattern calls for a 3.75mm (F) hook. Since gauge isn't critical for a single decorative square, you can adjust your hook size — just be aware that a larger hook will produce a bigger square and use more yarn, while a smaller hook will give a tighter, smaller result.

I've never done a Front Post Double Crochet before — is it hard?

It takes a little practice but it's very manageable! Instead of inserting your hook into the top of the stitch, you wrap your hook around the vertical post of the stitch below. The pattern description walks you through it, and the designer also links to a full video tutorial which makes it much easier to follow.

Why do I need to block this square?

Blocking is especially important for cotton yarns and stitch-detailed patterns like this one. Without blocking, the edges can look uneven and the stitches won't fully open up to show their shape. Simply soak the finished square, pin it to size on a foam mat, and let it dry — the difference is dramatic.

Can I make this in different colors?

Absolutely! The three-color graduation in pinks is beautiful, but this pattern works with any three coordinating colors. Try earthy neutrals, bold brights, or even a monochrome look using three different shades of the same color family for a more subtle effect.

How many squares do I need to make a blanket?

Each square finishes at approximately 4.75" x 4.75" (12x12 cm). For a standard lap blanket around 40" x 50", you'd need roughly 70-80 squares. A full throw would require around 120+ squares. The exact number depends on your joining method and whether you add a border.

What does it mean when the pattern says CH 2 doesn't count as a stitch?

It means those chain stitches are just there to bring your yarn up to the correct height — you don't treat them like a real stitch when counting or working into the round. This is a common technique in crochet and is clearly noted throughout the pattern so you never lose track of your stitch count.