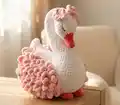
Create this graceful swan amigurumi using soft plush yarn that brings this elegant creature to life. This charming pattern features detailed wings, a curved neck, and delicate finishing touches including embroidered eyes and a sweet flower accessory. Perfect for gifting or adding a touch of elegance to your nursery décor, this swan stands approximately 23 cm tall and showcases beautiful texture work with its layered wing design.
Progress Tracker
0% Complete
— Beak :
Round 1 :
Make 4 ch. Start in 2nd ch from hook - 3 sc, continue on 2nd side of chain - 3 sc (6)
Round 3 :
inc, 1 sc, inc, 3 sc (8)
Round 5 :
2 sc, 3 sc into 1, 5 sc (10)
Round 7 :
2 sc, 3 sc into 1, 7 sc (12)
Round 8 :
3 sc, 3 sc into 1, 4 sc, 3 slst - finish row (14)
Info :
Change coral thread to white when crocheting last slst. Stuff beak with holofiber. Continue to head.
— Head + Neck + Body :
Round 1 :
2 slst, inc, 2 sc, 1 hdc, 5 hdc into 1, 1 hdc, 2 sc, inc, 3 slst (20)
Round 2 :
2 slst, inc, 5 sc, 1 hdc, 5 hdc into 1, 1 hdc, 5 sc, inc, 3 slst (26)
Round 3 :
2 slst, inc, 6 sc, 7 hdc, 6 sc, inc, 3 slst (28)
Round 4 :
2 slst, inc, 9 sc, 1 hdc, 3 hdc into 1, 1 hdc, 9 sc, inc, 3 slst (32)
Round 5 :
2 slst, 11 sc, 5 hdc, 11 sc, 3 slst (32)
Round 6 :
2 slst, 11 sc, 5 hdc, 11 sc, 1 slst, remove marker (move 1 st forward), 3 st together with slst (30)
Round 7 :
1 slst, 11 sc, 5 hdc, 11 sc, remove marker (move 1 st forward), 3 st together with slst (28)
Round 8 :
1 slst, 5 sc, dec, 3 sc, 5 hdc, 3 sc, dec, 5 sc, remove marker (move 1 st forward), 3 st together with slst (24)
Round 9 :
1 slst, 8 sc, 5 hdc, 8 sc, remove marker (move 1 st forward), 3 st together with slst (22)
Round 10 :
1 slst, 4 sc, dec, 1 sc, 5 hdc, 1 sc, dec, 4 sc, remove marker (move 1 st forward), 3 st together with slst (18)
Round 11 :
1 slst, 2 sc, dec, 1 sc, 5 hdc, 1 sc, dec, 2 sc, remove marker (move 1 st forward), 3 st together with slst (14)
Round 12 :
1 slst, 3 sc, 5 hdc, 3 sc, remove marker (move 1 st forward), 3 st together with slst (12)
Round 13 :
1 slst, 2 sc, 5 hdc, 2 sc, 2 slst (12)
Round 14 :
1 slst, 2 sc, 5 hdc, 2 sc, 1 slst, BLO - 1 slst (12)
Round 15 :
1 slst, 2 sc, 5 hdc, 2 sc, 2 slst (12)
Round 16 :
1 slst, 3 sc, 3 hdc, 3 sc, 2 slst (12)
Round 17 :
1 slst, 4 sc, 1 hdc, 4 sc, 1 slst, 1 slst grabbing back loop from row 14 (12), remove marker, crochet 5-6 more sc to reach center back of neck, set marker
Round 18 :
5 sc, inc, 6 sc (13)
Round 19 :
5 sc, 3 slst, 5 sc (13)
Round 20 :
6 sc, inc, 6 sc (14)
Round 21 :
1 sc, dec, 2 sc, inc, 2 sc, inc, 2 sc, dec, 1 sc (14)
Round 22 :
6 sc, 2 inc, 6 sc (16)
Round 23 :
6 sc, 4 slst, 6 sc (16)
Round 24 :
6 sc, inc, 2 sc, inc, 6 sc (18)
Round 25 :
1 sc, dec, 5 sc, 2 inc, 5 sc, dec, 1 sc (18)
Round 27 :
1 sc, dec, 4 sc, inc, 2 sc, inc, 4 sc, dec, 1 sc (18)
Round 28 :
8 sc, 2 inc, 8 sc (20)
Round 29 :
1 sc, dec, 5 sc, inc, 2 sc, inc, 5 sc, dec, 1 sc (20)
Round 30 :
9 sc, 2 inc, 9 sc (22)
Round 31 :
9 sc, inc, 2 sc, inc, 9 sc (24)
Round 32 :
11 sc, 2 inc, 11 sc (26)
Round 33 :
1 sc, dec, 9 sc, 2 inc, 9 sc, dec, 1 sc (26)
Round 34 :
11 sc, inc, 2 sc, inc, 11 sc (28)
Round 35 :
1 sc, dec, 10 sc, 2 inc, 10 sc, dec, 1 sc (28)
Round 36 :
12 sc, inc, 2 sc, inc, 12 sc (30)
Round 37 :
1 sc, dec, 6 sc, inc, 4 sc, 2 inc, 4 sc, inc, 6 sc, dec, 1 sc (32)
Round 38 :
1 sc, dec, 9 sc, inc, 2 sc, 2 inc, 2 sc, inc, 8 sc, 1 slst, dec with slst, 1 slst (34)
Round 39 :
6 slst, 22 sc, 3 slst, BLO - 3 slst (34)
Round 40 :
BLO - 3 slst, for both loops - 6 sc, inc, 6 sc, 2 inc, 6 sc, inc, 6 sc, 3 slst grabbing back loop from row 39 (38)
Round 41 :
3 slst grabbing back loop from row 40, 5 slst, 5 sc, inc, 10 sc, inc, 5 sc, 5 slst, BLO - 3 slst (40)
Round 42 :
BLO - 3 slst, for both loops - 5 sc, inc, 6 sc, inc, 3 sc, 2 inc, 3 sc, inc, 6 sc, inc, 5 sc, 3 slst grabbing back loop from row 41 (46)
Round 43 :
3 slst grabbing back loop from row 42, 7 slst, 9 sc, inc, 6 sc, inc, 9 sc, 7 slst, BLO - 3 slst (48)
Round 44 :
BLO - 3 slst, for both loops - 12 sc, inc, 16 sc, inc, 12 sc, 3 slst grabbing back loop from row 43 (50)
Round 45 :
3 slst grabbing back loop from row 44, 9 slst, 2 sc, inc, 9 sc, 2 inc, 9 sc, inc, 2 sc, 9 slst, BLO - 3 slst (54)
Round 46 :
BLO - 3 slst, for both loops - 48 sc, 3 slst (54)
Round 47 :
14 slst, 3 sc, inc, 18 sc, inc, 3 sc, 14 slst (56)
Round 48 :
3 slst, 7 sc, inc, 34 sc, inc, 7 sc, 3 slst (58)
Round 49 :
16 slst, 26 sc, 16 slst (58)
Round 50 :
3 inc grabbing back loop from row 46, 10 inc, dec, 4 sc, (dec, 3 sc)x2, (3 sc, dec)x2, 4 sc, dec, 10 inc, 3 inc grabbing back loop from row 45 (78)
Round 51 :
(1 sc, inc)x5, 10 sc, (1 sc, inc)x3, dec, 22 sc, dec, (inc, 1 sc)x3, 10 sc, (inc, 1 sc)x5 (92)
Round 52 :
13 sc, BLO - 10 sc (place green markers), for both loops - 11 sc, dec, 3 sc, dec, (2 sc, dec)x3, 3 sc, dec, 11 sc, BLO - 10 sc (place green markers), for both loops - 13 sc (86)
Round 53 :
(6 sc, inc)x4, 5 sc, (dec, 4 sc)x3, dec, 5 sc, (inc, 6 sc)x4 (90)
Round 54 :
5 sc, inc, 5 sc, BLO - (inc, 5 sc)x2 (place orange markers), for both loops - inc, 5 sc, inc, (dec, 3 sc)x3, (3 sc, dec)x3, inc, 5 sc, inc, BLO - (inc, 5 sc)x2 (place orange markers), for both loops - 5 sc, inc, 5 sc (94)
Round 55 :
(7 sc, inc)x4, (3 sc, dec)x3, (dec, 3 sc)x3, (inc, 7 sc)x4 (96)
Round 56 :
11 sc, BLO - 14 sc (place purple markers), for both loops - 8 sc, (dec, 3 sc)x3, (3 sc, dec)x3, 8 sc, BLO - 14 sc (place purple markers), for both loops - 11 sc (90)
Round 57 :
(6 sc, inc)x4, 2 sc, (3 sc, dec)x3, (dec, 3 sc)x3, 2 sc, (inc, 6 sc)x4 (92)
Round 58 :
9 sc, BLO - 15 sc (place blue markers), for both loops - 7 sc, (dec, 3 sc)x3, (3 sc, dec)x3, 7 sc, BLO - 15 sc (place blue markers), for both loops - 9 sc (86)
Round 59 :
(6 sc, inc)x4, (3 sc, dec)x3, (dec, 3 sc)x3, (inc, 6 sc)x4 (88)
Round 60 :
7 sc, BLO - 17 sc (place pink markers), for both loops - 5 sc, (dec, 3 sc)x3, (3 sc, dec)x3, 5 sc, BLO - 17 sc (place pink markers), for both loops - 7 sc (82)
Round 61 :
(5 sc, inc)x4, 2 sc, (3 sc, dec)x3, (dec, 3 sc)x3, 2 sc, (inc, 5 sc)x4 (84)
Round 62 :
5 sc, BLO - 19 sc (place yellow markers), for both loops - 3 sc, (dec, 3 sc)x3, (3 sc, dec)x3, 3 sc, BLO - 19 sc (place yellow markers), for both loops - 5 sc (78)
Round 63 :
(5 sc, inc)x4, (3 sc, dec)x3, (dec, 3 sc)x3, (inc, 5 sc)x4 (80)
Round 64 :
25 sc, (dec, 3 sc)x3, (3 sc, dec)x3, 25 sc (74)
Round 65 :
(6 sc, inc)x4, (1 sc, dec)x3, (dec, 1 sc)x3, (inc, 6 sc)x3, inc, 3 sc, (3 sc into 1)x3 (82)
Round 66 :
(3 sc into 1)x3, 29 sc, 6 dec, 38 sc (76)
Round 67 :
40 sc, 1 slst - finish row
Infos :
Fix thread, leave long piece (50-60cm) for sewing. Add holofiber. Sew the back hole (38 stitches total). Fix and hide thread.
— Wings (Make 2) :
Info :
Attach pink thread to last front loop of row 52. Make 5 ch. In each loop crochet: (dtr, ch, dtr, 3 ch, sc in 3rd loop from hook)
Right Wing Step 1 :
Row 52 from green to green marker - crochet combination 10 times under each front loop. Turn toy, go to row 54
Right Wing Step 2 :
Row 54 from orange to orange marker - crochet combination 12 times under each front loop. Turn toy, go to row 56
Right Wing Step 3 :
Row 56 from purple to purple marker - crochet combination 14 times under each front loop. Turn toy, go to row 58
Right Wing Step 4 :
Row 58 from blue to blue marker - crochet combination 15 times under each front loop. Turn toy, go to row 60
Right Wing Step 5 :
Row 60 from pink to pink marker - crochet combination 17 times under each front loop. Turn toy, go to row 62
Right Wing Step 6 :
Row 62 from yellow to yellow marker - crochet combination 19 times under each front loop. Make 4 ch and attach to last slst in row 60 with slst
Info :
Fix, cut, hide thread. Optionally tie beginning and end threads together and hide. Repeat same process for Left Wing.
— Face Details :
Eyes :
Embroider eyes on rows 3-4 of head at distance of 11 sc apart
Nostrils :
Embroider nostrils between rows 1-2 of beak at distance of 1-2 sc apart
— Legs (Make 2) :
Round 1 :
Make 5 ch. Start in 2nd ch from hook - 4 sc, continue on 2nd side of chain - 4 sc (8)
Round 3 :
3 sc, dec, 2 sc, remove marker, crochet 1 more dec and 3 sc (6)
Info :
Fill leg slightly with holofiber. Fold in half, connect by crocheting 3 sc. Leave thread for sewing.
— Flower Accessory :
Round 1 :
AR, 6 sc in AR (6). Change to pink thread on last sc
Round 2 :
In each loop crochet: (2 ch, 2 trc, 2 ch, 1 slst)
Info :
Fasten thread. Sew flower to head or neck using remaining thread pieces.
This elegant swan pattern brings together the luxurious softness of plush yarn with sophisticated shaping techniques to create a truly stunning amigurumi piece. The gracefully curved neck and beautifully layered wings showcase advanced construction methods while remaining approachable for intermediate crafters. With delicate coral accents and a sweet flower accessory, this swan makes a perfect gift or elegant nursery decoration that will be treasured for years. The detailed instructions guide you through every step of creating this timeless piece. 🦢 Happy crocheting! 🧶✨