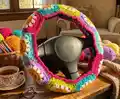
Transform your daily commute with this charming handmade steering wheel cover featuring adorable daisy squares and smiley faces. This detailed pattern guides you through creating ten connected granny squares that form a perfect circle to fit your steering wheel. Complete with ruffled edges and optional matching seatbelt covers, this project combines practical functionality with whimsical design to brighten up your car interior.
Progress Tracker
0% Complete
— First Square (Daisy):
Round 1:
With 3.5mm hook and smiley face color, make magic circle. Ch 3 (counts as first DC), work 11 DC in circle (12 DC total). Sl st to top of ch 3.
Round 2:
Ch 3, DC in same st. Work 2 DC in each of remaining 11 sts (24 sts total including ch 3). Sl st to top of ch 3. Cut yarn and fasten off.
Round 3:
Join new color (daisy petal color) in any st. First cluster: Ch 3, *yarn over, insert hook, pull through, yarn over, pull through first 2 loops*, repeat 2 more times (4 loops on hook). Yarn over, pull through all 4 loops, ch 2. For remaining clusters: work full cluster st in every other st around with ch 2 between each (12 cluster sts total). Sl st to first cluster, cut yarn, fasten off.
Round 4:
Join base color in any ch 2 space. Ch 3, work 2 DC in same space (first corner). *Work 3 HDC in next space, 3 HDC in following space. In next space work 3 DC, ch 2, 3 DC (corner)*. Repeat from * until reaching final space where you placed first 3 DC. In that space add 3 DC, ch 2, sl st to top of ch 3. Cut yarn and fasten off.
Info:
Make 10 total daisy squares following rounds 1-3. Complete round 4 only on first square.
— Joining Squares 2-9:
Step 1:
Join yarn in top left corner of completed square and pull up a loop. Grab a completed daisy.
Step 2:
Place 3 DC between 2 cluster sts on new daisy. Sl st to space between corner and 3 HDC set on original square.
Step 3:
Work 3 HDC in next daisy space, sl st to next space on original square. Repeat once more: 3 HDC between next cluster sts, sl st to next space of original square.
Step 4:
Work 3 DC between next cluster sts, sl st into ch 2 corner space of original square.
Step 5:
Continue around new daisy as normal: 3 DC, 3 HDC, 3 HDC, 3 DC, ch 2, 3 DC in same space, 3 HDC, 3 HDC, 3 DC, ch 2, 3 DC in same space, 3 HDC, 3 HDC, 3 DC. Sl st to corner of original square (sl st replaces ch 2). Cut yarn and fasten off.
— Joining Final Square (10th):
Steps 1-5:
Follow same joining process as squares 2-9 to attach one side to previous square.
Step 6:
Work next side as normal: 3 DC, 3 HDC, 3 HDC, 3 DC.
Step 7:
Join top of new square to bottom of very first square: Sl st to bottom corner of first square. Place 3 DC in same daisy space. Sl st to next space of first square. Work 3 HDC in next daisy space, sl st to next space of first square. Repeat: 3 HDC between next cluster sts, sl st to next space. Work 3 DC between next cluster sts, sl st to ch 2 corner of first square.
Step 8:
Finish final side: 3 DC, 3 HDC, 3 HDC, 3 DC, sl st to corner of square to left. All squares now form continuous circle.
— Trim:
Round 1:
With 5mm hook, attach yarn anywhere on cover edge. Ch 3. Work 1 DC in every st around. At corners/ch 2 spaces, place 1 DC. Sl st to top of ch 3.
Info:
To change colors each square: Begin DC (yarn over, insert, pull through, yarn over, pull through 2 loops), then pull through with new color. Continue with new color.
— Ruffle:
Round 1:
Join yarn, ch 1, sc in same st. *Skip 1 st, work 3 DC in following st. Skip 1 st, sc in next st*. Repeat around. Sl st to first ch, cut yarn, fasten off.
Round 2:
Repeat ruffle on opposite side of cover.
Info:
Weave in all loose ends.
— Smiley Faces (Optional):
Step 1:
With tapestry needle and black yarn, insert from back between cluster sts, halfway down outside DC row. Insert back through just below top of middle circle (first eye).
Step 2:
Insert needle about 1cm down from eye, halfway through middle circle. Stitch across to halfway through outside DC (smile line).
Step 3:
Stitch mouth following line between DC rows, going in and out around each DC until halfway through middle circle on opposite side.
Step 4:
Create second eye mirroring first: between opposite cluster sts, halfway down second DC row, back through below top of middle circle.
Step 5:
Create second smile line mirroring first. Follow back through mouth line, covering gaps. Weave in ends.
— Seatbelt Cover (Optional):
Step 1:
Make 2 daisies with 3.5mm hook (rounds 1-3 only). Join together using join-as-you-go method.
Step 2:
With 5mm hook, work 1 DC in every st around. At corners/ch 2 spaces: work 2 DC, ch 2, 2 DC in same space.
Step 3:
With cover horizontal, start in top right corner of right square. Ch 1, sc in corner, skip st, 3 DC in next st. Repeat to end of side, ending with sc in corner.
Step 4:
Work sc in each st around remaining sides. In corners/ch 2 spaces work 2 sc. Sl st to first sc when you return to start.
Step 5:
Sew 3 buttons securely to left side: top left corner of top square, between 2 squares on left, bottom left corner of bottom square. Buttons fit through ruffle gaps on opposite side.
Step 6:
Weave in loose ends.
— Reinforcement:
Info:
Strongly recommended to reinforce cover by sewing to steering wheel. Thread yarn through cover on both sides with tapestry needle, tie knot, weave back and forth through stitches. On sides where you cannot go through both front and back, carry yarn on backside then continue. Tie off and weave in end. Alternative: tie shorter yarn pieces every few inches around. Another option: use rubber grip on wheel before placing cover.
This delightful steering wheel cover pattern brings handmade charm to your everyday commute with colorful daisy granny squares and cheerful smiley faces. The join-as-you-go construction method makes assembly a breeze while creating just the right amount of stretch for a perfect fit. Customize it with your favorite color combinations and add matching seatbelt covers for a complete coordinated look. Your daily drive will never be the same once you wrap your hands around this cozy, personalized creation! 🚗🌼✨