🧢 Beautiful ✨ Detailed πŸ’ Adorable

Crochet Sunflower Pattern

Crochet Sunflower Pattern
4.4β˜… Rating
4-5 Hours Time Needed
2.6K Made This
βœ‚οΈ

Intermediate Level

Ideal for those with basic knitting experience, featuring slightly more advanced stitches and techniques to expand your skills.

⏱️

Weekend Treat

Takes 5-7 hours, making it an enjoyable project to finish over a couple of days.

🏑

Cozy Accent

A warm touch for your space that transforms ordinary corners into inviting nooks filled with handmade charm.

About This Crochet Sunflower Pattern

Crochet Sunflower Pattern crochet pattern - detailed view of completed project

The finished sunflower measures approximately 15-20cm across the bloom and stands around 40cm tall with the stem. Each component is worked separately and then assembled for a professional finish.

Why You'll Love This Crochet Sunflower Pattern

I absolutely love how this sunflower pattern brings together so many satisfying techniques in one project. The textured seed center is incredibly therapeutic to create, and watching the layers of petals come together feels like magic. I'm especially fond of how the wire reinforcement lets you shape each petal individually, giving your sunflower a realistic, natural look. It's the perfect balance between challenge and enjoyment, and the final result is so stunning that people always ask if it's from a fancy boutique. Plus, it never wilts, which makes it the ultimate everlasting gift!

Crochet Sunflower Pattern step 1 - construction progress Crochet Sunflower Pattern step 2 - assembly progress Crochet Sunflower Pattern step 3 - details and accessories Crochet Sunflower Pattern step 4 - final assembly and finishing

Switch Things Up

I love experimenting with color variations on this sunflower pattern to create entirely different moods and styles. Instead of traditional yellow and brown, try making a romantic pink and burgundy version that resembles a dahlia, or go bold with red and orange petals for a zinnia-inspired look. You could even create a whole rainbow collection for a whimsical display.

For a more rustic aesthetic, I sometimes use neutral tones like cream, taupe, and sage green, which gives the sunflower a vintage farmhouse vibe. If you're feeling adventurous, create an ombre effect by gradually shifting yarn colors throughout the petal rounds.

Another fun variation is adjusting the number of petals - try making just 12 petals instead of 18 for a more stylized, modern look, or add a third layer with even longer petals for maximum drama. I've also experimented with adding small beads or French knots to the seed center for extra texture and sparkle, which looks absolutely stunning when the light catches them.

Common Mistakes & How to Fix Them

βœ— Skipping the half-stitch technique on the flower heart rounds can make seed attachment difficult and messy later βœ— Not inserting wire during petal construction makes petals floppy and unable to hold their beautiful curved shape βœ— Forgetting to stuff the flower torus before fully closing creates a flat, lifeless base that won't support the bloom βœ— Working slip stitches through both loops instead of specified half-stitches disrupts the pattern structure and texture

Crochet Sunflower Pattern

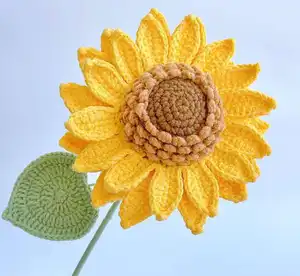
Create a stunning handmade sunflower that brightens any space with this detailed crochet pattern. This beautiful design features a realistic flower heart with textured seeds, layered petals with wire reinforcement for shape, and a sturdy stem with leaf details. Perfect for home dΓ©cor, gift-giving, or adding a touch of sunshine to your craft collection, this sunflower combines multiple techniques to create a lifelike botanical piece that will last forever.

Intermediate 4-5 Hours

Materials Needed for Crochet Sunflower Pattern

β€” Main Fabric

  • 01
    4ply milk cotton yarn in yellow, brown, and green colors
  • 02
    Floral stem wire 2mm diameter, 40cm long (3 pieces for strength)
  • 03
    Craft wire 0.5mm for leaf reinforcement
  • 04
    Craft wire 2.5mm for petal shaping

β€” Tools Required

  • 01
    2.5mm crochet hook
  • 02
    Yarn needle for sewing
  • 03
    Scissors
  • 04
    Stitch markers
  • 05
    Polyester fiberfill stuffing
  • 06
    Hot glue gun and glue sticks

Progress Tracker

0% Complete

β€” Flower Heart :

Info :

Every time start a new round, chain 1 as the turning chain (do not count as a stitch). Every time close a round, work a slip stitch through the 1st stitch.

R1 :

6sc in a magic ring (6)

R2 :

6 inc (12)

R3 :

(sc, inc) x 6 (18)

R4 :

(2sc, inc) x 6 (24)

R5 :

(3sc, inc) x 6 (30)

Info :

From R6: work only in the half-side stitches that are far away from us. Every time close a round, still work a normal slst (through a whole stitch, not just half side), still chain 1 to start every round. The left half stitches of R5-8 will be the place to work flower seeds.

R6 :

(2sc, inc, 2sc) x 6 (36)

R7 :

(5sc, inc) x 6 (42)

R8 :

(3sc, inc, 3sc) x 6 (48)

R9 :

(7sc, inc) x 6 (54)

R10 :

54 sc (54), FO, cut off the yarn

β€” Flower Seeds :

Info :

Work 4 rows of flower seeds at the left half stitches of R5-8. Seeds numbers at each round: R5-15, R6-18, R7-21, R8-24.

R5 Seeds :

Reconnect yarn to the 1st stitch of R5, chain 3, work a slst through the current space on the flower heart, 1 skip, 2slst, repeat until the end. Work a slst through the 1st space to close R5.

R6-8 Seeds :

Move yarn to the next round by working a slst through the 1st space of the new round, repeat the same process to finish all seeds. FO, move the tail to the back.

β€” Flower Petals :

R1 :

Reconnect yarn to the 1st stitch of R9, chain 8, from the 2nd stitch from the hook, work 7sc, 1 skip, 2slst, chain 8, repeat 18 times. Finally work a slst through the 1st stitch of this round to close. Keep the yarn.

R2 :

Insert the wire, for each flower petal, work: sc, hdc, 3dc, sc, [sc, 1ch picot, sc], hdc, 3dc, hdc, sc, 1 skip, 1slst. Repeat to work 18 petals. After finishing the last, work a slst through the 1st stitch to close round, FO. Cut off the yarn and wire.

R3 :

Work the second layer of petals only in half-side stitches that are facing us. Reconnect the yarn, chain 10, from the 2nd stitch from the hook, work 9sc, 1 skip, 2slst, chain 10, repeat 18 times. Finally work a slst through the 1st stitch of this round to close. Keep the yarn.

R4 :

Insert the wire, for each flower petal work: sc, hdc, 5dc, sc, [sc, 1ch picot, sc], hdc, 5dc, hdc, sc, 1 skip, 2slst. Repeat to work 18 petals. After finishing the last, work a slst through the 1st stitch to close round, FO. Cut off the yarn and wire.

β€” Flower Torus :

Info :

Every time start a new round, chain 1 as the turning chain (do not count as a stitch). Every time close a round, work a slip stitch through the 1st stitch.

R1 :

6sc in a magic ring (6)

R2-3 :

6sc (6)

R4 :

6inc (12)

R5 :

(sc, inc) x 6 (18)

R6 :

(2sc, inc) x 6 (24)

R7 :

(3sc, inc) x 6 (30)

R8 :

(2sc, inc, 2sc) x 6 (36)

R9 :

(5sc, inc) x 6 (42)

R10 :

(3sc, inc, 3sc) x 6 (48)

R11 :

(7sc, inc) x 6 (54)

R12 :

Work only in the half-side stitch that is facing us. 1ch, [1dc inc, 3ch picot, 1dc inc], [1slst, 1ch], 1 skip, repeat until the end. Finally, a slst through the 1st space to close round, FO, cut off the yarn

β€” Leaf :

R1 :

7sc in a magic ring (7)

R2 :

2ch as the turning chain, do not count as a stitch. [3dc], [dc inc] x 2, [3tr], [dc inc] x 2, [3dc, 2ch], 1slst through the 1st stitch of R1

R3 :

2ch as the turning chain, do not count as a stitch. Insert the wire (about 15cm long). [sc, hdc], [3dc], [dc inc] x 6, [3dc], [dc inc] x 6, [3dc], [hdc, sc, 1ch], 1slst through the 1st stitch of R2

R4 :

1ch as the turning chain, do not count as a stitch. sc, hdc, [dc inc] x 5, 11dc, [dc, tr, 2ch picot, tr, dc], 11dc, [dc inc] x 5, hdc, sc, 1ch, 1slst through the 1st stitch of R3. FO, wrap the craft wires with the tail.

Assembly Instructions

  • Prepare 3 pieces of floral stem wire (40cm long, 2mm wide) and wrap one end (about 5cm) together with yarn, then fold as shown in the pattern.
  • Sew the flower heart together with the torus using a yarn needle, working around the edges carefully.
  • Stop sewing when you have completed about three-quarters of the way around the pieces.
  • Insert the prepared floral stem bundle into the opening along with polyester fiberfill stuffing.
  • Continue sewing the flower heart to the torus all the way around until fully closed, then hide the yarn tail.
  • Apply hot glue at the base where the floral stem meets the torus to prevent movement and secure the structure.
  • Wrap the entire floral stem with a long piece of green yarn, attaching the leaf at your desired position, and apply glue at the end to fix everything in place.

Important Notes

  • πŸ’‘Pay close attention to which loop to work in (front loop, back loop, or half-side stitches) as this creates the dimensional texture
  • πŸ’‘Insert wire during the construction of petals and leaf, not after, to ensure proper integration and shape
  • πŸ’‘Use three floral stems twisted together rather than just one to create a sturdy stem that won't bend or break
  • πŸ’‘Keep your tension consistent throughout the flower heart to ensure the seeds sit evenly in their designated spaces
  • πŸ’‘Don't overstuff the torus - it should be firm but still slightly flexible to sew to the flower heart easily

This gorgeous sunflower pattern brings the beauty of nature into your home with incredible dimensional detail and lasting charm. From the textured seed center to the layered wire-reinforced petals, every element works together to create a botanical masterpiece. Whether displayed solo in a vase, crafted as part of a bouquet, or given as a heartfelt gift, this sunflower radiates warmth and handmade love. The combination of structural wire work and soft crochet creates a perfect balance between strength and delicacy. 🌻 Happy crocheting! 🧢✨

You ask,

we answer.

FAQs

Can I make this sunflower in different sizes?

Yes! You can easily adjust the size by using thicker or thinner yarn with an appropriately sized hook. For a larger sunflower, try using worsted weight yarn with a 4mm hook, or for a miniature version, use thread weight yarn with a 1.5mm hook. Just remember to adjust your wire thickness accordingly.

What type of wire works best for the petals and stem?

For the petals, use 2.5mm craft wire that's flexible enough to bend but sturdy enough to hold shape. For the stem, 2mm floral wire works perfectly. The leaf requires thinner 0.5mm wire for delicate shaping. You can find these at craft stores in the floral supply section.

How do I prevent the seeds from looking messy?

The key is working in the correct half-stitches during rounds 5-8 of the flower heart. Make sure you're consistently working in only the back loops during these rounds, leaving the front loops free for seed attachment. Keep your chain-3 loops uniform in tension for neat, even seeds.

Can I skip the wire and still have a nice sunflower?

While you can technically skip the wire, it's highly recommended for the best results. The wire gives the petals their natural curve and prevents drooping, and it's essential for the stem to stand upright. Without wire, your sunflower will be floppy and unable to maintain its beautiful shape.

How do I attach multiple sunflowers together for a bouquet?

Simply wrap the individual stems together with green yarn or floral tape at your desired height. You can stagger the heights for a more natural look. Add some green filler leaves between flowers, and finish by wrapping the entire bundle or placing it in a decorative vase.