About This Easy Modern Crochet Backpack Pattern
This stylish bag makes a wonderful accessory for daily adventures or a high-quality handmade gift that is sure to impress anyone who receives it.
Ideal for those with basic crocheting experience, featuring slightly more advanced stitches and techniques to expand your skills.
Fits nicely into a free afternoon — 2 to 5 hours of focused, enjoyable crocheting.
An elegant detail to elevate any look, combining traditional techniques with contemporary design sensibilities.
This stylish bag makes a wonderful accessory for daily adventures or a high-quality handmade gift that is sure to impress anyone who receives it.
I absolutely adore this project because it brings together the best of both worlds: fast-paced crochet and professional-looking hardware. Working with thick cord is so satisfying because you can watch the bag grow right before your eyes, and the finished texture is incredibly sturdy.
I will never forget the first time I made a crochet bag with leather hardware—it felt like magic! There is something so incredibly satisfying about combining soft yarn textures with structured leather. It instantly takes a project from looking 'homemade' to looking like a high-end designer piece you bought at a boutique.
When I was working on this design, I fell in love with the cross-stitch single crochet. If you have never tried it, you are in for a treat! It creates this wonderfully dense, woven texture that does not stretch out, which is exactly what you want for a sturdy backpack.
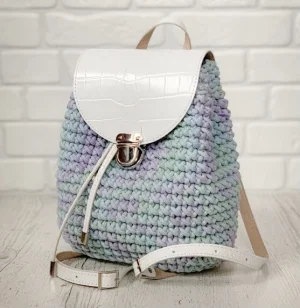
My biggest tip for this project is to take your time when aligning the valve and the lock. A millimeter off can make the whole bag look crooked, so use plenty of stitch markers or pins to hold everything in place before you secure it. You can also play around with colors—a cream-colored cord with tan leather looks incredibly classic, while a pastel variegated cord gives it a fun, playful vibe!
Get ready to make your new favorite accessory! This gorgeous, sturdy backpack combines the rustic charm of thick cotton cord with sleek leather hardware. It is the ultimate project for anyone looking to create a boutique-quality bag at home. You will love how fast it works up, and the unique textured stitches make it look incredibly professional.
Grab your 4mm hook to start. Leave a tail of about 40 inches (1 meter) before making your first stitch.
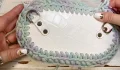
Insert your hook into any pre-punched hole on the leather base, pull up a loop, and CH 1.
Work 1 SC into each hole around the base. For the very last stitch, use the long tail end to finish the stitch and pull it completely through. Insert your hook from the back to the front under both loops of the first SC of the round, pull the tail through, then insert the hook from back to front through the center of the last SC and pull the tail back inside to create a seamless finish. Do not cut your main working yarn.
Switch over to your 6mm hook for the main body of the bag.
Working only into the back loop and the third loop (jumper) of the slip stitches on the base, work CrSC around. Work 6 Inc at the designated corner points to shape the corners. If your base has 43 holes, you should have a total of 49 stitches. Join the round using the tail end, then CH 1 with the working yarn. (49)
Work 49 CrSC, then CH 1. (49)
Work 49 CrSC, then CH 1. (49)
Work 49 CrSC, then CH 1. (49)
Work 49 CrSC, then CH 1. (49)
Work 49 CrSC, then CH 1. (49)
Work 49 CrSC, then CH 1. (49)
Work 49 CrSC, then CH 1. (49)
Work 49 CrSC, then CH 1. (49)
Work 49 CrSC, then CH 1. (49)
Work 49 CrSC, then CH 1. (49)
Work 49 CrSC, then CH 1. (49)
Work 49 CrSC, then CH 1. (49)
Work 49 CrSC, then CH 1. (49)
Work 49 CrSC, then CH 1. (49)
Work 49 CrSC, then CH 1. (49)
Work 49 CrSC, working only into the back loops, pull up a loop, then CH 1. (49)
Work 49 CrSC into the back loops only, then CH 1. (49)
Work 49 CrSC. Cut your yarn, pull the tail through, and finish the round. Secure both yarn tails on the inside with a knot, hide the ends, and use your hands to shape the sides of the bag. (49)
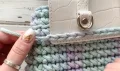
Switch back to your 4mm hook. Align the leather flap centered on the back of your backpack. Match the holes on the flap to the stitches in the third row from the top of the bag.
Bring your yarn up from the inside of the bag. Insert the hook through the first hole of the flap and the aligned stitch, pull up a loop. Insert into the next hole, skip 1 CrSC on the bag wall, pull up a loop, and work 1 SlSt.
Continue working 1 SlSt through each hole of the flap, skipping 1 CrSC on the bag for each hole. Work the final SlSt behind the flap. Cut the yarn, pull the loop through, and pull the tail to the inside of the bag.
Pull the starting tail to the front behind the flap, insert your hook under the first loop, pull the tail to the inside, then secure and weave in all ends.
Cut three separate pieces of cord, each measuring about 8 inches (20 cm) in length.
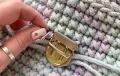
Position the back plate of the metal lock on the inside of the front wall. Secure it tightly using the metal clamp plate. Trim off any excess metal tabs with your scissors if they stick out.
Align the lower portion of the lock clasp on the front of the backpack so it matches up perfectly with the flap.
Thread the three pieces of cord through the lock holes to the inside of the bag. Tie them securely in pairs, trim any excess cord, and hide the ends.
You have done it! Your gorgeous new backpack is ready to accompany you on all your daily outings. There is nothing quite like the feeling of wearing a high-quality, boutique-style bag that you made entirely with your own hands. I hope you enjoyed every stitch of this project. Keep crafting, stay inspired, and happy crocheting! 🧶✨
Absolutely! You can easily substitute the 5mm cotton cord with a 4-5mm polyester cord (about 175 yards) or even a chunky 7-9mm t-shirt yarn. Just be sure to check your gauge so your bag turns out the right size!
No worries at all! If your base has more or fewer than 43 holes, simply adjust your stitch count. Just make sure to distribute your 6 increases evenly around the corners during the first round of the walls.
While the cross-stitch single crochet creates a very dense and sturdy fabric, adding a lining keeps smaller items from slipping through and prevents the bag from stretching over time. It really gives it that professional finish!
This is a super common issue with screw-in hardware! Once you have tightened the screws with your screwdriver, apply a tiny drop of superglue or clear nail polish directly onto the screw threads to lock them in place.
