About This Easter Bunny Amigurumi Pattern

This charming bunny makes a wonderful Easter basket stuffer or a beautiful spring mantel decoration that will bring handmade warmth to your holiday celebrations.
Ideal for those with basic crocheting experience, featuring slightly more advanced stitches and techniques to expand your skills.
Takes 5-7 hours, making it an enjoyable project to finish over a couple of days.
A delightful, gift-ready creation perfect for birthdays and special occasions that will be treasured for years.
This charming bunny makes a wonderful Easter basket stuffer or a beautiful spring mantel decoration that will bring handmade warmth to your holiday celebrations.
I absolutely love how this bunny's striped sweater is worked directly into the body, saving you the hassle of sewing on separate clothes! Plus, crocheting the tiny eggs and basket is incredibly satisfying and makes for a complete, interactive toy set.
There is something incredibly magical about crocheting for Easter, isn't there? Every spring, as the flowers start to peek through the soil, I find myself reaching for the brightest, prettiest pastel yarns in my stash. This year, I wanted to create a bunny that felt like a classic childhood toy but with a modern, playful twist.
When I was designing this sweet little bunny, I fell in absolute love with the striped sweater detail. It is such a fun way to bring a pop of color into the project without having to sew on a separate garment later! And let's talk about those tiny paw prints on the feet—they are my absolute favorite detail. They take just a tiny bit of concentration with the color changes, but the payoff is so incredibly worth it.
My biggest tip when making this bunny is to take your time with the embroidery. The sleepy eyes and the tiny pink nose give this bunny its gentle, sweet personality. Use a few pins to map out the facial features before you commit with your yarn needle!
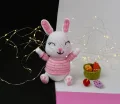
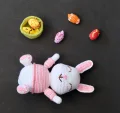
Bring some handmade magic to your spring celebrations with this incredibly sweet Easter Bunny! This pattern guides you through creating a lovely, huggable bunny wearing a classic striped sweater, complete with its own set of colorful miniature eggs and a matching green basket. It's a wonderful, relaxing project that will keep you cozy on a quiet afternoon and result in a beautiful keepsake you'll be proud to share.
Using white yarn, work 8 sc into a mr. Do not join rounds, work in a continuous spiral. (8)
Work [inc] in each of the 8 sts around. (16)
Work [1 sc, inc] 8 times around. (24)
Work [2 sc, inc] 8 times around. (40)
Work 1 sc in each of the 40 sts around. (40)
Work [4 sc, inc] 8 times around. (48)
Work 1 sc in each of the 48 sts around. (48)
Work [5 sc, inc] 8 times around. (56)
Work 1 sc in each of the 56 sts around. (56)
Work 12 sc, [inc] in each of the next 4 sts, 24 sc, [inc] in each of the next 4 sts, 12 sc. (64)
Work 1 sc in each of the 64 sts around. (64)
Work 1 sc in each of the 64 sts around. (64)
Work 12 sc, [dec] 4 times, 24 sc, [dec] 4 times, 12 sc. (56)
Work [5 sc, dec] 8 times around. (48)
Work [6 sc, dec] 6 times around. (42)
Work 1 sc in each of the 42 sts around. (42)
Work [5 sc, dec] 6 times around. (36)
Work [4 sc, dec] 6 times around. (30)
Work 8 sc, [dec] 3 times, 10 sc, [dec] 3 times. (24)
Work [2 sc, inc] 8 times around. (32)
Work [3 sc, inc] 8 times around. (40)
Work [4 sc, inc] 8 times around. (48)
Work [5 sc, inc] 8 times around, changing to pink yarn on the last step. (56)
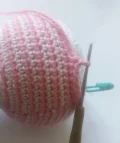
Using pink yarn, work 1 sc in each of the 56 sts around. (56)
Using white yarn, work 1 sc in each of the 56 sts around. (56)
Using pink yarn, work 1 sc in each of the 56 sts around. (56)
Using white yarn, work 1 sc in each of the 56 sts around. (56)
Using pink yarn, work 1 sc in each of the 56 sts around. (56)
Using white yarn, work 1 sc in each of the 56 sts around. (56)
Using pink yarn, work 1 sc in each of the 56 sts around. (56)
Using white yarn, work 1 sc in each of the 56 sts around. (56)
Using pink yarn, work 1 sc in each of the 56 sts around. (56)
Using white yarn, work 1 sc in each of the 56 sts around. (56)
Using pink yarn, work 1 sc in each of the 56 sts around. (56)
Using white yarn, work 1 sc in each of the 56 sts around. (56)
Using pink yarn, work 1 sc in each of the 56 sts around. (56)
Using white yarn, work 1 sc in each of the 56 sts around. (56)
Switch to white yarn and cut the pink yarn. Working in blo, work 1 sc in each of the 56 sts around. (56)
Work [5 sc, dec] 8 times around. (48)
Work 1 sc in each of the 48 sts around. (48)
Work [6 sc, dec] 6 times around. (42)
Work [5 sc, dec] 6 times around. (36)
Work 1 sc in each of the 36 sts around. (36)
Work [4 sc, dec] 6 times around. (30)
Work 1 sc in each of the 30 sts around. (30)
Begin stuffing the head and body firmly with fiberfill. Continue to stuff as you complete the remaining rounds.
Work [3 sc, dec] 6 times around. (24)
Work [2 sc, dec] 6 times around. (18)
Work [1 sc, dec] 6 times around. (12)
Work [dec] 6 times around. (6)
Fasten off, weave the tail through the final 6 stitches to close the opening, and hide the thread end inside the body.
Using white yarn, work 6 sc into a mr. (6)
Work [inc] in each of the 6 sts around. (12)
Work 1 sc in each of the 12 sts around. (12)
Switch to pink yarn. Working in blo, work 1 sc in each of the 12 sts around. (12)
Switch to white yarn, work 1 sc in each of the 12 sts around. (12)
Switch to pink yarn, work 1 sc in each of the 12 sts around. (12)
Switch to white yarn, work 1 sc in each of the 12 sts around. (12)
Switch to pink yarn, work 1 sc in each of the 12 sts around. (12)
Switch to white yarn, work 1 sc in each of the 12 sts around. (12)
Switch to pink yarn, work 1 sc in each of the 12 sts around. (12)
Switch to white yarn, work 1 sc in each of the 12 sts around. (12)
Switch to pink yarn, work [dec] 2 times, then 8 sc. (10)
Stuff the arms firmly. Fasten off, leaving a long yarn tail for sewing. To make the sleeve cuff detail, join pink yarn to the unworked front loops of Round 7 and work 1 sc in each loop around, then fasten off.
Using white yarn, work 6 sc into a mr. (6)
Work [inc] in each of the 6 sts around. (12)
Work [1 sc, inc] 6 times around. (18)
Work 1 sc in each of the 18 sts around. (18)
Work [1 sc, dec] 6 times around. (12)
Work [dec] 6 times around. (6)
Fasten off, leaving a long thread for sewing to the back of the body.
Make 2 in pink yarn and 2 in white yarn. Ch 9. Starting in the second ch from hook, work 3 cr. Work 1 cr in each of the next 7 ch. In the last ch, work 6 cr. Working down the opposite side of the chain, work 1 cr in each of the next 7 ch, then work 3 cr in the final ch. Fasten off. (26)
To assemble each ear, place one pink piece and one white piece together with wrong sides touching. Join white yarn through both layers and work 1 sc in each stitch around to join them. Fasten off, leaving a long tail for sewing.
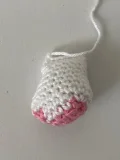
Using pink yarn, ch 5. Starting in the second ch from hook, work 2 sc. Work 1 sc in each of the next 3 ch. Work 2 sc in the final ch. Working along the opposite side of the chain, work 1 sc in each of the next 3 ch, then 2 sc in the last ch. (12)
Switch to white yarn (do not fasten off pink). Work inc, 4 sc, inc, 1 sc, inc, 4 sc, inc, 1 sc. (16)
Work 1 sc in each of the 16 sts around. (16)
Work 6 sc in white. [Switch to pink yarn, work inc in the next st, switch to white yarn, work 1 sc] 4 times to create the paw pads, then work 2 sc in white. (20)
Work 1 sc in each of the 20 sts around. Fasten off the pink yarn. (20)
Using white yarn, work 1 sc in each of the 20 sts around. (20)
Work 8 sc, [dec] 3 times, then 6 sc. (17)
Work 7 sc, [dec] 3 times, then 4 sc. (14)
Work 1 sc in each of the 14 sts around. (14)
Flatten the top of the leg and work 7 sc through both layers to close the opening. Fasten off, leaving a long tail for sewing.
Using your choice of colored yarn, work 6 sc into a mr. (6)
Work 1 sc in each of the 6 sts around. (6)
Work [inc] 2 times, then 4 sc. (8)
Work 1 sc in each of the 8 sts around. (8)
Work [inc, 1 sc] 4 times around. (12)
Work 1 sc in each of the 12 sts around. (12)
Work [inc, 2 sc] 4 times around. (16)
Work 1 sc in each of the 16 sts around. (16)
Work [dec, 2 sc] 4 times around. (12)
Stuff the egg firmly with fiberfill.
Work [dec, 1 sc] 4 times around. (8)
Work [dec] 4 times. Fasten off, weave in ends, and decorate with contrasting embroidery if desired. (4)
Using green yarn, repeat Rounds 1 through 6 of the Head and Torso pattern. (40)
Working in blo, work 1 sc in each of the 40 sts around. (40)
Work 1 sc in each of the 40 sts around. (40)
Work [2 hdc in the first st, ch 1, skip 1 st] 20 times around. Fasten off and weave in all yarn ends. (40)
I can't wait to see your finished Easter Bunny hopping to life! This project is such a joy to make, and I know it will bring so many smiles whether it's sitting on your holiday mantel or tucked into a loved one's Easter basket. Don't forget to share your photos with our crafting community—seeing your color choices and unique touches is my favorite part of designing! Happy stitching, friends! 🧶✨🐰
Absolutely! If you prefer safety eyes, place 10mm or 12mm eyes between Rounds 11 and 12, leaving about 7 stitches between them, before you begin stuffing the head.
This pattern is designed for DK weight yarn, but you can easily substitute worsted weight yarn. Just remember to use a slightly larger hook (like 3.5mm) and note that your finished bunny will turn out larger.
To get perfectly clean stripes, always complete the final pull-through of the last stitch of a round with the new color. Carrying the unused yarn loosely on the inside of the piece also helps maintain a neat shape.
This usually happens if the legs are sewn too far forward or backward. Try pinning the legs in place first and testing if the bunny balances before sewing them down permanently.
