About This Double-Sided Round Potholders Pattern

This pattern makes a beautiful handmade gift — thoughtful enough for someone special, but quick enough to make a few before the holidays.
Perfect for those just starting their crocheting journey, with clear instructions and simple techniques
Fits nicely into a free afternoon — 2 to 5 hours of focused, enjoyable crocheting.
A warm touch for your space that transforms ordinary corners into inviting nooks filled with handmade charm.
This pattern makes a beautiful handmade gift — thoughtful enough for someone special, but quick enough to make a few before the holidays.
I absolutely adore how practical these potholders are! There's nothing worse than a flimsy potholder, so joining two dense circles together is an absolute game-changer. Plus, the button-on hanging loop adds the sweetest rustic touch that looks beautiful hanging in any kitchen.

There is something so incredibly satisfying about making things for your own home, isn't there? Every time I reach for these potholders in my kitchen, I get a little spark of handmade joy. When I first designed these, I wanted to solve the classic 'thin potholder' problem once and for all. By joining two thick circles together, we get double the heat protection without needing any complicated bulky stitches.
If you want to play around with the design, try making the front circle in a bright, cheerful color and the back circle in a neutral cream. It gives you two completely different looks in one project! You can also skip the button entirely and sew the loop down flat for a classic, modern look. I love hanging mine from a copper S-hook right next to the stove so they double as beautiful kitchen decor. Grab your favorite cotton yarn and let's make something beautiful and functional together!
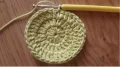
Keep your hands and countertops safe with these gorgeous, thick potholders! Crocheted with two layers of sturdy cotton, they are as functional as they are beautiful. You'll love how quickly these work up, making them the perfect instant-gratification project for your own kitchen or a thoughtful housewarming gift.
Start with your chosen yarn color. In a mr, ch 2 (this counts as your first dc), then work 11 dc into the ring. Pull the tail tight to close the center and join with a sl st to the top of the ch 2. (12)
ch 2 (counts as dc), work 1 dc in the very same stitch. Work 2 dc in each stitch around. Join with a sl st to the top of the starting ch 2. (24)
ch 2 (counts as dc), work 2 dc in the next stitch. *Work 1 dc in the next stitch, then 2 dc in the following stitch.* Repeat from * to * all the way around. Join with a sl st to the top of the starting ch 2. (36)
ch 2 (counts as dc), work 1 dc in the next stitch, then 2 dc in the following stitch. *Work 1 dc in each of the next 2 stitches, then 2 dc in the following stitch.* Repeat from * to * all the way around. Join with a sl st to the top of the starting ch 2. (48)
ch 2 (counts as dc), work 1 dc in each of the next 2 stitches, then 2 dc in the following stitch. *Work 1 dc in each of the next 3 stitches, then 2 dc in the following stitch.* Repeat from * to * all the way around. Join with a sl st to the top of the starting ch 2. (60)
ch 2 (counts as dc), work 1 dc in each of the next 3 stitches, then 2 dc in the following stitch. *Work 1 dc in each of the next 4 stitches, then 2 dc in the following stitch.* Repeat from * to * all the way around. Join with a sl st to the top of the starting ch 2. (72)
ch 2 (counts as dc), work 1 dc in each of the next 4 stitches, then 2 dc in the following stitch. *Work 1 dc in each of the next 5 stitches, then 2 dc in the following stitch.* Repeat from * to * all the way around. Join with a sl st to the top of the starting ch 2. (84)
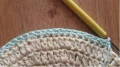
For the first circle (the back side), fasten off and weave in your ends. For the second circle (the front side), do not cut your yarn. Proceed directly to the joining section.
Place the two finished circles back-to-back with their wrong sides facing each other. Insert your hook through a stitch on the front circle and the corresponding stitch on the back circle. Work 1 sc through both layers in each stitch around to join them securely. (84)
If you do not want a hanging loop, fasten off and weave in all remaining ends. If you want to add a loop, do not cut your yarn and proceed to the Hanging Loop section.
Start with your chosen yarn color. In a mr, ch 2 (this counts as your first dc), then work 11 dc into the ring. Pull the tail tight to close the center and join with a sl st to the top of the ch 2. (12)
ch 2 (counts as dc), work 1 dc in the very same stitch. Work 2 dc in each stitch around. Join with a sl st to the top of the starting ch 2. (24)
ch 2 (counts as dc), work 2 dc in the next stitch. *Work 1 dc in the next stitch, then 2 dc in the following stitch.* Repeat from * to * all the way around. Join with a sl st to the top of the starting ch 2. (36)
ch 2 (counts as dc), work 1 dc in the next stitch, then 2 dc in the following stitch. *Work 1 dc in each of the next 2 stitches, then 2 dc in the following stitch.* Repeat from * to * all the way around. Join with a sl st to the top of the starting ch 2. (48)
ch 2 (counts as dc), work 1 dc in each of the next 2 stitches, then 2 dc in the following stitch. *Work 1 dc in each of the next 3 stitches, then 2 dc in the following stitch.* Repeat from * to * all the way around. Join with a sl st to the top of the starting ch 2. (60)
ch 2 (counts as dc), work 1 dc in each of the next 3 stitches, then 2 dc in the following stitch. *Work 1 dc in each of the next 4 stitches, then 2 dc in the following stitch.* Repeat from * to * all the way around. Join with a sl st to the top of the starting ch 2. (72)
ch 2 (counts as dc), work 1 dc in each of the next 4 stitches, then 2 dc in the following stitch. *Work 1 dc in each of the next 5 stitches, then 2 dc in the following stitch.* Repeat from * to * all the way around. Join with a sl st to the top of the starting ch 2. (84)
ch 2 (counts as dc), work 1 dc in each of the next 5 stitches, then 2 dc in the following stitch. *Work 1 dc in each of the next 6 stitches, then 2 dc in the following stitch.* Repeat from * to * all the way around. Join with a sl st to the top of the starting ch 2. (96)
ch 2 (counts as dc), work 1 dc in each of the next 6 stitches, then 2 dc in the following stitch. *Work 1 dc in each of the next 7 stitches, then 2 dc in the following stitch.* Repeat from * to * all the way around. Join with a sl st to the top of the starting ch 2. (108)
For the first circle (the back side), fasten off and weave in your ends. For the second circle (the front side), do not cut your yarn. Proceed directly to the joining section.
Place the two finished circles back-to-back with their wrong sides facing each other. Insert your hook through a stitch on the front circle and the corresponding stitch on the back circle. Work 1 sc through both layers in each stitch around to join them securely. (108)
If you do not want a hanging loop, fasten off and weave in all remaining ends. If you want to add a loop, do not cut your yarn and proceed to the Hanging Loop section.
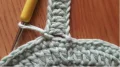
Without fastening off from the joining round, ch 21. Starting in the second chain from your hook, work 1 dc into each chain across. (20)
Secure the loop to the main body of the potholder by working a sl st into the edge, two stitches down from where you originally started the chain.
Now choose between finishing with a closed loop or a buttoned loop. See the assembly instructions for details on how to finish your chosen style.
I hope you enjoy making and using these lovely double-sided potholders! They are such a satisfying, practical make that brings a cozy, handmade touch to the heart of your home. Experiment with different color combinations to match your kitchen decor, or whip up a set as a thoughtful, loving gift for friends and family. Don't forget to share your finished potholders with our wonderful crafting community! Happy crocheting! 🧶✨
I highly recommend avoiding acrylic or any synthetic blends. Acrylic will melt if it comes into contact with hot pots or pans. Stick to 100% cotton for safety and durability.
Curling usually happens if your tension is too tight or if you missed an increase in the outer rounds. Try steam-blocking your finished potholder, or go up a hook size if your stitches are naturally very tight.
Since they are made of 100% cotton, you can easily machine wash them on a gentle cycle with cold water. Lay them flat to dry to help them keep their perfect circular shape.
Absolutely! This is a fantastic first project for learning how to crochet in circles. The increases are very predictable, and joining the two sides is a great way to practice basic single crochet alignment.
