🧢 Beautiful ✨ Detailed πŸ’ Adorable

Dino Backpack Crochet Pattern

Dino Backpack Crochet Pattern
4.7β˜… Rating
12-15 Hours Time Needed
1.4K Made This
βœ‚οΈ

Intermediate Level

Ideal for those with basic knitting experience, featuring slightly more advanced stitches and techniques to expand your skills.

⏱️

Slow & Steady

A 10-12 hour projectβ€”great for savoring the process over several sessions.

🎁

Tiny Treasure

Small, sweet, and gift-worthy creations that fit perfectly in the palm of your hand with detailed charm.

About This Dino Backpack Crochet Pattern

Dino Backpack Crochet Pattern crochet pattern - detailed view of completed project

The backpack measures approximately ten inches wide by nine inches tall, making it the perfect size for little ones to carry their treasures, snacks, and small toys. The adjustable cord closure with a toggle stopper ensures contents stay secure while being easy enough for small hands to operate independently.

Why You'll Love This Dino Backpack Crochet Pattern

I absolutely love this Dino Backpack pattern because it perfectly balances creativity with practicality in ways that truly delight both the maker and the wearer. The tapestry crochet technique might seem intimidating at first, but watching that adorable dinosaur design emerge row by row is incredibly satisfying and almost meditative. What really won me over is how the three-dimensional head brings the whole project to life, transforming it from just another bag into a character with personality that children genuinely connect with. I appreciate that the designer included sizing options for different ages and provided charts for both right and left-handed crocheters, showing real thoughtfulness about accessibility. The structural integrity is impressive too, with the second color carried throughout for extra strength, meaning this backpack can actually withstand the enthusiastic use of active toddlers and preschoolers. Plus, there's something deeply rewarding about creating a functional item that sparks joy and imagination in a child's daily life, making every stitch feel purposeful and meaningful.

Dino Backpack Crochet Pattern step 1 - construction progress Dino Backpack Crochet Pattern step 2 - assembly progress Dino Backpack Crochet Pattern step 3 - details and accessories Dino Backpack Crochet Pattern step 4 - final assembly and finishing

Switch Things Up

I love experimenting with color combinations on this adorable Dino Backpack pattern because it opens up so many creative possibilities beyond the suggested aqua green and orange palette. You could create a fierce red and black dragon-inspired version that would appeal to kids who love fantasy creatures, or go with soft pastels like mint and lavender for a gentler, dreamy dinosaur aesthetic. For ocean lovers, try combining teal with coral or turquoise with sunny yellow to create a tropical sea creature vibe.

Another fun variation I've considered is adding embroidered details or appliquΓ©s to the dinosaur head for extra personalityβ€”maybe some felt teeth peeking out from the mouth area or embroidered eyebrows to give your dino more expression. You could also experiment with the plate sizes and placement along the back, making them larger and more dramatic or adding extra plates for a more elaborate spine design.

If you're feeling adventurous with the tapestry crochet portion, you could modify the dinosaur pattern on the bag body itself, perhaps changing it to different dinosaur species or creating your own custom design using graph paper to plan out your motif. The beauty of tapestry crochet is that once you understand the technique, you can really make the design your own. Some makers might enjoy adding small details like stars, hearts, or the child's initials worked into the background areas around the main dinosaur design for a truly personalized touch that makes this backpack even more special and unique to its little owner.

Common Mistakes & How to Fix Them

βœ— Not maintaining consistent tension during tapestry crochet can cause the dinosaur design to appear distorted or puckered throughout the bag body βœ— Forgetting to relocate stitch markers at the beginning of each round leads to miscounting stitches and throws off the entire pattern alignment βœ— Skipping the gauge swatch results in a backpack that's either too small for practical use or too large and floppy for children βœ— Failing to carry the second color from round two onward weakens the bag structure and causes it to stretch out of shape with use βœ— Not stuffing the dinosaur head firmly enough before closing creates a floppy, shapeless appearance that lacks the adorable three-dimensional character quality βœ— Positioning the head incorrectly on the bag back makes the backpack sit awkwardly and prevents the lid function from working properly

Dino Backpack Crochet Pattern

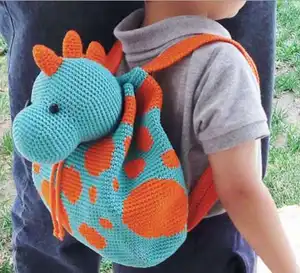
Create an adorable dinosaur backpack perfect for little adventurers with this charming tapestry crochet pattern. This playful design features a cute dino motif worked into the bag body with vibrant aqua green and orange colors, complete with a three-dimensional dinosaur head that doubles as a fun lid. The pattern includes adjustable straps sized for ages three to six years, making it ideal for toddlers and young children heading to preschool, playdates, or family outings. With its combination of functional design and whimsical character details including safety eyes and decorative plates along the dino's back, this backpack becomes both a practical accessory and a beloved companion for your little one's daily adventures.

Intermediate 12-15 Hours

Materials Needed for Dino Backpack Crochet Pattern

β€” Main Fabric

  • 01
    Two 100 gr/ 3.52 oz (200 m/ 218 yd) skeins of sport weight cotton yarn in aqua green (main color)
  • 02
    Two 100 gr/ 3.52 oz (200 m/ 218 yd) skeins of sport weight cotton yarn in orange (second color)

β€” Tools Required

  • 01
    3.5 mm crochet hook
  • 02
    25.2 inches/ 64 cm of 4 mm cord
  • 03
    One transparent toggle stopper
  • 04
    Two 1 cm safety eyes
  • 05
    Stuffing
  • 06
    Stitch markers in two colors
  • 07
    Measuring tape
  • 08
    Yarn needle
  • 09
    Scissors

Progress Tracker

0% Complete

β€” BAG :

Starting Chain :

With MC ch 35

Round 1 :

2 sc in 2nd ch from hook (place a color A and a color B marker in 1st st), sc 32, 4 sc in next ch (place a color B marker in 2nd and 3rd st), continue on the other side of the foundation ch, sc 32, 2 sc in the last ch (place a color B marker in last st)= 72 sts

Round 2 :

From this round on carry and wrap SC yarn. Take it leaving a 4 inch/ 10 cm strand, don't make knots. Continue crocheting with MC wrapping SC in between the sts. Relocate A marker in the 1st st of every rnd and B markers in the middle st every time you make 3 sc in one st. 3 sc in 1st st, sc 34, 3 sc in next st, 3 sc in next st, sc 34, 3 sc in next st= 80 sts

Round 3 :

Sc 1, 3 sc in next st, sc 36, 3 sc in next st, sc 2, 3 sc in next st, sc 36, 3 sc in next st, sc 1= 88 sts

Round 4 :

Sc 2, 3 sc in next st, sc 38, 3 sc in next st, sc 4, 3 sc in next st, sc 38, 3 sc in next st, sc 2= 96 sts

Round 5 :

Sc 3, 3 sc in next st, sc 40, 3 sc in next st, sc 6, 3 sc in next st, sc 40, 3 sc in next st, sc 3= 104 sts

Round 6 :

Sc 4, 3 sc in next st, sc 42, 3 sc in next st, sc 8, 3 sc in next st, sc 42, 3 sc in next st, sc 4= 112 sts

Round 7 :

Sc 5, 3 sc in next st, sc 44, 3 sc in next st, sc 10, 3 sc in next st, sc 44, 3 sc in next st, sc 5= 120 sts

Round 8 :

Sc 6, 3 sc in next st, sc 46, 3 sc in next st, sc 12, 3 sc in next st, sc 46, 3 sc in next st, sc 6= 128 sts

Round 9-55 :

Continue crocheting over 128 sts by following the dino pattern chart and/or stitch count. Switch colors to make the drawing. Remove B markers and relocate A marker in the 1st st of every round

Round 56 :

Sc 12 following the charts to reach the fold of the bag= 12 sts. Close last st with MC

Round 57 :

With MC wrapping SC: Sc 6 (relocate A marker in the 1st st, this will be the new beginning of rounds), 3 sc over SC only, skip 3 sts, (sc 13, 3 sc over SC only, skip 3 sts) rep 7 times, sc 7= 128 sts

Round 58-59 :

With MC wrapping SC: Sc 128= 128 sts. Sl st in the next st. Fasten off. Cut SC leaving a 4 inch/10 cm strand. Weave in all ends

β€” BACKPACK STRAPS (Make 2) :

Info :

Sizes: 3, 4, 5, 6 years old. Crocheted in the round, in a spiral way, starting from one end

Starting Chain :

With SC ch (97, 104, 111, 118) leaving a long strand in the beginning to sew afterwards

Round 1 :

2 sc in 2nd ch from hook (place an A and a B marker in 1st st), sc (94, 101, 108, 115), 4 sc in next ch (place a B marker in 2nd and 3rd st), continue on the other side of the foundation ch, sc (94, 101, 108, 115), 2 sc in last ch (place a B marker in last st)= (196, 210, 224, 238) sts

Round 2 :

From this round on carry and wrap MC yarn. Continue crocheting with SC wrapping MC in between the sts. Relocate A marker in the 1st st of every rnd and B markers in the middle st every time you make 3 sc in one st. 3 sc in 1st st, sc (96, 103, 110, 117), 3 sc in next st, 3 sc in next st, sc (96, 103, 110, 117), 3 sc in next st= (204, 218, 232, 246) sts

Round 3 :

Sc 1, 3 sc in next st, sc (98, 105, 112, 119), 3 sc in next st, sc 2, 3 sc in next st, sc (98, 105, 112, 119), 3 sc in next st, sc 1= (212, 226, 240, 254) sts. Sl st in the next st. Fasten off leaving a long strand of SC for sewing. Cut MC leaving a 4 inch/ 10 cm strand. Weave in MC strands only

β€” DINO HEAD :

Info :

Crocheted in the round, in a spiral way, starting from the front. With MC ch 2

Round 1 :

6 sc in 2nd ch from hook (place a marker in 1st st)= 6 sts

Round 2 :

Sc 2 in each sc around= 12 sts (relocate marker in the 1st st of this and the following rounds)

Round 3 :

(Sc 1, 2 sc in next st) rep 6 times= 18 sts

Round 4 :

(Sc 2, 2 sc in next st) rep 6 times= 24 sts

Round 5 :

(Sc 3, 2 sc in next st) rep 6 times= 30 sts

Round 6 :

(Sc 4, 2 sc in next st) rep 6 times= 36 sts

Round 7 :

(Sc 5, 2 sc in next st) rep 6 times= 42 sts

Round 8 :

(Sc 6, 2 sc in next st) rep 6 times= 48 sts

Round 9-14 :

Sc 48= 48 sts

Round 15 :

(Sc 6, dec 1) rep 6 times= 42 sts

Round 16 :

(Sc 5, dec 1) rep 6 times= 36 sts

Round 17 :

(Sc 5, 2 sc in next st) rep 6 times= 42 sts

Round 18 :

(Sc 6, 2 sc in next st) rep 6 times= 48 sts

Round 19 :

(Sc 7, 2 sc in next st) rep 6 times= 54 sts

Info :

Place the eyes between rounds 16 and 17 with an interspace of 7 sts

Round 20 :

(Sc 8, 2 sc in next st) rep 6 times= 60 sts

Round 21 :

(Sc 9, 2 sc in next st) rep 6 times= 66 sts

Round 22 :

(Sc 10, 2 sc in next st) rep 6 times= 72 sts

Round 23-30 :

Sc 72= 72 sts

Round 31 :

(Sc 10, dec 1) rep 6 times= 66 sts

Round 32 :

(Sc 9, dec 1) rep 6 times= 60 sts

Round 33 :

(Sc 8, dec 1) rep 6 times= 54 sts

Round 34 :

(Sc 7, dec 1) rep 6 times= 48 sts

Round 35 :

(Sc 6, dec 1) rep 6 times= 42 sts

Round 36 :

(Sc 5, dec 1) rep 6 times= 36 sts

Info :

Start filling in with stuffing

Round 37 :

(Sc 4, dec 1) rep 6 times= 30 sts

Round 38 :

(Sc 3, dec 1) rep 6 times= 24 sts

Round 39 :

(Sc 2, dec 1) rep 6 times= 18 sts

Info :

Fill in the rest of the head

Round 40 :

(Sc 1, dec 1) rep 6 times= 12 sts

Round 41 :

(Dec 1) rep 6 times= 6 sts

Round 42 :

(Sc 1, skip 1 st) rep 3 times= 3 sts. Sl st in the next st. Fasten off leaving a long strand for sewing

β€” PLATES (Make 3) :

Info :

Crocheted in the round, in a spiral way, starting from the top. With SC ch 2

Round 1 :

6 sc in 2nd ch from hook (place a marker in 1st st)= 6 sts

Round 2 :

(Sc 1, 2 sc in next st) rep 3 times= 9 sts (relocate marker in the 1st st of this and the following rounds)

Round 3 :

Sc 9= 9 sts

Round 4 :

(Sc 2, 2 sc in next st) rep 3 times= 12 sts

Round 5-6 :

Sc 12= 12 sts

Round 7 :

(Sc 3, 2 sc in next st) rep 3 times= 15 sts

Round 8 :

Sc 15= 15 sts. Sl st in the next st. Fasten off leaving a long strand for sewing

Assembly Instructions

  • Fill each of the three plates with stuffing, then sew them to the top center part of the dinosaur head, starting from the ending of the head moving toward the front
  • Choose which side will be the front and back of your bag before beginning assembly
  • Sew 0.8 inches/ 2 cm of one strap end one round below one back center eyelet on the bag
  • Sew 0.8 inches/ 2 cm of the other end of the same strap to round 9 of the bag, measuring from the base corners toward the inside
  • Repeat the strap attachment process for the second strap on the opposite side
  • Join the dinosaur head to the backpack by sewing the back of the head at the height of the ending to the back of the bag on the inside (pin first to ensure correct positioning; the head should lay between the two center back eyelets and fall down centered to the front)
  • Pull the cord through the eyelets starting from one front center eyelet until it comes out from the other front center hole, then pull the tips of the cord through the stopper and make a knot on both ends

Important Notes

  • πŸ’‘Use stitch markers in two different colors to track your place accurately, especially when working the tapestry crochet sections with frequent color changes
  • πŸ’‘Maintain consistent tension throughout the project to ensure the dinosaur design appears clear and the bag structure remains sturdy and even
  • πŸ’‘Be sure to carry and wrap the second color from round 2 onward throughout the entire bag for extra strength and durability
  • πŸ’‘Follow the appropriate chart (right-handed or left-handed) carefully to ensure your dinosaur design faces the correct direction
  • πŸ’‘Stuff the dinosaur head firmly but not overly tight to achieve the best three-dimensional shape and character appearance
  • πŸ’‘Pin the dinosaur head in place before sewing to ensure it's positioned correctly between the center back eyelets and hangs properly
  • πŸ’‘Work a gauge swatch before starting to ensure your finished backpack will be the correct size for your intended age group

This charming Dino Backpack pattern brings together functionality and whimsy in the most delightful way, creating a truly special accessory for little adventurers. The tapestry crochet technique allows you to create a colorful dinosaur design that emerges beautifully as you work, while the three-dimensional head with its adorable safety eyes and textured plates adds personality and charm. Designed with adjustable sizing for ages three through six, this backpack grows with your child and provides the perfect place to store treasures, snacks, and small toys. Whether you're making it as a thoughtful handmade gift or creating a special project for your own little one, this pattern combines intermediate techniques with clear instructions to guide you through every step. Happy crocheting, and enjoy watching this prehistoric friend come to life! πŸ¦•πŸ§Άβœ¨

You ask,

we answer.

FAQs

What is tapestry crochet and is it difficult to learn?

Tapestry crochet is a technique where you crochet with one color while carrying one or more additional colors within your stitches, then switch colors throughout to create a design or picture. While it requires practice to maintain even tension, the technique itself uses basic single crochet stitches, making it accessible for intermediate crocheters who are comfortable with color changes. This pattern includes detailed instructions and helpful charts to guide you through the process.

Can I adjust the strap length if I'm making this for an older or younger child?

Yes! The pattern includes four different size options for ages 3, 4, 5, and 6 years old with corresponding chain counts: 97, 104, 111, or 118 chains respectively. You can also customize further by adding or subtracting chains in multiples that match the pattern repeat, just remember to adjust your stitch counts accordingly in the following rounds.

How do I keep my tapestry crochet tension even so the dinosaur design doesn't pucker?

Maintaining consistent tension is key in tapestry crochet. Make sure you're wrapping the carried color loosely enough that it doesn't pull the fabric, but tight enough that it doesn't show loops on the surface. Practice on a small swatch first, and remember that the carried yarn should lie flat against the back of your work. Using cotton yarn as recommended also helps achieve better results than stretchy acrylics.

What if I'm left-handed? Will this pattern work for me?

Absolutely! This pattern thoughtfully includes separate charts specifically designed for left-handed crocheters. The left-handed chart mirrors the design so your dinosaur will face the correct direction when you work from left to right instead of right to left. Simply follow the left-handed chart provided on page 8 of the pattern.

How do I attach the dinosaur head so it functions properly as a lid?

The pattern instructs you to pin the head in place first before sewing to ensure correct positioning. The back of the dinosaur head should be sewn to the inside back of the bag at the height where the head ends, positioned between the two center back eyelets. This allows the head to hang down centered over the front opening, effectively working as a decorative lid when the drawstring is loosened.

Can I use acrylic yarn instead of cotton for this project?

While the pattern recommends sport weight cotton yarn for structure and durability, you can substitute acrylic if needed. However, cotton provides better stitch definition for the tapestry crochet design and creates a sturdier bag that holds its shape better under the weight of contents. If using acrylic, choose a non-stretchy variety and be extra mindful of maintaining tight, even tension throughout.