🧢 Beautiful ✨ Detailed πŸ’ Adorable

Delilah Boho Bag Crochet Pattern

Delilah Boho Bag Crochet Pattern
4.5β˜… Rating
12-15 Hours Time Needed
3.3K Made This
βœ‚οΈ

Advanced Level

Designed for experienced knitters, these patterns involve intricate designs and complex techniques to challenge and inspire.

⏱️

Slow & Steady

A 10-12 hour projectβ€”great for savoring the process over several sessions.

✨

Stylish Touch

An elegant detail to elevate any look, combining traditional techniques with contemporary design sensibilities.

About This Delilah Boho Bag Crochet Pattern

The Delilah Boho Bag pattern is a comprehensive guide that takes you through creating a stunning textured bag from start to finish. Starting with a magic ring and building up through 21 detailed rounds, you'll work with popcorn stitches, post stitches, and various crochet techniques to create beautiful dimensional texture. The pattern includes complete instructions for making two matching panels, joining them together, adding a functional strap, creating decorative fringe, and even sewing a professional fabric lining.

Delilah Boho Bag Crochet Pattern crochet pattern - detailed view of completed project

This pattern is worked in the round using sport weight cotton yarn and includes blocking instructions to ensure your finished bag has a polished, professional appearance. With clear stitch counts and measurements for each round, you'll always know you're on track.

Why You'll Love This Delilah Boho Bag Crochet Pattern

I absolutely love this pattern because it's one of those projects that looks incredibly impressive when finished, yet the construction is logical and satisfying to work through. The texture created by the popcorn stitches and post stitches gives the bag such beautiful dimension and visual interest that it becomes a real statement piece. I especially appreciate how the pattern includes finishing touches like the lining tutorial and fringe details - it teaches you how to create a truly professional-looking bag that's sturdy enough for daily use. Every time I make this bag, I'm amazed at how the simple cotton yarn transforms into something so elegant and bohemian-chic!

Delilah Boho Bag Crochet Pattern step 1 - construction progress Delilah Boho Bag Crochet Pattern step 2 - assembly progress Delilah Boho Bag Crochet Pattern step 3 - details and accessories Delilah Boho Bag Crochet Pattern step 4 - final assembly and finishing

Switch Things Up

I love experimenting with this pattern to make each bag uniquely mine! While the original design calls for a single color to let the texture shine, I've created stunning versions using variegated cotton yarn that creates a beautiful ombre effect as you work through the rounds. The color transitions highlight each section of stitches in unexpected ways.

For a more dramatic look, I've tried using two contrasting colors - working the popcorn stitches in one color and the background in another creates incredible dimension. You could even use three colors by adding a different shade for the fringe! I've also played with the fringe length - cutting it longer at 40cm instead of 30cm creates a more dramatic bohemian vibe, while shorter 20cm fringe gives a more subtle, modern look.

Another fun variation is the lining fabric - I've used everything from bold geometric prints that peek through the stitches to luxurious velvet for an elegant touch. Metallic thread details on the lining add a secret sparkle! Size-wise, using DK weight yarn creates a wonderful oversized tote that's perfect for beach days or grocery shopping, while the sport weight makes an ideal everyday crossbody bag.

Don't be afraid to adjust the strap length to your preference either - I'm tall so I often add an extra 10-15 rows for a longer drop, and you could easily make it shorter for a more structured shoulder bag look. The button closure is another place to get creative - I've used everything from vintage wooden buttons to modern resin ones, and each completely changes the bag's personality!

Common Mistakes & How to Fix Them

βœ— Forgetting to use the Chainless Starting Treble (CStr) at the beginning of rounds which can make the join line more visible and inconsistent βœ— Not blocking both panels to exactly the same size before joining them together which results in an uneven or lopsided finished bag βœ— Pulling the top edge too tight or too loose when working the opening rounds which affects the bag's overall shape and functionality βœ— Skipping the lining step or not sewing it securely enough which can cause the bag to lose its structure and stretch out over time

Delilah Boho Bag Crochet Pattern

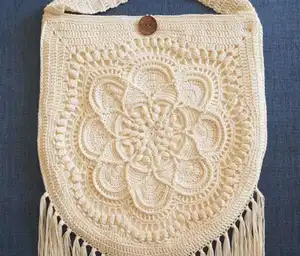
Create your own stunning bohemian-style bag with this beautiful crochet pattern! The Delilah Boho Bag features intricate textured stitches, popcorn details, and gorgeous fringe accents that capture the essence of boho-chic style. Perfect for everyday use or special occasions, this bag combines functionality with handmade artistry. Complete with a comfortable shoulder strap, button closure, and lined interior, you'll love carrying this unique accessory that showcases your crochet skills and personal style.

Advanced 12-15 Hours

Materials Needed for Delilah Boho Bag Crochet Pattern

β€” Main Fabric

  • 01
    Sport/Baby/4ply category yarn, 100% cotton or cotton/acrylic blend
  • 02
    Bendigo Woollen Mills 4ply, 100% cotton, 180g/660yds (1 ball) recommended
  • 03
    Approximately 180g of sport weight cotton yarn in your chosen color
  • 04
    Lining fabric: de-lustered satin, regular satin, or cotton fabric (no stretch fabrics)
  • 05
    135 strands of yarn at 30cm (12in) each for fringe
  • 06
    2cm diameter button for closure

β€” Tools Required

  • 01
    2mm crochet hook
  • 02
    Stitch markers
  • 03
    Yarn needle for weaving in ends
  • 04
    Scissors
  • 05
    Blocking boards or foam mats
  • 06
    Pins for blocking and sewing
  • 07
    Ruler or measuring tape
  • 08
    Paper for making lining pattern
  • 09
    Pencil for pattern marking
  • 10
    Sewing machine
  • 11
    Thread to match bag color
  • 12
    Iron for fringe

Progress Tracker

0% Complete

β€” First Panel :

Round 1 :

Magic ring, Ch1, 16dc into ring, slst in dc (16 dc, 2cm gauge)

Round 2 :

Ch1, *dc, ch2, skip 1 dc* x 8, slst in dc, slst in ch2 sp (8 dc, 8 ch2 sps, 2.5cm gauge)

Round 3 :

(PC, ch2) in each ch2 sp, slst in PC, slst in ch2 sp (8 PC, 8 ch2 sps, 4.5cm gauge)

Round 4 :

(PC, ch3, PC) in each ch2 sp, slst in PC, slst in ch2 sp (16 PC, 8 ch2 sps, 6cm gauge)

Round 5 :

*(PC, ch5, PC) in ch3 sp, tr between next 2 PC* x 8, slst in PC, slst in ch5 sp (16 PC, 8 tr, 8 ch5 sps, 8cm gauge)

Round 6 :

*9tr in ch5 sp, FPdtr around tr* x 8, slst in tr (72 tr, 8 FPdtr, 10.5cm gauge)

Round 7 :

Ch1, *BPdc x 9, (FPdtr, ch3, FPdtr) around FPdtr* x 8, slst in BPdc (9 BLdc, 2 FPdtr, 1 ch3 sp per side, 12cm gauge measured ch3 to ch3)

Round 8 :

Ch1, *dc x 9, FPtr around FPdtr, 5tr in ch3 sp, FPtr around FPdtr* x 8, slst in dc, slst in next dc (9 dc, 2 FPtr, 5 tr per side, 13.5cm gauge)

Round 9 :

Ch1, *dc x 7, skip 1 dc, FPtr, 2BLtr x 5, FPtr, skip 1 dc* x 8, slst in dc, slst in next dc (7 dc, 2 FPtr, 10 BLtr per side, 15.5cm gauge)

Round 10 :

Ch1, *dc x 5, skip 1 dc, FPtr, [2tr, tr] x 5, FPtr, skip 1 dc* x 8, slst in dc, slst in next dc (5 dc, 2 FPtr, 15 tr per side, 17.5cm gauge)

Round 11 :

Ch1, *dc x 3, skip 1 dc, FPtr, [tr x 2, 2tr] x 5, FPtr, skip 1 dc* x 8, slst in dc, slst in next dc (3 dc, 2 FPtr, 20 tr per side, 19.5cm gauge)

Round 12 :

Ch1, *dc, skip 1 dc, FPtr, BPdc x 20, FPtr, skip 1 dc* x 8, slst in dc, slst in FPtr, slst in BPdc (1 dc, 2 FPtr, 20 BPdc per side, 19.5cm gauge)

Round 13 :

*tr x 20, FPtr2tog using next 2 FPtr (skipping dc)* x 8, slst in tr, slst in next 3 tr (20 tr, 1 FPtr2tog per side, 21cm gauge)

Round 14 :

Replace the first BPtr of the round with (BPdc, ch2). Ch1, *[BPtr, ch1] x 14, BPtr6tog using next 6 tr (skipping tr2tog), ch1* x 8, slst in top ch2, slst in ch1 space (14 BPtr, 1 BPtr6tog, 15 ch1 sps per side, 24cm gauge)

Round 15 :

Mark the 3rd dc in each set. Ch1, *dc in ch1 sp, 2dc in next 11 ch1 sps, dc in ch1 sp, skip BPtr, skip ch1 sp, skip BPtr6tog, skip ch1 sp, skip BPtr* x 8, slst in dc, slst in next 4 dc (24 dc per side, 24cm gauge)

Round 16 :

*[tr, ch2, skip 1 dc] x 9, tr2tog using next dc and next marked stitch, ch2* x 8, replace last ch2 with tr in first tr (9 tr, 10 ch2 sps, 1 tr2tog per side, 26cm gauge)

Round 17 :

First PC goes into the sp created by the joining tr. Note that there is no chain space between the 2 PC either side of the tr2tog. *[PC in ch2 sp, ch3] x 9, PC in ch2 sp, skip tr2tog* x 8, slst in PC. Fasten off. (10 PC, 9 ch3 spaces per side, 29cm gauge)

Round 18 :

Attach yarn to the 5th space of any 'petal'. Skip all PC. 3tr in next 6 ch3 sps, *3htr in next ch3 sp, 3dc in next 5 ch3 sps, 3htr in next ch3 sp, 3tr in next 2 ch3 sps* x 5, 3tr in next 3 ch3 sps, (3tr, ch2, 3tr) in next ch3 space, 3tr in next 5 ch3 sps, 3htr in next ch3 sp, 3dc in next 5 ch3 sps, 3htr in next ch3 sp, 3tr in next 5 ch3 sps, 3tr in first ch3 sp, ch1, dc in first tr (counts as ch2 sp) (96 tr, 36 htr, 90 dc, 2 ch2 sps, 29cm gauge)

Round 19 :

3tr into space created by joining dc, tr x 18, htr x 3, *dc x 15, htr x 3, tr x 6, htr x 3* x 4, dc x 15, htr x 3, tr x 18, (3tr, ch2, 3tr) in ch2 space, tr x 15, htr x 6, dc x 15, htr x 6, tr x 15, 3tr in first space, ch1, dc in first tr (102 tr, 42 htr, 90 dc, 2 ch2 sps, 30cm gauge)

Round 20 :

3tr into space created by joining dc, tr x 21, htr x 3, dc x 15, htr x 3, tr x 87, htr x 3, dc x 15, htr x 3, tr x 21, (3tr, ch2, 3tr) in ch2 space, tr x 18, htr x 3, dc x 21, htr x 3, tr x 18, 3tr into first space, ch1, dc in first tr (177 tr, 18 htr, 51 dc, 2 sps, 31cm gauge)

Round 21 :

3tr in sp created by joining dc (mark first tr), tr x 177, 5tr in ch2 sp (mark 3rd tr), tr x 69, 2tr in first sp, slst in tr. Fasten off. (256 tr, 32cm gauge)

Info :

Repeat the pattern for the second panel then block both panels to the same size (32cm x 32cm or 12.6in x 12.6in recommended)

β€” Joining Panels :

Step 1 :

With wrong sides of panels facing each other and corners aligned, attach yarn to left-hand marked stitches of both panels

Step 2 :

Ch1, dc in corresponding stitches of both panels all the way around curved edge, stopping at right-hand corner marked stitch (183 dc). Do not fasten off, continue to top edge

β€” Top Edge :

Round 1 :

Turn bag to work along right side of top edge opening. Mark first st. Ch1, dc x 73 starting with next tr, dc in first dc of joining row, dc x 37, ch20 (button loop), dc x 36, dc in last dc of joining row (148 dc, 1 ch20)

Round 2 :

Dc x 148 (moving button loop to outside of bag) (148 dc)

Round 3 :

Dc x 143 (finishing with 5 stitches left). Do not fasten off, continue to strap (143 dc)

β€” Strap :

Row 1 :

Ch2 (does not count as stitch), tr in same stitch as last dc, tr x 11, turn (12 tr)

Rows 2-61 :

Ch2, tr in first tr, tr x 11, skip ch2, turn (approximately 60cm or 24in long) (12 tr)

Finishing :

With no twists in strap, place right side of strap against right side of bag. Ch1, slst strap to bag with 6 slst either side of seam. Fasten off and weave in ends

β€” Fringe :

Step 1 :

Cut 135 strands of yarn at 30cm (12in) each (27 tassels with 5 strands each)

Step 2 :

Attach first tassel to 53rd dc of joining row: Fold 5 strands in half, place hook through stitch from back to front, place folded end over hook and pull through stitch, yarn over with strands, pull through and tighten

Step 3 :

Repeat for remaining strands in every 3rd stitch around bottom curve of bag (27 tassels total)

Step 4 :

Iron the fringe and trim ends with sharp scissors as needed

β€” Button Attachment :

Final Step :

Attach 2cm diameter button to top centre of front of bag

Assembly Instructions

  • Block both crocheted panels to exactly the same size (32cm x 32cm recommended) using blocking boards or foam mats, ensuring they're completely dry before unpinning
  • Place panels with wrong sides together and corners aligned, then join by working double crochet through corresponding stitches around the curved edge
  • Work the top edge rounds carefully, maintaining consistent tension to create an opening the same width as the bag without pulling too tight or loose
  • Attach the strap securely to both sides of the bag opening with slip stitches, making sure there are no twists in the strap before joining
  • Create the lining by making a paper pattern, cutting fabric pieces with proper seam allowances, sewing the curved edge, and hemming the top edge
  • Pin the lining inside the bag with right side facing inward and side seams aligned, then sew close to the fold being careful not to catch the button loop or straps
  • Attach all 27 fringe tassels evenly around the bottom curve, iron them for a neat finish, and trim to desired length before sewing on the button closure

Important Notes

  • πŸ’‘The Chainless Starting Treble (CStr) is essential for achieving a consistent look - practice this technique before starting the main pattern
  • πŸ’‘Keep track of your gauge measurements at each round to ensure your panels will be the correct size for blocking
  • πŸ’‘Use 100% cotton or cotton/acrylic blend yarn only - acrylic or wool will stretch and lose shape over time with use
  • πŸ’‘Mark important stitches throughout the pattern (especially in rounds 15, 16, and 21) to make joining and finishing easier
  • πŸ’‘Block both panels to exactly the same dimensions - even small differences will result in an uneven finished bag
  • πŸ’‘When working the lining, choose a fabric that looks good from both sides as it may show through the crochet stitches
  • πŸ’‘The strap will naturally stretch with use, so the pattern length accounts for this - don't make it longer than specified

This stunning Delilah Boho Bag pattern combines advanced crochet techniques with beautiful bohemian style to create a truly special accessory! The intricate popcorn stitches create gorgeous texture, while the professional finishing touches like the fabric lining and flowing fringe give it a polished, boutique-quality look. Perfect for showcasing your crochet expertise, this bag is both practical and eye-catching. Whether you're heading to the farmers market or out for coffee with friends, your handmade boho bag will turn heads and spark conversations. Happy crocheting! 🧢✨

You ask,

we answer.

FAQs

Can I use a different weight of yarn for this pattern?

Yes! The pattern recommends Sport/4ply for a 30cm x 30cm bag, but you can use DK/Light Worsted/8ply for a larger bag. Just remember that yarn quantity and final measurements will vary, and you'll need to adjust your hook size accordingly.

What is a Chainless Starting Treble and why is it important?

The CStr creates a more consistent look for all treble crochet stitches and better disguises the start of the round compared to the traditional ch3. If you find it difficult, you can substitute with ch2 then a regular treble crochet, but the CStr gives much better results.

Do I have to add the lining to the bag?

While the lining isn't absolutely required, it's highly recommended as it gives the bag structure, prevents stretching, and provides a more professional finish. The pattern includes complete instructions for creating and attaching the lining.

How do I make sure both panels are exactly the same size?

The key is blocking! After completing both panels, block them both to the exact same measurements using blocking boards or foam mats. The pattern recommends 32cm x 32cm, but any size works as long as both panels match perfectly.

Can I make this bag without the fringe?

Absolutely! The fringe is a decorative element that adds bohemian flair, but the bag is fully functional without it. You can skip the fringe section entirely or replace it with a different embellishment like pom-poms or tassels.

Why is cotton or cotton blend yarn recommended over acrylic?

Cotton and cotton blends maintain their shape much better than acrylic or wool when the bag is in use and carrying weight. Acrylic and wool yarns will stretch and change shape over time, causing your beautiful bag to become distorted.