🧢 Beautiful ✨ Detailed πŸ’ Adorable

Daffodil Baby in Cradle Amigurumi Pattern

Daffodil Baby in Cradle Amigurumi Pattern
4.0β˜… Rating
6-8 Hours Time Needed
2.3K Made This
βœ‚οΈ

Intermediate Level

Ideal for those with basic knitting experience, featuring slightly more advanced stitches and techniques to expand your skills.

⏱️

Weekend Treat

Takes 5-7 hours, making it an enjoyable project to finish over a couple of days.

🌸

Spring Bloom

Light and fresh designs for warmer days, capturing the renewal and brightness of the season.

About This Daffodil Baby in Cradle Amigurumi Pattern

This delightful Daffodil Baby pattern brings the spirit of spring into your home with an adorable baby doll dressed as a cheerful daffodil flower. The pattern features intricate petal work and a innovative leaf cradle design that can be displayed year-round. With wire reinforcement in the cradle, your creation will maintain its beautiful shape and can even be hung as decoration. The combination of soft cotton yarns in sunny yellows and fresh greens creates a piece that truly celebrates the season of renewal.

Daffodil Baby in Cradle Amigurumi Pattern crochet pattern - detailed view of completed project

The finished piece measures approximately 8cm for the baby and 14cm for the cradle, making it a perfect decorative accent for spring displays or nature-themed collections. The pattern includes detailed instructions for embroidering facial features and properly assembling all components for a professional finish.

Why You'll Love This Daffodil Baby in Cradle Amigurumi Pattern

I absolutely love this pattern because it combines the sweetness of amigurumi with the beauty of botanical design. The challenge of creating the leaf cradle with its detailed shaping keeps the project engaging, while the adorable baby doll brings such joy to complete. I find the wire reinforcement technique particularly clever as it allows the finished piece to be displayed in various ways. The spring color palette is so refreshing to work with, and watching the daffodil petals come together is incredibly satisfying. This pattern taught me new techniques for creating dimensional botanical elements that I've used in other projects since.

Daffodil Baby in Cradle Amigurumi Pattern step 1 - construction progress Daffodil Baby in Cradle Amigurumi Pattern step 2 - assembly progress Daffodil Baby in Cradle Amigurumi Pattern step 3 - details and accessories Daffodil Baby in Cradle Amigurumi Pattern step 4 - final assembly and finishing

Switch Things Up

I love experimenting with different color combinations for this pattern! While the traditional yellow and green daffodil colors are stunning, you could create an entire garden of flower babies by switching up the palette. Try pink and green for a tulip baby, purple and green for a crocus, or even red and green for a poinsettia version perfect for winter holidays.

For a more whimsical look, I sometimes add tiny embroidered details like rosy cheeks or freckles to give each baby more personality. You could also experiment with different facial expressions by varying the eye placement and adding a simple smile.

If you want to make the project easier, you can skip the wire reinforcement and simply display the cradle flat on a surface instead of hanging it. Another fun variation is to make just the baby doll without the cradle and create a whole collection of different flower babies.

I've also tried using variegated yarn for the petals which creates a beautiful ombre effect, and adding a light dusting of fabric blusher to the petal tips for extra dimension. The small leaves can be made in different shades of green for a more realistic botanical look.

Common Mistakes & How to Fix Them

βœ— Losing count of stitches when working the leaf pattern - use stitch markers at key increase points to track your progress βœ— Making the wire frame too short or too long for the leaf cradle - measure and test fit before sewing permanently βœ— Overstuffing the baby's body making it too stiff - stuff lightly to keep it soft and slightly flat as instructed βœ— Not ironing the leaves properly causing asymmetrical shapes - use damp cloth and gently stretch while ironing for symmetry βœ— Sewing petals together too loosely causing gaps - use small tight stitches near the stem for secure attachment βœ— Forgetting to grab the initial tail into crocheting when working petals - this causes loose ends that are hard to hide later

Daffodil Baby in Cradle Amigurumi Pattern

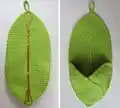
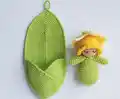
Create an enchanting spring scene with this adorable Daffodil Baby nestled in a beautiful leaf cradle. This charming amigurumi features a sweet baby doll dressed as a daffodil flower with detailed yellow petals and a cozy green outfit. The pattern includes instructions for crafting both the 8cm baby doll and a 14cm leaf cradle reinforced with wire for display. Perfect for seasonal decorations or as a unique handmade gift, this pattern combines delicate crochet work with creative assembly techniques to bring springtime magic to life.

Intermediate 6-8 Hours

Materials Needed for Daffodil Baby in Cradle Amigurumi Pattern

β€” Main Fabric

  • 01
    Cotton yarn Alpina Lily (50g/175m) in Beige and Yellow
  • 02
    Cotton yarn Alpina Sati (50g/170m) in Pale Yellow
  • 03
    Cotton yarn Alpina Sati (50g/170m) or Yarn Vita Orion (77% cotton, 23% rayon, 50g/170m) in Green-Yellow
  • 04
    Black embroidery thread for eyes

β€” Tools Required

  • 01
    Crochet hook 2.0mm
  • 02
    Aluminum wire 1mm
  • 03
    Sewing needles and pins
  • 04
    Tapestry needle
  • 05
    Scissors
  • 06
    Synthetic or organic fiber stuffing
  • 07
    Damp cloth for ironing

Progress Tracker

0% Complete

β€” Head :

Round 1 :

6 sc into magic ring (6 sts)

Round 2 :

(inc) X 6 (12 sts)

Round 3 :

(1 sc, inc) X 6 (18 sts)

Round 4 :

(2 sc, inc) X 6 (24 sts)

Round 5-9 :

sc around (24 sts)

Round 10 :

(2 sc, dec) X 6 (18 sts)

Round 11 :

(1 sc, dec) X 6 (12 sts)

Info :

After Round 11 stuff the head tightly

Round 12 :

(dec) X 6 (6 sts)

Info :

Leave a tail. In remaining 6 sc sew 6 stitches from inside to outside in sequence, pull the yarn, secure and hide it

β€” Body & Arms :

Info :

First make 2 arms

Arms - Round 1 :

6 sc into magic ring (6 sts)

Round 2 :

(inc, 2 sc) X 2 (8 sts)

Round 3 :

(inc, 3 sc) X 2 (10 sts)

Round 4-5 :

sc around (10 sts)

Round 6 :

(dec, 3 sc) X 2 (8 sts)

Round 7-8 :

sc around (8 sts)

Info :

Make 1 sl st more and leave short tail

Body - Round 1 :

6 sc into magic ring (6 sts)

Round 2 :

(inc) X 6 (12 sts)

Round 3 :

(1 sc, inc) X 6 (18 sts)

Round 4 :

(2 sc, inc) X 6 (24 sts)

Round 5 :

(inc, 11 sc) X 2 (26 sts)

Round 6 :

sc around (26 sts)

Round 7 :

(inc, 12 sc) X 2 (28 sts)

Round 8-11 :

sc around (28 sts)

Round 12 :

(dec, 12 sc) X 2 (26 sts)

Round 13 :

(dec, 11 sc) X 2 (24 sts)

Round 14 :

(2 sc, dec) X 6 (18 sts)

Round 15-16 :

sc around (18 sts)

Info :

Place one arm closely to the body and join them together with 2 sc. For the arm use its last stitch and the next following stitch. Work 7 sc and join the second arm with 2 sc, then 7 sc again. These inner connecting sc will not be used in the next rounds

Round 17 :

(6 sc of the arm, 7 sc of the body) X 2 (26 sts)

Round 18 :

(2 sc, dec, 2 sc, (1 sc, dec) X 2, 1 sc) X 2 (20 sts)

Round 19 :

(dec) X 10 (10 sts)

Info :

Fasten and hide the tail. Stuff the body and arms not very tight, it should be a little flat

Assembly :

Place the head onto the body, pin it. Note that the initial, neater part of the head will be at the bottom where the neck is. Carefully sew on the head with fine stitches with beige yarn split in half

β€” Flower-Hat :

Cap - Round 1 :

6 sc into magic ring (6 sts)

Round 2 :

inc X 6 (12 sts)

Round 3 :

(1 sc, inc) X 6 (18 sts)

Round 4 :

sc around (18 sts)

Round 5 :

(2 sc, inc) X 6 (24 sts)

Round 6 :

sc around (24 sts)

Round 7 :

(3 sc, inc) X 6 (30 sts)

Round 8-12 :

sc around (30 sts)

Info :

Make 1 sl st more in Round 12

Round 13 :

2 ch, skip 1 st, (1 sc, 1 ch, skip 1 st) X 14, sl st in 1st ch (31 sts)

Round 14 :

1 ch, (2 sc, 1 dc, 2 sc) X 15 (76 sts), sl st

Info :

Make clean fastening off on the edge of the cap

Petals :

Make 6 petals. Make chain of 6, then start in 2nd ch from the hook

Petal - Round 1 :

4 sc, (1 sc, 1 dc, 1 sc) in 6th ch, 4 sc, inc 3 in 1st ch (14 sts)

Round 2 :

5 sc, (1 sc, 1 dc, 1 sc) in one st, 7 sc (15 sts)

Round 3 :

(2 sc, inc) X 2, 1 sc, (1 sc, 1 dc, 1 sc) in one st, 1 sc, inc, (2 sc, inc) X 2 (23 sts)

Round 4 :

(2 sc, inc) X 2, 4 sc, (1 sc, 1 dc, 1 sc) in one st, 4 sc, (inc, 2 sc) X 2, 2 sl st (29 sts)

Info :

For five petals cut the yarn off. For the last petal do not cut the yarn. Working on the other side of the chain, grab the initial tail into the crocheting to hide it

Petal Assembly :

Divide the petals into two triples. For the first triplet with uncut yarn: Work 1 sl st more for this petal and join 2nd petal making 2 sl sts in its last and previous stitches. Join 3rd petal in the same way. Make 1 sl st in 1st petal. Cut the yarn off. Pull all the tails into the center hole

Second Triplet :

Attach the green-yellow yarn in the previous st before the last st of a petal. Work 3 sc in the 2nd and the 3rd petals in the penultimate, last and previous sts. It turned out the first round (9 sts) of a stem

Stem - Round 2 :

sc around (9 sts)

Round 3 :

4 dec, sl st (5 sts)

Info :

Leave a long tail. Pull all the tails into the center hole. Pull this bundle of tails through the center hole of the first triplet of petals. Align the two triplets, pull up the tails well and sew the petals together with small stitches near the green stem with pale yellow yarn. When the petals are securely stitched, trim off the bundle of tails. Thread the green tail into the needle and make stitch into each st of the 3rd round. Pull the yarn, secure and hide

Final Assembly :

Place the pale yellow flower on top of the yellow cap, pin in the center and sew tightly with tiny stitches using the same pale yellow yarn

β€” Face :

Info :

Put the hat on the doll's head and mark the places for the eyes with pins. Remove the hat. Embroider the eyes a few stitches with 2-strand black embroidery thread. Put the hat back on and sew it on with yellow yarn
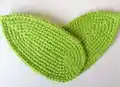
β€” Leaf-Cradle :

Big Leaf :

Make chain of 26, then start in 2nd ch from the hook

Round 1 :

24 sc, inc 3 in 26th ch, 24 sc, inc 3 in 1st ch (54 sts)

Round 2 :

inc, 23 sc, inc, 1 sc, inc 3, 1 sc, inc, 23 sc, inc, 1 sc, inc 3 (61 sts)

Round 3 :

14 sc, inc, 14 sc, inc 3, 14 sc, inc, 15 sc, inc 3 (67 sts)

Round 4 :

2 sc, inc, 26 sc, inc, 2 sc, inc 3, 2 sc, inc, 26 sc, inc, 3 sc, inc 3 (75 sts)

Round 5 :

36 sc, inc 3, 37 sc, inc 3 (79 sts)

Round 6 :

4 sc, inc, 7 sc, inc, 12 sc, inc, 7 sc, inc, 4 sc, inc 3, 4 sc, inc, 7 sc, inc, 12 sc, inc, 7 sc, inc, 5 sc, inc 3 (91 sts)

Round 7 :

44 sc, inc 3, 45 sc, inc 3 (95 sts)

Round 8 :

6 sc, inc, 32 sc, inc, 6 sc, inc 3, 6 sc, inc, 32 sc, inc, 7 sc, inc 3 (103 sts)

Round 9 :

24 sc, inc, 25 sc, inc 3, 25 sc, inc, 25 sc, inc 3 (109 sts)

Round 10 :

4 sc, inc, 43 sc, inc, 4 sc, inc 3, 4 sc, inc, 44 sc, inc, 4 sc, inc 3 (117 sts)

Round 11 :

57 sc, inc 3, 58 sc, inc 3 (121 sts)

Round 12 :

13 sc, inc, 31 sc, inc, 13 sc, inc 3, 13 sc, inc, 31 sc, inc, 14 sc, inc 3 (129 sts)

Round 13 :

63 sc, inc 3, 63 sc, sl st, 2 sl st in one st, chain of 15, sl st (133 sts + 15 ch)

Info :

Working on the other side of the chain, grab the initial tail into the crocheting to hide it. Make clean fastening off on the edge

Small Leaf :

Make 2 pieces. Make chain of 16, then start in 2nd ch from the hook

Round 1 :

14 sc, (1 sc, 1 dc, 1 sc in one stitch), 14 sc, inc 3 (34 sts)

Round 2 :

14 sc, inc, (1 sc, 1 dc, 1 sc in one st), inc, 16 sc (37 sts)

Round 3 :

2 sc, inc, 5 sc, inc, 9 sc, (1 sc, 1 dc, 1 sc in one st), 9 sc, inc, 5 sc, inc, 2 sc, inc 3 (46 sts)

Round 4 :

2 sc, inc, 3 sc, inc, 12 sc, inc, 1 sc, (1 sc, 1 dc, 1 sc in one st), 1 sc, inc, 12 sc, inc, 3 sc, inc, 5 sc (54 sts)

Round 5 :

inc, 24 sc, (1 sc, 1 dc, 1 sc in one st), 24 sc, inc, 3 sc (58 sts)

Round 6 :

2 sc, inc, 3 sc, inc, 18 sc, inc, 1 sc, (1 sc, 1 dc, 1 sc in one st), 1 sc, inc, 18 sc, inc, 3 sc, inc, 5 sc (66 sts)

Round 7 :

31 sc, (1 sc, 1 dc, 1 sc in one st), 32 sc, 2 sl st (68 sts)

Info :

Make clean fastening off on the edge. Carefully and gently iron the leaves through damp cloth. Adjust their shape while ironing by slightly stretching one side and squeezing the other

Assembly Instructions

  • Sew the head to the body using fine beige yarn split in half, with the neater part of the head positioned at the neck area.
  • Put the small leaves on top of each other and sew them together along the edge with fine stitches, creating a convex double leaf.
  • Place the double leaf on top of the large leaf, pin it to check fit with the baby, then sew together along the edge with small tight stitches.
  • Iron all leaves carefully through damp cloth, adjusting their shape by stretching and squeezing to create symmetry.
  • Create a wire loop slightly longer than the large leaf, bend the ends, place in the center of the leaf and sew in several places with small inconspicuous stitches.
  • Optionally pull down the edge of the double leaf by threading yarn through it and fastening to the side so the baby sits more snugly.
  • Embroider eyes with 2-strand black embroidery thread, then sew the completed flower-hat onto the doll's head with yellow yarn.

Important Notes

  • πŸ’‘Pull the initial yarn tail out between rounds 2 and 3 of the head to serve as a marker for counting rounds
  • πŸ’‘Be very careful when working the leaf patterns and check the chart constantly to avoid confusion with the many increases
  • πŸ’‘Stuff the head tightly but the body and arms should be stuffed lightly to keep them slightly flat as intended
  • πŸ’‘Split the yarn in half when sewing parts together to create finer, less visible stitches for a professional finish
  • πŸ’‘The leaf shape will not be perfectly symmetrical initially but this is corrected during the ironing process
  • πŸ’‘When ironing leaves use a damp cloth and gently adjust the shape by stretching and squeezing for symmetry
  • πŸ’‘Secure all wire stitches with tight knots and hide yarn tails carefully as the wire makes the cradle more visible from all angles

This enchanting Daffodil Baby pattern celebrates the magic of springtime with a sweet little doll nestled in a beautifully crafted leaf cradle. The combination of delicate petal work, detailed botanical elements, and clever wire reinforcement creates a stunning decorative piece that captures nature's beauty. Whether you display it as a seasonal decoration or give it as a heartfelt handmade gift, this pattern offers both technical challenge and creative satisfaction. The finished piece brings joy and reminds us of spring's fresh beginnings. 🌼 Happy crocheting! 🧢✨

You ask,

we answer.

FAQs

What size will my finished Daffodil Baby and cradle be?

Using the recommended materials, the baby doll will measure approximately 8cm (3 inches) tall and the leaf cradle will be about 14cm (5.5 inches) high. The size may vary slightly depending on your tension and yarn substitutions.

Can I use different yarn brands than those specified?

Yes, you can substitute yarns as long as they have similar weight and yardage (50g/170-175m). Cotton or cotton-blend yarns work best for this project to maintain the structure of the leaves and petals.

Is the wire frame necessary for the cradle?

The wire frame is highly recommended as it provides structure and allows the cradle to be displayed or hung. Without it, the large leaf will be too flexible and won't hold its shape well with the baby inside.

How do I make the leaves symmetrical?

The leaves are intentionally asymmetrical when crocheted. You'll correct this by carefully ironing them through a damp cloth while gently stretching one side and squeezing the other to achieve the desired symmetrical shape.

What's the best way to embroider the eyes?

Use 2-strand black embroidery thread and practice on a scrap piece of fabric first. Mark the eye positions with pins while the hat is on, then remove the hat to embroider. The pattern recommends placing eyes based on reference photos.

How should I split the yarn for sewing?

To split yarn in half, carefully separate the plies of your yarn lengthwise. This creates a thinner thread that produces finer, less visible stitches when sewing parts together for a more professional finish.