Discover the enchanting world of adorable crawling creatures with this comprehensive amigurumi collection featuring 11 charming designs. From Spinderella the Spider to the Froggy Trio, each pattern brings whimsical woodland friends to life with detailed instructions and creative embellishments. Perfect for crocheters who love creating playful characters with personality, this collection includes insects, reptiles, and amphibians that will delight both makers and gift recipients alike.
Progress Tracker
0% Complete
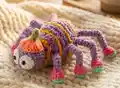
— SPINDERELLA THE SPIDER
— Eyes (yarn C, X2)
Round 1 :
sc 6 into a magic loop (6)
Round 2 :
inc 6, slst (12)
Info :
Break the yarn, leave a long thread to sew later
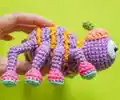
— Body (yarn A)
Info :
Crochet BLO on all the rnds on the Body. Change to color each 2 lines
Round 1 :
sc 6 into a magic loop (6)
Round 2 :
(blo) inc 6 (12)
Round 3 :
(blo) [sc 1, inc] 6x (18)
Round 4 :
(blo) [sc 2, inc] 6x (24)
Round 5 :
(blo) [sc 3, inc] 6x (30)
Round 6 :
(blo) [sc 4, inc] 6x (36)
Round 7-8 :
(blo) sc 36 (2 rnds) (36)
Round 9 :
(blo) sc 36 (36)
Round 10-11 :
(blo) sc 36 (2 rnds) (36)
Round 12 :
(blo) sc 12, dec 6, sc 12 (30)
Round 13 :
(blo) sc 30 (30)
Round 14 :
(blo) sc 9, dec 6, sc 9 (24)
Round 15 :
(blo) sc 24 (24)
Round 16 :
(blo) sc 6, dec 6, sc 6 (18)
Round 17 :
(blo) sc 18, start stuffing (18)
Info :
Do not break the yarn, move to crochet the Head
— Head (yarn A)
Round 18 :
[sc 2, inc] 6x (24)
Round 19 :
[sc 3, inc] 6x (30)
Round 20-24 :
sc 30 (5 rnds) (30)
Round 25 :
[sc 3, dec] 6x (24)
Round 26 :
[sc 2, dec] 6x (18)
Round 27 :
[sc 1, dec] 6x, stop to insert the eyes into the Head, stuffing (12)
Info :
Break the yarn, weave in the last 6 sts, hide the remaining yarn. Join yarn A on the 1st of the 2nd rnd of the Body and continue crocheting *ch 3, slst 1 on the next st* in the flo of rnd 2-17. Remember to change the color to create the color stripes
— Pumpkin's Hat (yarn D)
Round 1 :
MR, ch 2 (do not count as a hdc), dc 9, slst on the ch 2 (9)
Round 2 :
ch 2 (do not count as a hdc), (dc 1, FPDC 1 on the same stitch) 9x, slst in the ch 2 (18)
Info :
Break the yarn, leave a long thread to sew later. Continue to crochet the Stem
— Stem (yarn E)
Round 1 :
sc 5 into a magic loop (5)
Round 2-4 :
sc 5 (3 rnds) (5)
Info :
Break the yarn, leave a long thread to sew later
— Leg 1 (yarn F, X2)
Round 1 :
sc 6 into a magic loop (6)
Round 2 :
inc 6, change to yarn G (12)
Round 5 :
dec 6, change to yarn A (6)
Round 6 :
sc 6 blo, stuff slightly (6)
Round 7-8 :
sc 6 (2 rnds) (6)
Round 9 :
sc 3 blo, sc 3 (6)
Round 10 :
sc 6, stuff the shoes only (6)
Round 11 :
sc 3 in the flo of the 3sts on rnd 9, sc 3 on the last 3sts of rnd 10 (6)
Round 12-13 :
sc 6 (2 rnds) (6)
Info :
Break the yarn, leave a long thread to sew later
— Leg 2 (yarn F, X2)
Round 1-6 :
Repeat 1-6 of the Leg 1 (6)
Round 7-9 :
sc 6 (3 rnds) (6)
Round 10 :
sc 3 blo, sc 3 (6)
Round 12 :
sc 3 in the flo of the 3sts on rnd 10, sc 3 on the last 3sts of rnd 11 (6)
Round 13-15 :
sc 6 (3 rnds) (6)
Info :
Break the yarn, leave a long thread to sew later
— Leg 3 (yarn F, X2)
Round 1-6 :
Repeat 1-6 of the Leg 1 (6)
Round 7-10 :
sc 6 (4 rnds) (6)
Round 11 :
sc 3 blo, sc 3 (6)
Round 13 :
sc 3 in the flo of the 3sts on rnd 11, sc 3 on the last 3sts of rnd 12 (6)
Round 14-17 :
sc 6 (4 rnds) (6)
Info :
Break the yarn, leave a long thread to sew later
— Leg 4 (yarn F, X2)
Round 1-6 :
Repeat 1-6 of the Leg 1 (6)
Round 7-11 :
sc 6 (5 rnds) (6)
Round 12 :
sc 3 blo, sc 3 (6)
Round 14 :
sc 3 in the flo of the 3sts on rnd 12, sc 3 on the last 3sts of rnd 13 (6)
Round 15-19 :
sc 6 (5 rnds) (6)
Info :
Break the yarn, leave a long thread to sew later
This enchanting Cutie Crowlies collection brings the magical world of woodland insects and critters to life with eleven unique amigurumi designs. Each pattern features detailed construction techniques, creative color work, and charming accessories that give every character personality. From beginner-friendly techniques to more advanced texture work, this collection offers something for every skill level while creating adorable companions that will be treasured for years. Happy crocheting! 🧶✨🐛