🧢 Beautiful ✨ Detailed πŸ’ Adorable

Crochet Textured Flower Square Motif Pattern

Crochet Textured Flower Square Motif Pattern
4.5β˜…Rating
3-4 HoursTime Needed
2.3KMade This
βœ‚οΈ

Intermediate Level

Ideal for those with basic crocheting experience, featuring slightly more advanced stitches and techniques to expand your skills.

⏱️

Quick Craft

Fits nicely into a free afternoon β€” 2 to 5 hours of focused, enjoyable crocheting.

✨

Stylish Touch

An elegant detail to elevate any look, combining traditional techniques with contemporary design sensibilities.

About This Crochet Textured Flower Square Motif Pattern

Crochet Textured Flower Square Motif Pattern crochet pattern - detailed view

Stitch it as a table mat, a cushion panel or a centerpiece, or make several in different shades for a gift set that looks far more complicated than it feels while you work.

Why You'll Love This Crochet Textured Flower Square Motif Pattern

I got a little hooked on the rhythm of this one. Working every row through the back loop gives that knitted, ribbed look, and watching each petal narrow down to a single point never gets old. The blocks are almost meditative, and I always end up making one more than I planned to.

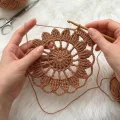
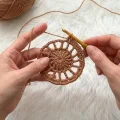
Crochet Textured Flower Square Motif Pattern step 1 Crochet Textured Flower Square Motif Pattern step 2 Crochet Textured Flower Square Motif Pattern step 3 Crochet Textured Flower Square Motif Pattern step 4

Switch Things Up

I made my first one of these on a rainy afternoon with a cup of tea going cold beside me, and I honestly lost an hour just watching the petals take shape. There's something deeply satisfying about a leaf that starts seven stitches wide and narrows to a single point.

Here's the tip that changed everything for me: keep your tension a touch snug on the back loop rows. When the stitches sit tight, the ribbing pops and the whole motif looks almost knitted. If your rows feel loose, drop down half a hook size and you'll see the difference straight away.

I also love playing with color. Try a deep forest green with the blocks left in cream, or make the center disc in mustard and keep the petals neutral. A soft grey version looks gorgeous as a cushion front.

One last thing from my own mistakes. Pin the eight blocks out before you start the chain arcs, because working them while the blocks flop around is a recipe for wonky corners. Take your time with the outline round and the whole thing will sit beautifully flat.

Common Mistakes & How to Fix Them

βœ— If you work the petal rows through both loops instead of the back loop only, the ribbed texture disappears and each leaf looks flat, so stay in the back loop on every petal row.βœ— Petal tips can end up lopsided when the sc2tog decreases are placed off center, so check that Row 2 gives you 5 stitches and Row 4 gives you 3 before moving on.βœ— The corner arcs pull the blocks inward if the chains are too short and sag if they are too long, so pin all eight blocks out square and test one arc against them before working the full outline.βœ— The ch 5 arches in Round 5 are easy to skip or double, which leaves a petal group sitting off center, so mark the first sc and count 12 arches before you start Round 6.βœ— The ribbed blocks twist into a parallelogram if you lose track of the turning chain, so ch 1 at the start of every row and count 10 stitches at the end of each one.

Crochet Textured Flower Square Motif Pattern

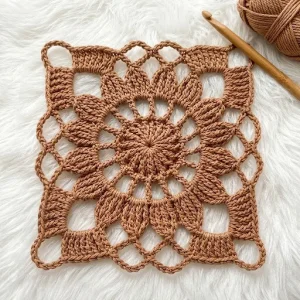
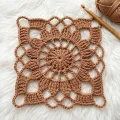
You'll love how this caramel brown square comes together. A tight ribbed center spirals out into twelve leaf petals, and then eight chunky ribbed blocks are tied into place with sweeping chain loops. It's the kind of crochet motif that makes people lean in and ask how it's made, yet every piece is built from simple single crochet and a few chains. Make one to admire, or stitch a handful and join them into something bigger.

Intermediate 3-4 Hours

Materials Needed for Crochet Textured Flower Square Motif Pattern

β€” Main Fabric

  • 01
    About 30 g of sport weight mercerized cotton yarn in warm caramel brown for every part of the motif, including the petals, blocks, and chain arcs (approximate amount)
  • 02
    A few extra meters of the same caramel cotton yarn to leave as tails for weaving in ends

β€” Tools Required

  • 01
    Crochet hook, approximately 2.5 mm, adjusted up or down to match your yarn
  • 02
    Tapestry needle for weaving in ends
  • 03
    Sharp scissors
  • 04
    Stitch markers, at least 2
  • 05
    Blocking mat
  • 06
    Rustproof pins for blocking
  • 07
    Spray bottle of water for wet blocking
  • 08
    Measuring tape

Progress Tracker

0% Complete

β€” 1. Center Disc :

Info :

The finished square measures approximately 20 cm (8 in) across when worked with sport weight cotton and a hook of about 2.5 mm. Stitch counts are given for one size only. Place a stitch marker in the first st of every round, since the ch 1 at the start of each round does not count as a stitch.

Round 1 :

Make a MR, ch 1, 12sc into the ring, pull the tail tight, sl st to the first sc (12)

Round 2 :

ch 1, 2sc in each st around, sl st to the first sc (24)

Round 3 :

ch 1, 12 x (sc in next st, 2sc in next st), sl st to the first sc (36)

Round 4 :

ch 1, sc blo in each st around, sl st to the first sc (36)

β€” 2. Spoke Arches :

Round 5 :

ch 1, 12 x (sc in next st, ch 5, skip next 2 sts), sl st to the first sc (12 sc and 12 ch 5 sps)

β€” 3. Petal Base :

Round 6 :

ch 1, work (sc, hdc, 3dc, hdc, sc) in each ch 5 sp around, sl st to the first sc (84 sts, 7 in each group). Do not fasten off the first time round; fasten off once the round is joined.

β€” 4. Petals (Make 12) :

Info :

Number the petals clockwise from 1 to 12, with the gap between petal 12 and petal 1 sitting at the top of the motif. Each petal is worked on its own group of 7 sts from Round 6, so petal 1 uses sts 1-7, petal 2 uses sts 8-14, and so on. Work and fasten off one petal at a time.

Row 1 :

Join yarn with a sl st in the first st of the group, ch 1, sc blo in the same st and in each of the next 6 sts, turn (7)

Row 2 :

ch 1, sc2tog blo over the first 2 sts, sc blo in the next 3 sts, sc2tog blo over the last 2 sts, turn (5)

Row 3 :

ch 1, sc blo in each of the 5 sts, turn (5)

Row 4 :

ch 1, sc2tog blo over the first 2 sts, sc blo in the next st, sc2tog blo over the last 2 sts, turn (3)

Row 5 :

ch 1, sc3tog blo over the 3 sts (1). Fasten off. This single st is the petal tip. Repeat Rows 1-5 for the other 11 groups.

β€” 5. Ribbed Blocks (Make 8) :

Foundation :

ch 11

Row 1 :

sc in the 2nd ch from the hook and in each ch across, turn (10). This is the base edge of the block.

Row 2-9 :

ch 1, sc blo in each st across, turn (10). Repeat for 8 rows in total. Row 9 is the outer edge of the block. Fasten off and weave in the tail.

β€” 6. Attaching Blocks to Petals :

Info :

Number the blocks clockwise from 1 to 8 and pin them out on your blocking mat around the motif before attaching. Block 1 sits at the top right with its Row 9 edge facing up. Block 2 sits on the right side near the top with Row 9 facing right. Block 3 sits on the right side near the bottom with Row 9 facing right. Block 4 sits at the bottom right with Row 9 facing down. Block 5 sits at the bottom left with Row 9 facing down. Block 6 sits on the left side near the bottom with Row 9 facing left. Block 7 sits on the left side near the top with Row 9 facing left. Block 8 sits at the top left with Row 9 facing up. Keep each block about 4 cm (1.6 in) in from its corner. Petals 1, 3, 4, 6, 7, 9, 10 and 12 connect to Blocks 1 to 8 in that order. The chain length is approximate, so shorten or lengthen it until the spoke sits taut without pulling the petal.

Spoke :

Join yarn with a sl st in the tip st of the petal, ch 12, sl st in the 5th st of the matching block's Row 1 edge, fasten off. Repeat for all 8 petal and block pairs.

β€” 7. Outline Frame :

Info :

Work the outline clockwise along the Row 9 edge of each block, using the stitches of the last row. Corner arcs bridge between the two blocks at each corner, and side arcs bridge across the open gap in the middle of each side.

Block 1 Edge :

Join yarn in the first st of Block 1 Row 9 (the st closest to the top center gap), ch 1, sc in the same st and in each of the next 9 sts (10 sc)

Corner Arc 1 :

ch 22, sc in the first st of Block 2 Row 9 (the st closest to the top), sc in each of the next 9 sts (10 sc)

Side Arc 1 :

ch 30, sc in the first st of Block 3 Row 9 (the st closest to the top), sc in each of the next 9 sts (10 sc)

Corner Arc 2 :

ch 22, sc in the first st of Block 4 Row 9 (the st closest to the right side), sc in each of the next 9 sts (10 sc)

Side Arc 2 :

ch 30, sc in the first st of Block 5 Row 9 (the st closest to the right side), sc in each of the next 9 sts (10 sc)

Corner Arc 3 :

ch 22, sc in the first st of Block 6 Row 9 (the st closest to the bottom), sc in each of the next 9 sts (10 sc)

Side Arc 3 :

ch 30, sc in the first st of Block 7 Row 9 (the st closest to the bottom), sc in each of the next 9 sts (10 sc)

Corner Arc 4 :

ch 22, sc in the first st of Block 8 Row 9 (the st closest to the left side), sc in each of the next 9 sts (10 sc)

Closing Arc :

ch 30, sl st in the first sc of Block 1 to close the round. Fasten off. In total you will have 80 sc, 4 corner arcs of ch 22 and 4 side arcs of ch 30.

Corner Cross Chain :

Join yarn with a sl st in the tip st of petal 2, ch 20, sl st in the 11th ch of Corner Arc 1 (counted from the Block 1 end), fasten off. Repeat from the tips of petals 5, 8 and 11 to the middle of Corner Arcs 2, 3 and 4. If the chain pulls the arc out of shape, add or remove 1-2 ch until it sits smooth.

Assembly Instructions

  • Weave in all the tails from the center disc, the 12 petals and the 8 blocks before you attach anything, since the spokes and arcs will make those ends hard to reach later.
  • Lay the motif face up on your blocking mat and pin the 8 blocks into a square layout, each one about 4 cm (1.6 in) in from its corner, with the Row 9 edges facing outward.
  • Work the 8 spoke chains from the tips of petals 1, 3, 4, 6, 7, 9, 10 and 12 to the 5th st of Row 1 on Blocks 1 to 8, keeping each chain taut but not pulling the petal out of line.
  • Work the outline frame clockwise from Block 1, checking after each arc that the corner and side chains lie in smooth curves with no twists.
  • Add the four corner cross chains from the tips of petals 2, 5, 8 and 11 to the middle of each corner arc, then weave in the remaining ends along the edge of the nearest block.
  • Spritz the whole motif with water, pin it out to about 20 cm (8 in) square with the arcs stretched into gentle loops, and let it dry completely before unpinning.

Important Notes

  • πŸ’‘Work every petal row and every block row through the back loop only. That single detail creates the ribbed, almost knitted texture, so keep your tension even.
  • πŸ’‘Keep your sc stitches snug on the petal rows so the leaves hold their pointed shape. If they feel floppy, go down half a hook size.
  • πŸ’‘Chain lengths for the spokes, corner arcs and side arcs are approximate because tension varies. Test one against the pinned layout and adjust before repeating it.
  • πŸ’‘Leave a 10 cm (4 in) tail on each block when you fasten off so you can tidy the edges without hunting for ends later.
  • πŸ’‘Each petal group has exactly 7 sts, so count Round 6 carefully. If your total is not 84, the petals will crowd or gap.
  • πŸ’‘Mercerized cotton holds blocking beautifully. Wet block rather than steam so the chains dry stiff enough to keep their curves.

Every petal, block and chain loop you finish brings this square a little closer to something you'll be proud to show off. Take it slowly, enjoy the ribbed texture growing under your hook, and don't worry if your first petal wobbles a bit, because the second one always comes out better. Stitch a few, join them up, and give your home a handmade touch that feels truly yours. Happy crocheting! 🧢✨

You ask,

we answer.

FAQs

Can I use thicker yarn for this square?

You can, but the pattern is designed around sport weight cotton and a hook of about 2.5 mm. Worsted yarn makes the petals and blocks larger, so the spokes and arcs will need longer chains. Make the center disc first and measure it against the 4-5 cm (1.6-2 in) it should reach before committing.

Is this crochet motif suitable for a beginner?

It uses only chains, single crochet and a few half double and double crochets, but the petals and the chain arcs take some patience. If you're comfortable working in the round and reading stitch counts, you'll manage fine. Start with a single petal to see how the decreases work.

How do I join several squares together?

The easiest way is to sl st the Row 9 edges of neighboring blocks together on the back, so the arcs hang free along each seam. You can also sc through the outer chain loops of two squares at once for a lacy join.

Do I really have to block this motif?

Yes, it makes a big difference. Blocking sets the petal shapes, lays the ribbed blocks flat and gives the arcs their smooth curve. Pin the square to about 20 cm (8 in), spritz it, and leave it until dry.

Why do my petals look flat instead of ribbed?

This usually means the stitches were worked through both loops. Every petal and block row should use the back loop only. Also keep your tension snug, because loose stitches hide the ridges.