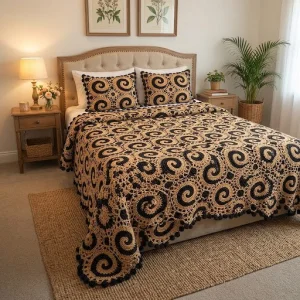
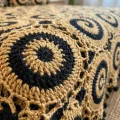
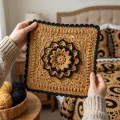
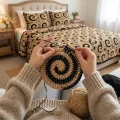
You know that moment when a blanket stops being a project and turns into the star of the bedroom? This one gets there. Bold black spirals swirl across warm tan hexagons, and the whole thing comes together one motif at a time, so you can crochet a few while the kettle boils or a show plays in the background. The matching pillow shams use the very same hexagon, so you’ll be a pro by the time you reach them. Pick your favorite chair, stack up some skeins, and get ready to build a bedspread with real presence.
Progress Tracker
0% Complete
— 1. Spiral Hexagon Motif :
Info :
Each hexagon measures approximately 15 cm (6 in) from flat side to flat side. The finished bedspread is approximately 195 x 238 cm (77 x 94 in) and uses 225 hexagons. Make 9 for each sham front as well. Work in joined rounds with the right side always facing you, and don’t turn. Ch 1 at the start of a round does not count as a st. Mark the first sc of every round. Change color on the last yarn over of the st before the change, and carry the unused color along the back by working over it. Twist the two strands every 8 to 10 sts so the floats stay snug. Check your first hexagon against 15 cm (6 in) and change your hook size if needed.
Round 1 :
With B, make an MR, ch 1, work 6 sc in the ring, pull the ring closed, join with sl st to the first sc (6)
Round 2 :
Ch 1, 2 sc in each st around, join with sl st to the first sc. Color: B for the first 4 sts, T for the last 8 sts (12)
Round 3 :
Ch 1, [sc in next st, 2 sc in next st] 6 times, join. Color: T for the first 2 sts, B for the next 6 sts, T for the last 10 sts (18)
Round 4 :
Ch 1, [sc in next 2 sts, 2 sc in next st] 6 times, join. Color: T for the first 6 sts, B for the next 8 sts, T for the last 10 sts (24)
Round 5 :
Ch 1, [sc in next 3 sts, 2 sc in next st] 6 times, join. Color: T for the first 11 sts, B for the next 10 sts, T for the last 9 sts (30)
Round 6 :
Ch 1, [sc in next 4 sts, 2 sc in next st] 6 times, join. Color: T for the first 18 sts, B for the next 12 sts, T for the last 6 sts (36)
Round 7 :
Ch 1, [sc in next 5 sts, 2 sc in next st] 6 times, join. Color: T for the first 26 sts, B for the next 14 sts, T for the last 2 sts (42)
Round 8 :
Ch 1, [sc in next 6 sts, 2 sc in next st] 6 times, join. Color: B for the first 4 sts, T for the next 32 sts, B for the last 12 sts (48)
Round 9 :
Ch 1, [sc in next 7 sts, 2 sc in next st] 6 times, join. Color: B for the first 11 sts, T for the next 36 sts, B for the last 7 sts (54)
Round 10 :
Ch 1, [sc in next 8 sts, 2 sc in next st] 6 times, join. Color: B for the first 20 sts, T for the last 40 sts. Cut B and carry on with T only (60)
Round 11 :
With T, ch 1, [sc in next 10 sts, ch 3] 6 times, join with sl st to the first sc. Change to B on the last yarn over of the join (60 sc and six ch-3 sps)
Round 12 :
With B, ch 1, [sc in next 10 sc, 3 sc in next ch-3 sp] 6 times, join with sl st to the first sc, fasten off. This is the outline round that you join as you go in the next section (78)
— 2. Joining and Layout :
Info :
Join as you go during Round 12. Number the six sides of the hexagon 1 to 6, counterclockwise, starting from the first corner. On a side that touches a finished hexagon, work each of the 10 side sc into the matching st of the neighbor: insert the hook from front to back through both loops of the neighbor’s st, then finish the sc as usual. For each corner, work the first and third sc in your own hexagon and the middle sc into the neighbor’s middle corner st. Where three hexagons meet, work that middle corner sc into the shared corner st of the third hexagon too. Keep the joining sc as loose as your regular sc.
Row 1 :
Lay the hexagons with a corner pointing up. Make 13 hexagons, joining each new one to the previous along one vertical side (13 hexagons, 12 joins)
Row 2 :
Make 12 hexagons, nesting each one into the dip between two hexagons of Row 1. Join each to Row 1 along two sides, and join each after the first along one vertical side to its left neighbor (12 hexagons)
Info :
Repeat Rows 1 and 2 eight more times for 18 rows in total: 9 rows of 13 hexagons and 9 rows of 12 hexagons, which is 225 hexagons. In each 13-hexagon row after the first, the two end hexagons touch only one hexagon of the row above, so they join along one side only. To widen by about 15 cm (6 in), make 14 hexagons in the odd rows and 13 in the even rows, which adds 18 hexagons in total. To lengthen, each extra pair of rows adds about 26 cm (10 in) and 25 hexagons. For a throw of about 120 x 150 cm (47 x 59 in), make 11 rows alternating 8 and 7 hexagons, starting and ending with 8 (83 hexagons).
— 3. Bedspread Bobble Edging :
Info :
Bobble: yarn over, insert hook in the st, yarn over and pull up a loop, yarn over and draw through 2 loops, leaving the last loop on the hook. Repeat that 4 more times in the same st (6 loops on hook), yarn over and draw through all 6 loops, then ch 1 to lock it. That locking ch does not count as a st. Work the edging in B around the entire outer edge of the spread with the right side facing you.
Round 1 :
Join B in any outer corner st, ch 1, and work sc evenly around the whole outer edge: 1 sc in each outer sc, 3 sc in each outer corner of the spread, and 1 sc in each join where two hexagons meet. Near the end, work or skip 1 or 2 sts so the total divides evenly by 3. Join with sl st to the first sc
Round 2 :
Ch 1, [sc in next 2 sts, bobble in next st] repeat around the whole edge, join with sl st to the first sc, fasten off
— 4. Pillow Sham Front :
Info :
Each sham front uses 9 spiral hexagons and measures approximately 52 x 43 cm (20.5 x 17 in), which fits a pillow form of about 50 x 40 cm (20 x 16 in). Make two fronts for a pair of shams, working the hexagons and joins exactly as in Sections 1 and 2.
Row 1 :
Make 3 hexagons and join them side by side along vertical sides (3 hexagons, 2 joins)
Row 2 :
Make 3 hexagons shifted half a hexagon to the right. Nest the first hexagon in the dip between hexagons 1 and 2 of Row 1, and the second in the dip between hexagons 2 and 3. Place the third so it hangs half past the right end, joined to Row 1 hexagon 3 along one side. Join each hexagon to its left neighbor along one vertical side (3 hexagons)
Row 3 :
Make 3 hexagons lined up under Row 1. Join hexagon 1 to Row 2 hexagon 1 along one side, hexagon 2 to Row 2 hexagons 1 and 2 along two sides, and hexagon 3 to Row 2 hexagons 2 and 3 along two sides. Join each to its left neighbor along one vertical side (3 hexagons)
— 5. Pillow Sham Back :
Info :
The back is made of plain hexagons so it has the same zigzag outline as the front. Make 9 plain hexagons for each sham.
Plain Back Hexagon :
Work Rounds 1 to 11 of the Spiral Hexagon using T for every st and keeping all the same stitch counts, then work Round 12 in B with the same joining method (78)
Row 1 :
Join 3 plain hexagons side by side along vertical sides (3 hexagons)
Row 2 :
Join 3 plain hexagons shifted half a hexagon to the right, nested and joined exactly as on the front (3 hexagons)
Row 3 :
Join 3 plain hexagons lined up under Row 1, joined exactly as on the front (3 hexagons)
— 6. Pillow Sham Edging :
Info :
Hold the front and back with wrong sides together and the right side of the front facing you. Match the zigzag outlines and pin at every outer corner. The edging closes the sham, so work Round 1 through both layers.
Round 1 :
Join B in any outer corner, ch 1, and work sc through both layers around the edge, placing 3 sc in each outer corner and 1 sc in each join. When you reach the middle of the bottom edge, stop and slip the pillow form inside. Keep working sc through both layers to close the opening, adjusting by 1 or 2 sts so the total divides by 3, then join with sl st to the first sc
Round 2 :
Ch 1, [sc in next 2 sts, bobble in next st] repeat around, join with sl st to the first sc, fasten off
Every swirl you add makes this bedspread a little more yours. Keep a pile of finished hexagons nearby, spread them out whenever you need a boost, and watch the pattern slowly take over the floor. Once the black bobbles go on, you’ll have a piece that looks like it came straight from a boutique, only it carries every evening you spent making it. Grab your hook and your two favorite colors, and start with that first tiny black ring. 🧶✨ Happy hooking, and don’t forget to show off those spirals! 🧵