🧶 Beautiful ✨ Detailed 💝 Adorable

Sweetheart Garden Doll Amigurumi Pattern

Sweetheart Garden Doll Amigurumi Pattern
4.8★Rating
5-7 HoursTime Needed
1.3KMade This
✂️

Intermediate Level

Ideal for those with basic crocheting experience, featuring slightly more advanced stitches and techniques to expand your skills.

⏱️

Weekend Treat

Takes 5-7 hours, making it an enjoyable project to finish over a couple of days.

🐰

Whimsical Buddy

Playful characters full of personality, designed to spark imagination and become cherished playtime favorites.

About This Sweetheart Garden Doll Amigurumi Pattern

Sweetheart Garden Doll Amigurumi Pattern crochet pattern - detailed view

This doll is a wonderful choice for anyone looking to practice multi-layered hair techniques and seamless color transitions. She makes a heartfelt heirloom gift that will be cherished for years to come.

Why You'll Love This Sweetheart Garden Doll Amigurumi Pattern

I absolutely adore how the hair layers turned out on this one! It takes a little patience, but seeing those curls bounce is incredibly satisfying. I also love that the shoes and socks are built right into the legs—it saves so much time on assembly while still looking like she's wearing a complete little outfit. It’s the perfect blend of clever construction and adorable aesthetics.

Sweetheart Garden Doll Amigurumi Pattern step 1 Sweetheart Garden Doll Amigurumi Pattern step 2 Sweetheart Garden Doll Amigurumi Pattern step 3 Sweetheart Garden Doll Amigurumi Pattern step 4

Switch Things Up

When I first sat down to design this doll, I wanted something that felt like a classic childhood treasure. You know the kind—the one that sits on a bed for years and holds all the secrets. The process of making her really took me back to my own early days of learning amigurumi.

I remember struggling with hair for the longest time, but once I figured out this layered technique, it changed everything! It gives the doll so much volume and life. If you find the strands a bit tedious, put on a good podcast or your favorite show; it becomes quite a rhythmic and meditative process.

One little tip from my studio: I like to use a tiny bit of blush on her cheeks at the very end. It just adds that final pop of life that makes her look like she's ready to go on an adventure in a secret garden. I can't wait to see the color combinations you choose—maybe a sunny yellow dress or a deep forest green? Whatever you pick, she’s going to be stunning!

Common Mistakes & How to Fix Them

✗ If you don't maintain tight tension while working the skin-colored head, the stuffing might show through the stitches once the face is shaped.✗ When working the hair layers, it's easy to accidentally skip a stitch on the base cap—mark your starting stitch of each layer to keep the strands even.✗ The transition between the neck and the head needs to be very firm; if you under-stuff this area, the head may tilt or wobble over time.✗ Be careful when joining the legs at Round 38; if they aren't perfectly aligned facing forward, the doll's body will look twisted.

Sweetheart Garden Doll Amigurumi Pattern

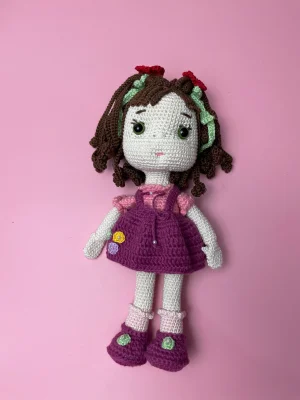
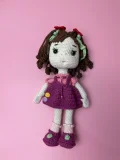
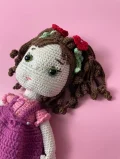
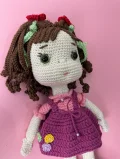
There is something so magical about watching a little character come to life right in your hands. This sweetheart doll, with her bouncy corkscrew curls and her tiny floral accents, is one of those projects that you just won't want to put down. She has such a gentle, vintage feel that makes her the perfect gift for a special little one or a lovely addition to your own handmade collection. You'll find the color changes and textures so engaging, making every round feel like a new discovery.

Intermediate 5-7 Hours

Materials Needed for Sweetheart Garden Doll Amigurumi Pattern

— Main Fabric

  • 01
    Medium weight yarn in Cream for the skin tone
  • 02
    Rich Chocolate Brown yarn for the curly hair
  • 03
    Fuchsia or Deep Purple yarn for the pinafore skirt
  • 04
    Soft Pink yarn for the shirt and shoe details
  • 05
    Light Pink yarn for the socks
  • 06
    Small amounts of Red and Green for the hair accessories

— Tools Required

  • 01
    2.5 mm crochet hook or size needed to match your yarn weight
  • 02
    One pair of plastic safety eyes
  • 03
    High-quality polyester fiberfill stuffing
  • 04
    Tapestry needle for sewing and embroidery
  • 05
    Sharp crafting scissors
  • 06
    Stitch markers and dressmaker pins

Progress Tracker

0% Complete

— 1. Head :

Round 1 :

Start with 8 sc into a mr (8)

Round 2 :

Work 8 inc around (16)

Round 3 :

Repeat (1 sc, 1 inc) 8 times (24)

Round 4 :

Repeat (2 sc, 1 inc) 8 times (32)

Round 5 :

Repeat (3 sc, 1 inc) 8 times (40)

Round 6 :

Repeat (4 sc, 1 inc) 8 times (48)

Round 7 :

Repeat (5 sc, 1 inc) 8 times (56)

Round 8-18 :

Work 1 sc in each st around (56)

Round 19 :

21 sc, work 14 inc, 21 sc (70)

Round 20-24 :

Work 1 sc in each st around (70)

Round 25 :

Repeat (9 sc, 1 dec) 8 times (62)

Round 26 :

Repeat (8 sc, 1 dec) 8 times (54)

Round 27 :

Repeat (7 sc, 1 dec) 8 times (46)

Info :

Insert safety eyes between Rounds 15 and 16, leaving a gap of 8 stitches between them. Begin stuffing the head firmly.

Round 28 :

Repeat (6 sc, 1 dec) 8 times (38)

Round 29 :

Repeat (5 sc, 1 dec) 8 times (30)

Round 30 :

Repeat (4 sc, 1 dec) 8 times (22)

Round 31-36 :

Work 1 sc in each st around (22)

Info :

Fasten off and leave a long tail for sewing to the body.

— 2. Legs & Body :

Round 1 :

Using Color A, work 6 sc into a mr (6)

Round 2 :

Work 6 inc around (12)

Round 3 :

Repeat (1 sc, 1 inc) 6 times (18)

Round 4 :

Repeat (2 sc, 1 inc) 6 times (24)

Round 5 :

Work 1 sc in each st around (24)

Round 6 :

Work 1 sc in each st around in flo (24)

Round 7-8 :

Work 1 sc in each st around (24)

Round 9 :

4 sc, work 8 dec, 4 sc (16)

Round 10 :

Work 1 sc in each st around (16)

Colour Change :

Switch to Color C for the socks.

Round 11 :

Work 1 sc in each st around in flo (16)

Round 12-17 :

Work 1 sc in each st around (16)

Round 18 :

Work the sock detail by working in blo: (1 sc, ch 3) in every stitch around (16)

Colour Change :

Switch to the Main Color for the legs.

Round 19 :

In flo, work 2 dec evenly spaced (14)

Round 20-33 :

Work 1 sc in each st around (14)

Round 34 :

Work 2 inc evenly spaced (16)

Round 35 :

Work 1 sc in each st around (16)

Round 36 :

Work 2 inc evenly spaced (18)

Round 37 :

Work 2 inc evenly spaced (20)

Round 38 :

Join the legs together by working 1 sc into the first leg, then sc around both legs (40)

Round 39 :

Work 1 sc in each st around (40)

Round 40-44 :

Work 1 sc in each st around (40)

Colour Change :

Switch to Color B for the shirt.

Round 45-47 :

Work 1 sc in each st around (40)

Round 48 :

Repeat (9 sc, 1 dec) 4 times (36)

Round 49-50 :

Work 1 sc in each st around (36)

Round 51 :

Repeat (4 sc, 1 dec) 6 times (30)

Round 52-57 :

Work 1 sc in each st around (30)

Round 58 :

Repeat (3 sc, 1 dec) 6 times (24)

Round 59-60 :

Work 1 sc in each st around (24)

Colour Change :

Switch back to the Main Color for the neck.

Round 61 :

Work 1 sc in each st around in flo (24)

Round 62 :

Work 1 sc in each st around (24)

Info :

Work the collar detail: In the blo of Round 61, work (1 sc, ch 3) in every stitch around, then fasten off.

— 3. Arms :

Round 1 :

Using the Main Color, work 6 sc into a mr (6)

Round 2 :

Work 6 inc around (12)

Round 3-6 :

Work 1 sc in each st around (12)

Round 7 :

ch 2, turn, and work sc in each st around (12)

Round 8 :

Work 1 dec, then sc around (10)

Round 9 :

Work 1 dec, then sc around (8)

Round 10 :

Repeat (1 sc, 1 inc) 4 times (12)

Round 11-22 :

Work 1 sc in each st around (12)

Colour Change :

Switch to Color B for the sleeves.

Round 23 :

Work 1 sc in each st around (12)

Round 24 :

Work 1 sc in each st around in flo (12)

Round 25 :

Work 2 inc evenly spaced (14)

Round 26-27 :

Work 1 sc in each st around (14)

Round 28 :

Work 4 dec evenly spaced around (10)

Round 29 :

Flatten the arm and work 5 sc through both layers to close (5)

Info :

Work the sleeve detail: In the blo of Round 24, work (1 sc, ch 3) in every stitch around, then fasten off.

— 4. Skirt :

Round 1 :

Using Color A, ch 40 and join into a ring with a sl st (40)

Round 2 :

Work 1 sc into each ch around (40)

Round 3 :

Work 1 sc in each st around (40)

Round 4 :

Work 1 inc in every stitch around (80)

Round 5 :

Work 1 sc in each st around (80)

Round 6 :

Work 1 sc in each st around (80)

Round 7-9 :

Work 1 cr in each st around (80)

Round 10 :

Work in blo: 1 sc in each st, then work hdc around (80)

Hangers :

For the straps: ch 30, turn and work 29 sc back. Fasten off and leave a tail for sewing.

— 5. Hair :

Round 1 :

Using Color D, work 8 sc into a mr (8)

Round 2 :

Work 8 inc around (16)

Round 3 :

Repeat (1 sc, 1 inc) 8 times (24)

Round 4 :

Repeat (2 sc, 1 inc) 8 times (32)

Note :

Stitch count at Round 4 may vary slightly in source; ensure you have enough base stitches for the strands.

First Layer :

Round 5: Work 10 sc, then create 6 strands by (ch 10, work 9 sc back, sl st to next base st).

Second Layer :

Round 6: Create 17 strands by (ch 40, skip 8 ch, work 32 sc back, sl st to next base st).

Third Layer :

Round 7: Create 14 strands by (ch 45, skip 8 ch, work 8 inc, then 37 sc back, sl st to next base st).

Fourth Layer :

Round 8: Create 14 strands by (ch 50, skip 8 ch, work 8 inc, then 42 sc back, sl st to next base st).

— 6. Accessories :

Flowers :

Make 5: Work 8 sc into a mr and fasten off.

Buckles :

Round 1: Work 12 sc into a mr. Round 2: (1 sc, 1 sc into next 4 st) x 6. Round 3: ch 95, turn and sc back.

Assembly Instructions

  • Firmly sew the head to the body at the neck opening, ensuring the face is centered and the neck is well-stuffed.
  • Attach the arms to the sides of the body at Round 56, making sure the thumb details point forward.
  • Place the hair cap on the head and sew the first layer of strands down to frame the face.
  • Layer the remaining hair strands over the back and sides, pinning them to achieve a full look before sewing the base of the strands.
  • Slide the skirt onto the doll and sew the shoulder straps in place, crossing them at the back.
  • Decorate the shoes and the skirt with the tiny crocheted flowers, securing them with a small stitch and a pearl if desired.
  • Embroider the eyebrows and a small pink mouth to finish her sweet expression.

Important Notes

  • 💡Ensure you leave long yarn tails on all pieces for easier assembly and more secure seams.
  • 💡The curly hair strands naturally twist; you can help them along by twirling them around your finger after crocheting.
  • 💡When working the shirt and sock details, keep your chains loose so the decorative edges don't pull the fabric too tight.
  • 💡Double-check the alignment of the eyes and the feet before final assembly to keep the doll looking symmetrical.
  • 💡Use a high-quality fiberfill and pack it firmly into the legs and neck to provide structural integrity for the doll.

I hope you had as much fun making this little sweetheart as I did! There’s something so rewarding about the final assembly phase—when all those separate pieces finally come together and you see her little face looking back at you. She’s truly a labor of love, from her tiny floral-tipped shoes to those beautiful brown curls. I'd love to see how your doll turned out, so please share your photos with our crafting community! Keep those hooks busy and enjoy your beautiful new handmade friend. 🧶 ✨

You ask,

we answer.

FAQs

Can I make the hair shorter for a different look?

Absolutely! You can simply reduce the number of chains in the hair strand rounds (Rounds 6-8) to create a cute bob or shoulder-length style.

What should I do if the doll's head is floppy?

This usually means the neck needs more stuffing. You can also insert a rolled-up piece of felt or a thick crochet 'tube' into the neck and head to act as a support beam.

How do I get the flowers to look so neat?

When finishing the flowers, use the 'invisible join' technique for a perfectly round edge before sewing them onto the skirt or shoes.

Can I use safety eyes if I'm giving this to a baby?

For children under three, it is safer to embroider the eyes with black yarn or embroidery floss to avoid any potential choking hazards.