About This Crochet Puff Flower Granny Square Bedspread Pattern
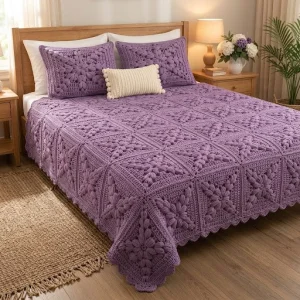
Make it as a wedding gift, a housewarming treat, or the centerpiece of your own bedroom, then add matching pillow shams so everything looks pulled together.
Ideal for those with basic crocheting experience, featuring slightly more advanced stitches and techniques to expand your skills.
A 10-12 hour project—great for savoring the process over several sessions.
A warm touch for your space that transforms ordinary corners into inviting nooks filled with handmade charm.
Make it as a wedding gift, a housewarming treat, or the centerpiece of your own bedroom, then add matching pillow shams so everything looks pulled together.
I’m honestly a little obsessed with puff stitches, and this is the project where they really get to shine. Every square feels like a tiny finished project, so I got that little burst of satisfaction again and again. I also love that I could pick up a single motif during a TV show and make real progress. By the time the last square was joined, I kept running my hand over the bumps just because it felt so good.

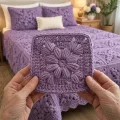
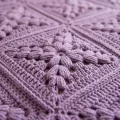
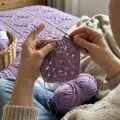
I started this bedspread on a rainy weekend, and I remember thinking that the first square would never look like the picture in my head. Then the puffs filled out, and I was hooked. The trick that changed everything for me was counting out the eight puffs and tagging the first one with a stitch marker. After that, every flower came out round and even.
I made a handful of squares each evening, usually while a good show played in the background. It felt less like one giant project and more like a collection of little wins. By the time I laid them all out on the bedroom floor, I couldn’t stop smiling.
If you want to play with color, try making every other square in a pale grey or soft cream for a patchwork look. A deeper plum would also look gorgeous in a winter bedroom. Whatever shade you pick, buy a little extra yarn, because running out of the same dye lot is the worst feeling.
Picture a bedspread that looks like a cozy garden in soft lavender, with every square blooming with plump little puff petals. You’ll stitch each motif one at a time, so the project travels well and never feels overwhelming. Once the squares are joined and edged with a scalloped border, you’ll have a showpiece for the bedroom that feels like a family heirloom from day one. Grab a comfy chair and your favorite tea, because this one is a joy to build.
Each square measures about 28 cm (11 in) across. The finished bedspread, made from 5 squares across and 6 squares down, measures roughly 140 x 168 cm (55 x 66 in) before the edging. To make it wider, add squares across. Each extra square adds about 28 cm (11 in).
Make a magic ring. Ch1, work 16 sc into the ring, sl st to the first sc to join (16)
Ch3 (counts as a dc), puff in the same st, ch2, sk 1 st, *puff in the next st, ch2, sk 1 st; rep from * around, sl st to the top of the first puff (8 puffs)
Sl st into the next ch2 sp, ch1, work 2 sc in each ch2 sp around, sl st to the first sc to join (16)
Ch1, sc in each of the next 16 sts, sl st to the first sc to join (16)
Ch3 (counts as a dc), dc in the same st, 2 dc in each st around, sl st to the top of the beginning ch3 to join (32)
Ch1, sc in the same st, *ch2, sk 1 st, sc in the next st; rep from * around, ch2, sl st to the first sc (16 sc and 16 ch2 sps)
Sl st into the next ch2 sp, ch3, 2 dc in the same sp, *3 dc in the next sp; rep from * around, sl st to the top of the beginning ch3 (48)
Ch1, sc in the same st, sc in each of the next 5 sts, *ch3 for the corner, sc in the next 6 sts; rep from * 7 more times, sl st to the first sc (48 sc and 8 ch3 sps)
Ch3, dc in each st across to the first corner sp, (2 dc, ch2, 2 dc) in the corner sp, dc in each st along the next side; rep to complete all four corners, sl st to the top of the beginning ch3 (68)
Ch1, sc in each st around, working (sc, ch2, sc) in each corner ch2 sp, sl st to the first sc (76)
Ch3, FPdc around the next st, *BPdc around the next st, FPdc around the next st; rep from * across each side, working (dc, ch2, dc) in each corner sp, sl st to the top of the beginning ch3 (84)
Ch1, sc in each st around, working (sc, ch2, sc) in each corner ch2 sp, sl st to the first sc and fasten off (92)
Make 30 squares in total for the 5 x 6 layout. Block each square to the same size before joining.
Join the squares with a flat slip stitch seam worked through the back loops only, which keeps the seam low and the puffs visible.
Lay 5 squares in a row, wrong sides together. Working through both back loops of the edge stitches, sl st the first pair of squares together from corner to corner, then join the next pair the same way until the row is complete (5 squares)
Make 5 more rows of 5 squares in the same way, for 6 strips in total (6 strips of 5 squares)
Join the 6 strips together along their long edges with the same slip stitch seam, matching the corners of every square so the grid stays straight (30 squares)
The edging is worked around the whole bedspread. If you’d like the scallops to line up neatly, work the stitch counts on each side as a multiple of 6 and adjust by skipping or adding one stitch where needed.
Join yarn at any corner, ch1, sc evenly around the whole bedspread, working 3 sc in each corner, sl st to the first sc to join
Ch3, dc in each st around, working 3 dc in each corner st, sl st to the top of the beginning ch3 to join
Ch1, sc in the same st, *sk 2 sts, 5 dc in the next st, sk 2 sts, sc in the next st; rep from * around, sl st to the first sc and fasten off
There’s something wonderfully satisfying about watching a pile of puffy lavender squares slowly turn into a full-size bedspread. Take it one flower at a time, enjoy the rhythm of each round, and don’t be surprised when the finished piece becomes the most-loved thing in your home. Pull it up on a chilly evening, share a picture with friends, and be proud of every single stitch you made. Happy hooking! 🧶✨
As written, 30 squares in a 5 x 6 layout make a bedspread of about 140 x 168 cm (55 x 66 in). For a queen, add a row or two of squares and a plain border, and keep in mind that each extra square adds about 28 cm (11 in).
You can, but the puff petals look best in a smooth worsted weight. A thinner yarn will shrink each square, so you’d need more of them, while a bulkier yarn makes a much heavier cover. Make one test square and measure it before you commit.
Pull up each loop to the same height, about the height of a dc, and give the final pull-through a firm tug. Keeping all seven loops even is what makes the petals look plump and round.
If you’re comfortable with sc, dc, and a magic ring, you can manage it. The puff stitch and post stitches are the only new bits, and you can practice them on a single square before committing to the full bedspread.
A slip stitch seam worked through the back loops only keeps the join flat and tidy. Match the corners first, then work toward the middle, and keep your tension loose so the seam doesn’t pull the squares tight.