About This Crochet Pinwheel Lace Bedspread Pattern
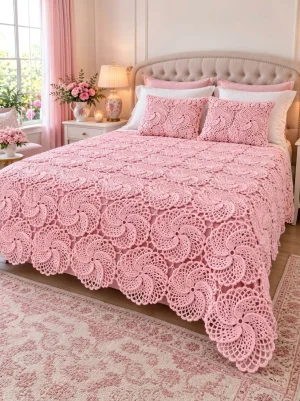
Spread it over a bed, drape it across the foot of the mattress or a reading chair, or give it as a wedding or housewarming gift to someone who loves a vintage-feeling bedroom.
Ideal for those with basic crocheting experience, featuring slightly more advanced stitches and techniques to expand your skills.
A 10-12 hour project—great for savoring the process over several sessions.
A warm touch for your space that transforms ordinary corners into inviting nooks filled with handmade charm.
Spread it over a bed, drape it across the foot of the mattress or a reading chair, or give it as a wedding or housewarming gift to someone who loves a vintage-feeling bedroom.
I love that this pattern teaches your hands one rhythm and then lets you repeat it. Once the spiral rounds click, you stop checking the page and each motif turns into a little evening ritual. I also adore how kind the joining is. If one circle comes out a hair larger than the others, the shells and fillers absorb the difference and nobody ever notices.

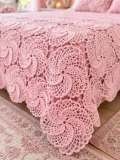
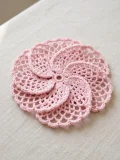
The first time I stitched one of these pinwheels, I honestly thought I'd made a mistake. The blades looked wonky until Round 7 came along and suddenly everything swirled into place. I remember holding that little circle up to the window and grinning like a kid.
Here's my best tip: give the rising rounds your full attention and let the lace rounds be your rest. Rounds 4 and 6 climb from sc to tr, and that's where the spiral is born, so I tuck a marker into the first stitch of every ramp. Rounds 8 to 10 are almost meditative, just arches and shells, and they're perfect for a movie night. Cotton can be tough on the fingers after a long session, so I pause after every second motif and shake out my hands.
I made mine in a pale blush, but I've also pictured it in soft sage or warm ivory, and a bold navy would be gorgeous too. If you're short on time, stitch the pillow front first. Six motifs give you a finished project in an afternoon or two and a nice preview of how the bigger cover will look and feel.
Picture your bed wrapped in a soft blush-pink blanket of lacy pinwheels, each one spinning gently outward into a scalloped edge. This pattern walks you through one motif at a time, so you can stitch in the car, on the sofa, or at the kitchen table and watch your pile of circles grow. You'll join them as you go, tuck tiny star fillers into the gaps, and finish with matching pillow fronts if you want the full bedroom set. It's the kind of project that becomes a family keepsake.
Each motif measures approximately 17 cm (6.7 in) across. As written, the bedspread is approximately 85 x 119 cm (33.5 x 46.9 in), made from 5 motifs across and 7 down, which takes 35 motifs and 24 fillers. To go bigger, add one motif to every row for each extra 17 cm of width, and add one full row of motifs for each extra 17 cm of length. A queen-size cover is roughly 10 across by 13 down (about 170 x 221 cm, or 67 x 87 in), which takes 130 motifs and 108 fillers.
Every round is closed with a sl st and you don't turn, so the right side always faces you. A ch 3 at the start of a round counts as a dc. A ch 1 at the start of a round does not count as a stitch.
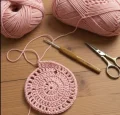
Ch 6, sl st to the first ch to form a ring.
Ch 3, 15 dc in the ring, sl st to the top of the ch 3 (16 dc).
Ch 3, dc in the same st, 2 dc in each remaining st around, sl st to the top of the ch 3 (32 dc).
Ch 1, sc in the same st, hdc in next st, dc in next st, tr in next st; [sc in next st, hdc in next st, dc in next st, tr in next st] 7 times, sl st to first sc (32 sts). Each group of four builds the rising edge of one blade.
Ch 3, dc in next 2 sts, 2 dc in next st; [dc in next 3 sts, 2 dc in next st] 7 times, sl st to the top of the ch 3 (40 dc).
Ch 1, sc in the same st, hdc in next st, dc in next 2 sts, tr in next st; [sc in next st, hdc in next st, dc in next 2 sts, tr in next st] 7 times, sl st to first sc (40 sts).
Ch 3, dc in next 3 sts, 2 dc in next st; [dc in next 4 sts, 2 dc in next st] 7 times, sl st to the top of the ch 3 (48 dc).
Ch 1, sc in the same st; [ch 3, sk 2 sts, sc in next st] 15 times, ch 3, sk the last 2 sts, sl st to first sc (16 sc and 16 ch-3 sps).
Sl st into the next ch-3 sp, ch 1, sc in the same sp; [ch 5, sc in next ch-3 sp] 15 times, ch 5, sl st to first sc (16 sc and 16 ch-5 sps).
Ch 1, sc in the same sc; [3 dc, ch 2, 3 dc in next ch-5 sp, sc in next sc] 15 times, 3 dc, ch 2, 3 dc in last ch-5 sp, sl st to first sc. Fasten off (16 shells and 16 sc). A shell here means the 3 dc, ch 2, 3 dc group.
To keep every motif facing the same way, hold it with the first sc of Round 10 just to the right of the top. Number the shells counterclockwise starting with the first shell you make, and slip a marker into the ch-2 sp of shell 1. Shells 1 and 2 sit at the top, 5 and 6 on the left, 9 and 10 at the bottom, and 13 and 14 on the right. Shells 4, 8, 12 and 16 are saved for the filler points.
On a motif that attaches to a neighbor, make each joined shell like this: 3 dc, ch 1, sl st in the ch-2 sp of the matching shell on the neighbor, ch 1, 3 dc. Left neighbor: your shell 5 joins its shell 14, and your shell 6 joins its shell 13. Upper neighbor: your shell 1 joins its shell 10, and your shell 2 joins its shell 9. All other shells are worked as in Round 10.
Each filler measures approximately 5 cm (2 in) from point to point and sits in the gap where four motifs meet.
Ch 4, sl st to the first ch to form a ring.
Ch 1, 16 sc in the ring, sl st to first sc (16 sc).
Ch 1, sc in the same sc and in next 3 sc, ch 3, sl st in the ch-2 sp of the first shell, ch 3; [sc in next 4 sc, ch 3, sl st in the ch-2 sp of the next shell, ch 3] 3 times, sl st to first sc. Fasten off (16 sc and 4 joining points).
The four points join in this order, going counterclockwise: shell 8 of the motif at the upper right, shell 12 of the motif at the upper left, shell 16 of the motif at the lower left, and shell 4 of the motif at the lower right. Hold the filler so the first point reaches into the upper right gap.
Work the motifs in rows of 5 and join them during Round 10 using the Joining Shells step. Check your shell 1 marker on every motif so all the pinwheels spin the same direction.
Make 5 motifs. Leave motif 1 unjoined. Motifs 2 to 5 each join to the motif on their left (5 motifs).
Make 5 motifs. Motif 1 joins to the motif above it only, using shells 1 and 2. Motifs 2 to 5 join to the motif above (shells 1 and 2) and to the motif on their left (shells 5 and 6) (10 motifs total).
Repeat Layout Row 2 for each of these five rows (35 motifs total, 5 across and 7 down).
Once every motif is joined, make 24 star fillers, one for each spot where four motifs meet (4 across and 6 down), joining the points as described in the filler section. Fasten off.
Each pillow front measures approximately 51 x 34 cm (20 x 13.4 in), made of 3 motifs across and 2 down, and fits an insert of about 50 x 35 cm (20 x 14 in). The back is plain pink fabric with an envelope opening, which keeps the lace front as the star and makes the cover easy to wash. If you'd rather crochet the back, simply make a second front.
Make 3 motifs. Motif 1 stays unjoined and motifs 2 and 3 each join to the motif on their left (3 motifs).
Make 3 motifs. Motif 1 joins to the motif above it only. Motifs 2 and 3 join to the motif above and to the motif on their left (6 motifs total).
Make 2 star fillers and join them where four motifs meet (2 across, 1 down), following the same point order as the bedspread fillers.
There's something so satisfying about watching a stack of pale pink circles slowly turn into a blanket big enough to fill a bed. Take your time, enjoy the repeat, and let each finished pinwheel remind you how far your hands have come. From a cozy throw to a full bedroom set, this one will carry your stitches into a lot of quiet mornings. 🧶 Grab your hook, pour something warm, and start that very first little ring. ✨
You can, but the pattern was designed around DK cotton and a 3.5 mm hook, which gives a 17 cm motif. Worsted yarn makes each pinwheel larger and heavier, so you'd need fewer motifs, while fingering weight gives a daintier, lacier look but takes many more circles. Stitch one motif first and divide your target width by its diameter to get your motif count.
For roughly 170 x 221 cm (67 x 87 in), make 10 motifs across and 13 down, which is 130 motifs and 108 fillers, because the fillers fill the 9 by 12 spots where four motifs meet. Add or remove a row of motifs to fine-tune the length.
You don't, but joining during Round 10 saves you a lot of sewing and gives a smooth, flat seam. Just follow the shell numbers in the Joining Shells step and use a ch 1 on each side of the sl st so the join doesn't pull tight.
This usually happens when the rising rounds (4 and 6) are worked tightly or a stitch count is off. Check that you have exactly 40 sts after Round 5 and 48 after Round 7, and try going up half a hook size for the dc rounds. A good wet block will relax most of the cupping.
Yes, they give the cover its finished lacy look and keep the corners from sagging, since four rounded motifs leave a small gap where they meet. They only take three short rounds each, so they're a very quick make.
