🧢 Beautiful ✨ Detailed πŸ’ Adorable

Crochet Lace Square Motif Bedspread Pattern

Crochet Lace Square Motif Bedspread Pattern
4.0β˜…Rating
10-15 HoursTime Needed
1.6KMade This
βœ‚οΈ

Intermediate Level

Ideal for those with basic crocheting experience, featuring slightly more advanced stitches and techniques to expand your skills.

⏱️

Slow & Steady

A 10-12 hour projectβ€”great for savoring the process over several sessions.

β˜•

Warm Welcome

A comforting piece for home or gifts that brings handmade warmth to everyday moments and special occasions.

About This Crochet Lace Square Motif Bedspread Pattern

Crochet Lace Square Motif Bedspread Pattern crochet pattern - detailed view

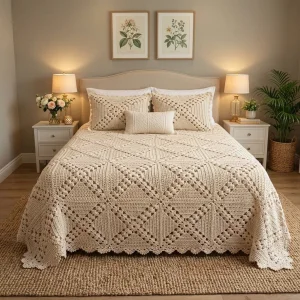
Lovely as a wedding or housewarming gift, and just as happy on a guest room bed as it is folded over the foot of your own. Make matching pillow covers from leftover motifs for a full set.

Why You'll Love This Crochet Lace Square Motif Bedspread Pattern

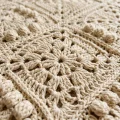
I love how forgiving a motif bedspread is. I never feel overwhelmed, because all I ever have in front of me is one little square. Round 5 is my favorite part. The clusters pop up and suddenly those plain dc rounds turn into something special. And the joint flowers? They're the cherry on top, and sewing them on is a calm evening job I always look forward to.

Crochet Lace Square Motif Bedspread Pattern step 1 Crochet Lace Square Motif Bedspread Pattern step 2 Crochet Lace Square Motif Bedspread Pattern step 3 Crochet Lace Square Motif Bedspread Pattern step 4

Switch Things Up

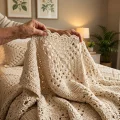
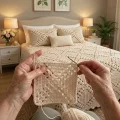
I started my first big motif blanket during a rainy week when I couldn't settle on anything. One square felt silly to commit to, so I told myself I would make just three. By Sunday I had twelve, stacked on the arm of the sofa like little cream pancakes, and I was hooked.

Here's the tip that saved me: keep a small basket by your seat and make one motif every time you sit down with a cup of tea. Measure the very first one before you make the rest. Mine came out about 1 cm smaller than planned, so I moved up half a hook size and every square after that matched. Blocking the squares before joining them makes the seams so much neater too.

Color ideas? I've dreamed of this in soft oatmeal with a slightly deeper tan for the Round 5 clusters so the lattice stands out even more. A pale sage for the flowers would be sweet in a spring bedroom. Whatever you choose, the quiet joy is in watching those squares come together on the floor, square after square, until suddenly it's a real bedspread.

Common Mistakes & How to Fix Them

βœ— In Round 5 it's easy to skip two stitches instead of one between clusters, which makes the side pull wider than 13 dc, so check that you have 7 clusters per side before moving on.βœ— If you catch the front loops when whip stitching motifs together, the seam shows as a ridge across the lattice, so stitch through the back loops only and keep matching stitch to stitch.βœ— The scallop round only lands neatly at the corners if the Round 1 sc counts are right, so make sure you work one sc into every seam, because missing even one throws the 4-stitch repeat off.βœ— The joint flowers can end up off-center if you eyeball them, so pin each one over the spot where four ch-2 corner spaces meet and check it from a few steps back before sewing.βœ— The first motif often comes out smaller than 23 cm (9 in) with tight tension, which would leave you short on bed width, so block it and measure before you make the other 109.βœ— A cl worked loosely in the Round 5 corners looks floppy and gaps, so pull each loop up to the same height as your dc and snug the final yarn over firmly.

Crochet Lace Square Motif Bedspread Pattern

Picture a cream-colored bedspread that makes the whole bedroom feel calmer the second you smooth it over the mattress. This crochet bedspread pattern is built from square motifs that join into a lattice of raised cluster lines, with little flowers sitting at every junction and a lacy scalloped edge along the bottom. You make it one motif at a time, so you can stitch on the sofa, on the train, or anywhere you've got a spare half hour, and watch the pattern grow as the squares meet.

Intermediate 10-15 Hours

Materials Needed for Crochet Lace Square Motif Bedspread Pattern

β€” Main Fabric

  • 01
    Approximately 4,500 to 5,300 g of aran weight cotton yarn in soft cream for all 110 motifs and the scalloped border
  • 02
    About 60 g of the same cream cotton for the 90 joint flowers and the sewing-up
  • 03
    Buy all the yarn from the same dye lot so the cream tone stays even across the whole spread

β€” Tools Required

  • 01
    4.5 mm crochet hook (approximate, adjust so your motif measures about 23 cm / 9 in square)
  • 02
    Tapestry needle with a large eye
  • 03
    Sharp scissors
  • 04
    Stitch markers for marking the first stitch of each round
  • 05
    Rust-proof pins for blocking and for holding flowers in place
  • 06
    Blocking mats or a clean towel-covered floor area
  • 07
    Measuring tape
  • 08
    Spray bottle or steam iron for blocking

Progress Tracker

0% Complete

β€” 1. Square Motif (make 110) :

Info :

The finished spread measures approximately 230 x 253 cm (about 91 x 100 in), made from 10 motifs across and 11 motifs down. Each blocked motif measures about 23 cm (9 in) square. To change the size, add or remove whole motifs. Every motif added across adds 6 repeats to the top and bottom scallop runs in the border, and every motif added down adds 6 repeats to the right and left scallop runs. Each added motif also adds to the joint flower count.

Info :

To make a cl, work 3 dc in the same place, leaving the last loop of each on the hook, then yarn over and pull through all 4 loops. For a beg cl, ch 2, work 2 dc leaving the last loop of each on the hook, then yarn over and pull through all 3 loops. Always join rounds with a sl st and do not turn.

Round 1 :

MR, ch 3 (counts as dc), 15 dc in ring, join with sl st to top of ch 3. (16 dc)

Round 2 :

Ch 3 (counts as dc), dc in same st, 2 dc in each st around, join with sl st to top of ch 3. (32 dc)

Round 3 :

Ch 3 (counts as dc), ch 2, dc in same st, dc in next 7 sts, [(dc, ch 2, dc) in next st, dc in next 7 sts] 3 times, join with sl st to top of ch 3. (36 dc and 4 ch-2 sps, 9 dc on each side between corner sps)

Round 4 :

Sl st in next ch-2 sp, ch 3 (counts as dc), dc, ch 2, 2 dc in same sp, dc in next 9 sts, [(2 dc, ch 2, 2 dc) in next ch-2 sp, dc in next 9 sts] 3 times, join with sl st to top of ch 3. (52 dc and 4 ch-2 sps, 13 dc on each side between corner sps)

Round 5 :

Sl st in next dc and in next ch-2 sp. Beg cl, ch 3, cl in same sp (first corner). Side: ch 1, cl in next dc, [ch 1, skip 1 dc, cl in next dc] 6 times, ch 1. Corner: (cl, ch 3, cl) in next ch-2 sp, then work the Side instructions again. Work the Corner and Side 3 times in total after the first corner, join with sl st to top of beg cl. (36 cl, 4 ch-3 sps, 32 ch-1 sps, 7 cl across each side)

Round 6 :

Sl st in next ch-3 sp, ch 3 (counts as dc), dc, ch 2, 2 dc in same sp, dc in each of next 17 sts (every cl and every ch-1 sp), [(2 dc, ch 2, 2 dc) in next ch-3 sp, dc in each of next 17 sts] 3 times, join with sl st to top of ch 3. (84 dc and 4 ch-2 sps, 21 sts on each side between corner sps)

Round 7 :

Sl st in next dc and in next ch-2 sp, ch 1, (sc, ch 2, sc) in same sp, sc in each of next 21 sts, [(sc, ch 2, sc) in next ch-2 sp, sc in each of next 21 sts] 3 times, join with sl st to first sc. Fasten off and weave in ends. (92 sc and 4 ch-2 sps, 23 sc on each side counting the corner sc)

β€” 2. Joint Flower (make 90) :

Info :

These small five-petal flowers sit over every point where four motifs meet. Each one measures about 4 cm (1.6 in) across. For a smaller spread you need one flower per inner junction, which is (motifs across minus 1) x (motifs down minus 1).

Round 1 :

MR, ch 1, 10 sc in ring, join with sl st to first sc. (10 sc)

Round 2 :

*(Sc, hdc, 2 dc, hdc, sc) in next st, sl st in next st; rep from * 4 more times, join with sl st at base of first petal. Fasten off leaving a tail of about 30 cm (12 in) for sewing. (5 petals)

β€” 3. Scalloped Border :

Info :

Work the border after all 110 motifs are joined into one 10 x 11 spread. At every seam where two motifs meet, put one sc through both ch-2 sps together. The border corners are the four outer ch-2 sps of the spread. Each motif edge has 23 sc, so each run between corners is easy to count.

Round 1 :

Join yarn with sl st in the top left corner ch-2 sp, ch 1, (sc, ch 2, sc) in same sp. Top edge: [sc in each of next 23 sts, sc in next seam] 9 times, sc in each of next 23 sts. (sc, ch 2, sc) in next corner sp. Right edge: [sc in each of next 23 sts, sc in next seam] 10 times, sc in each of next 23 sts. (sc, ch 2, sc) in next corner sp. Bottom edge: [sc in each of next 23 sts, sc in next seam] 9 times, sc in each of next 23 sts. (sc, ch 2, sc) in next corner sp. Left edge: [sc in each of next 23 sts, sc in next seam] 10 times, sc in each of next 23 sts. Join with sl st to first sc. (1012 sc and 4 ch-2 sps. Each top or bottom run between corner sps has 241 sc, each side run has 265 sc.)

Round 2 :

Sl st in next ch-2 sp, ch 3 (counts as dc), 2 dc, ch 2, 3 dc in same sp (corner shell). Top edge: sc in next st, [skip 1 st, 5 dc in next st, skip 1 st, sc in next st] 60 times. Corner shell in next ch-2 sp. Right edge: sc in next st, [skip 1 st, 5 dc in next st, skip 1 st, sc in next st] 66 times. Corner shell in next ch-2 sp. Bottom edge: sc in next st, [skip 1 st, 5 dc in next st, skip 1 st, sc in next st] 60 times. Corner shell in next ch-2 sp. Left edge: sc in next st, [skip 1 st, 5 dc in next st, skip 1 st, sc in next st] 66 times. Join with sl st to top of ch 3. Fasten off and weave in ends. (252 five-dc scallops and 4 corner shells)

Assembly Instructions

  • Weave in every end on all 110 motifs, then wet or steam block each one to a 23 cm (9 in) square and let them dry completely before joining.
  • Lay the motifs out on a big floor space in 11 rows of 10. Arrange them so every seam and four-way junction lines up, and check that the cluster frames all face the same way.
  • Join each row of 10 motifs into a strip. Hold two motifs with right sides together and whip stitch through the back loops only, matching the 23 sc along each side stitch for stitch and meeting corner ch-2 sps exactly.
  • Join the 11 strips the same way, long edge to long edge. At each four-way junction, stitch the four corner ch-2 sps together tightly so there's no gap.
  • Work Round 1 and Round 2 of the scalloped border all the way around the joined spread, starting at the top left corner and putting 1 sc in every seam.
  • Pin one joint flower over each of the 90 inner junctions, with the flower center sitting where the four ch-2 sps meet. Sew each one down with the tail, taking a small stitch through the base of every petal.
  • Wet block the finished spread flat, pinning it to about 230 x 253 cm (91 x 100 in) and easing each scallop into shape. Leave it for 48 hours until bone dry.

Important Notes

  • πŸ’‘Plan on roughly 40 minutes per motif, so with 110 squares this is a long project. Making a few motifs each week is the easiest way to stay with it.
  • πŸ’‘Make and block your first motif before anything else. It should measure about 23 cm (9 in) square, and if it's smaller, go up half a hook size for the rest.
  • πŸ’‘Check the counts at the end of Rounds 3, 4, 5 and 6 on your first few motifs, because every later round depends on them: 36 dc, 52 dc, 36 clusters, then 84 dc.
  • πŸ’‘Buy all your cotton from one dye lot and keep a ball or two spare, since even slight shade differences show in a large expanse of cream.
  • πŸ’‘For matching pillow shams, join 2 x 2 motifs into a 46 cm (18 in) square, work the same border with 12 scallop repeats on every side, and sew it to a fabric backing.
  • πŸ’‘For a throw, make 5 x 6 motifs (about 115 x 138 cm), use 30 repeats along the top and bottom borders and 36 along the sides, and sew on 20 joint flowers.
  • πŸ’‘Hand wash gently in cool water and dry flat. Cotton gets heavy when wet, so support the whole spread when you lift it.

Grab your favorite cozy playlist, a big basket of creamy cotton, and get ready to fall for this one stitch at a time 🧢 By the time the last scallop is finished, you'll have a bedspread that looks like it belongs in a country cottage and feels even better in person ✨ Don't forget to snap a photo of your finished spread and share it with your crochet friends, because they'll want to see it. Happy hooking, and may your tension be even and your tea always warm 🧡

You ask,

we answer.

FAQs

How big is the finished bedspread and will it fit a queen bed?

With 10 motifs across and 11 down, it measures roughly 230 x 253 cm (91 x 100 in) after blocking, which covers a queen mattress with a generous drop on each side. For a king, make 11 motifs across and add 6 repeats to the top and bottom scallop runs in Round 2.

Can I use a different yarn weight for this bedspread?

You can, but the pattern was designed around aran weight cotton and a hook of about 4.5 mm. DK weight makes each motif closer to 19 cm (7.5 in), so you'd need more motifs to reach the same size. Make one motif first, block it, and measure before committing.

How much yarn do I need for 110 motifs?

Plan on roughly 4,500 to 5,300 g of aran weight cotton in total, including the border and flowers. Buy a little extra from the same dye lot, because shade differences are very noticeable on big cream pieces.

Do I really need to block each motif before joining?

Yes, it's worth it. Cotton motifs often come off the hook slightly uneven, and blocking each to 23 cm (9 in) makes the whip stitch seams line up stitch for stitch. It also keeps the 23 sc per side count easy to follow when you work the border.

Can I make a smaller throw from this pattern?

Absolutely. Make 5 x 6 motifs for a throw of about 115 x 138 cm (45 x 54 in). Work the border with 30 scallop repeats on the top and bottom runs and 36 on the sides, and sew on 20 joint flowers.

What's the trickiest part of the motif?

Round 5. You work clusters into dc sts from the previous round, skipping every other stitch, so it helps to count 7 clusters per side as you go. Mark the first corner with a stitch marker so you know where the round started.