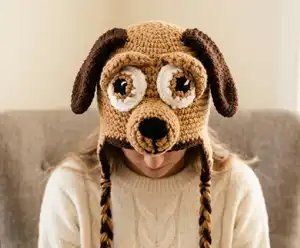
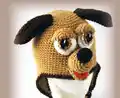
If you're looking for a crochet hat pattern that will make absolutely everyone in the room melt, this Crochet Hatimals Puppy Hat is exactly what you need. Built on a warm, wind-resistant single crochet beanie base, this pattern brings an irresistibly floppy-eared puppy to life with a pair of long folded ears, a 3D stuffed snout, a cartoon nose, expressive eyes, a rounded mouth, and a little red tongue. The entire hat is worked in single crochet, which keeps the stitches tight and the finished piece genuinely functional in cold weather. You have full creative freedom when it comes to the eyes — go playful with big cartoon eyes, add depth with layered serious eyes, or mix in optional eyelids for extra personality. The pattern covers five head sizes from newborn all the way to large adult, and optional earflaps with braided ties can be added for extra warmth and that signature Hatimals look. Every single piece is crocheted separately and assembled at the end, giving you the joy of building your puppy step by step before bringing it all together.
Progress Tracker
0% Complete
— Basic Beanie (All Sizes) :
Info :
Hat is made in continuous rounds. Do not join at the end of rounds. Use a stitch marker.
Rnd 1 :
With Main Color (Warm Brown) and H hook, CH 2, 6 SC in 2nd CH from hook. (6 SC)
Rnd 2 :
2 SC in each SC around. (12 SC)
Rnd 3 :
*1 SC in next SC, 2 SC in next SC*, repeat from * to * around. (18 SC)
Rnd 4 :
*1 SC in each of the next 2 SC, 2 SC in next SC*, repeat from * to * around. (24 SC)
Rnd 5 :
*1 SC in each of the next 3 SC, 2 SC in next SC*, repeat from * to * around. (30 SC)
Rnd 6 :
*1 SC in each of the next 4 SC, 2 SC in next SC*, repeat from * to * around. (36 SC)
Rnd 7 :
*1 SC in each of the next 5 SC, 2 SC in next SC*, repeat from * to * around. (42 SC)
Rnd 8 :
*1 SC in each of the next 6 SC, 2 SC in next SC*, repeat from * to * around. (48 SC)
— Size 14"–16" (0–3 month) :
Rnd 9 :
1 SC in each SC around. (48 SC)
Info :
Repeat Rnd 9 until hat measures approximately 5" from top to bottom, SLST to join, fasten off.
Trim :
With Trim Color (Coffee), join with SC in back of hat, 1 SC in each SC around, SLST to join, fasten off. (48 SC)
— Size 16"–18" (3–6 month) :
Rnd 9 :
*1 SC in each of the next 7 SC, 2 SC in next SC*, repeat from * to * around. (54 SC)
Rnd 10 :
1 SC in each SC around. (54 SC)
Info :
Repeat Rnd 10 until hat measures approximately 6" from top to bottom, SLST to join, fasten off.
Trim :
With Trim Color (Coffee), join with SC in back of hat, 1 SC in each SC around, SLST to join, fasten off. (54 SC)
— Size 18"–20" (Toddler / Child) :
Rnd 9 :
*1 SC in each of the next 7 SC, 2 SC in next SC*, repeat from * to * around. (54 SC)
Rnd 10 :
*1 SC in each of the next 8 SC, 2 SC in next SC*, repeat from * to * around. (60 SC)
Rnd 11 :
1 SC in each SC around. (60 SC)
Info :
Repeat Rnd 11 until hat measures approximately 7" from top to bottom, SLST to join, fasten off.
Trim :
Join SC in back of hat with Trim Color, 1 SC in each SC around, SLST to join, fasten off. (60 SC)
— Size 20"–22" (Child / Pre-Teen / Adult) :
Rnd 9 :
*1 SC in each of the next 7 SC, 2 SC in next SC*, repeat from * to * around. (54 SC)
Rnd 10 :
*1 SC in each of the next 8 SC, 2 SC in next SC*, repeat from * to * around. (60 SC)
Rnd 11 :
*1 SC in each of the next 9 SC, 2 SC in next SC*, repeat from * to * around. (66 SC)
Rnd 12 :
1 SC in each SC around. (66 SC)
Info :
Repeat Rnd 12 until hat measures approximately 8" from top to bottom, SLST to join, fasten off.
Trim :
Join SC in back of hat with Trim Color, 1 SC in each SC around, SLST to join, fasten off. (66 SC)
— Size 22"–24" (Large Teen / Adult) :
Rnd 9 :
*1 SC in each of the next 7 SC, 2 SC in next SC*, repeat from * to * around. (54 SC)
Rnd 10 :
*1 SC in each of the next 8 SC, 2 SC in next SC*, repeat from * to * around. (60 SC)
Rnd 11 :
*1 SC in each of the next 9 SC, 2 SC in next SC*, repeat from * to * around. (66 SC)
Rnd 12 :
*1 SC in each of the next 10 SC, 2 SC in next SC*, repeat from * to * around. (72 SC)
Rnd 13 :
1 SC in each SC around. (72 SC)
Info :
Repeat Rnd 13 until hat measures approximately 9" from top to bottom, SLST to join, fasten off.
Trim :
Join SC in back of hat with Trim Color, 1 SC in each SC around, SLST to join, fasten off. (72 SC)
— Earflaps (Optional) :
Info :
Lay hat flat on hard surface with tie off in center back. Count 3 stitches in from left side and place a marker. Count 3 stitches in from right side and place a marker.
— Left Earflap :
Info :
With right side facing, opening at top, attach Main Color with a SC in the same SC the stitch marker is in.
Row 1 (14"–16") :
SC in next 7 SC, CH 1, turn. (8 SC)
Row 1 (16"–18") :
SC in next 7 SC, CH 1, turn. (8 SC)
Row 1 (18"–20") :
SC in next 9 SC, CH 1, turn. (10 SC)
Row 1 (20"–22") :
SC in next 11 SC, CH 1, turn. (12 SC)
Row 1 (22"–24") :
SC in next 11 SC, CH 1, turn. (12 SC)
Row 2 (all sizes) :
Skip first SC, SC in each SC across, CH 1, turn.
Info :
Repeat Row 2 until only 1 SC remains. Fasten off. Remove marker.
— Right Earflap :
Info :
With right side facing, opening at top, count to the right of the remaining stitch marker the number of stitches needed for desired size and attach yarn with a SC. The stitch marker space counts as the first stitch.
Row 1 (14"–16") :
SC in next 7 SC, CH 1, turn. (8 SC)
Row 1 (16"–18") :
SC in next 7 SC, CH 1, turn. (8 SC)
Row 1 (18"–20") :
SC in next 9 SC, CH 1, turn. (10 SC)
Row 1 (20"–22") :
SC in next 11 SC, CH 1, turn. (12 SC)
Row 1 (22"–24") :
SC in next 11 SC, CH 1, turn. (12 SC)
Row 2 (all sizes) :
Skip first SC, SC in each SC across, CH 1, turn.
Info :
Repeat Row 2 until only 1 SC remains. Fasten off. Remove marker.
— Earflap Trim :
Info :
Attach Trim Color to back of hat in same stitch where hat was fastened off. CH 1, SC in each stitch and row end around the hat. Do 3 SC in the tip of each earflap. SLST to join, fasten off.
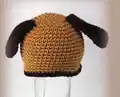
— Puppy Ears (make 2) :
Info :
With Trim Color (Coffee) and H hook. Note: If you want the ears to be longer, make a longer starting chain and adjust your stitch count accordingly.
Rnd 1 :
CH 11, 1 SC in 2nd CH from hook, 1 SC in each of the next 8 CH, 3 SC in last CH. Working on opposite side of CH, 1 SC in each of the next 9 SC, CH 1, turn. (21 SC)
Rnd 2 :
1 SC in each of the next 9 SC, 2 SC in each of the next 3 SC, 1 SC in each of the last 9 SC, CH 1, turn. (24 SC)
Rnd 3 :
1 SC in each of the next 9 SC, *2 SC in next SC, 1 SC in next SC*, repeat from * to * 2 more times, 1 SC in each of the next 9 SC, CH 1, turn. (27 SC)
Rnd 4 :
1 SC in each of the next 9 SC, *2 SC in the next SC, 1 SC in each of the next 2 SC*, repeat from * to * 2 more times, 1 SC in each of the next 9 SC, CH 1, turn. (30 SC)
Info :
Fold ear in half and make 1 SC through both thicknesses across the rows. (4 SC) Fasten off leaving a long tail for sewing.
— Snout :
Info :
With Main Color (Warm Brown) and H hook.
Rnd 1 :
CH 2, 6 SC in 2nd CH from hook. Do not join. (6 SC)
Rnd 2 :
2 SC in each SC around. (12 SC)
Rnd 3 :
*1 SC in next SC, 2 SC in next SC*, repeat from * to * around. (18 SC)
Rnd 4–8 :
SC in each SC around. (18 SC)
Rnd 9 :
SC in each SC around, SLST to join, fasten off leaving a tail to sew with. (18 SC)
— Cartoon Nose :
Info :
With Black and H hook. Use a small amount of fiberfill or yarn to lightly stuff the nose so it is perky. This nose will be sewn to the top of the snout during assembly.
Rnd 1 :
CH 2, 6 SC in 2nd CH from hook. Do not join. (6 SC)
Rnd 2 :
2 SC in each SC around. (12 SC)
Rnd 3 :
1 SC in each SC around. (12 SC)
Rnd 4 :
SC DEC around 6 times, SLST to join, fasten off leaving a tail to sew with. (6 SC)
— Cartoon Eyes — Backs (make 2) :
Info :
With White and H hook. If eyes come out too big, drop down to a smaller hook.
Rnd 1 :
CH 5, 1 SC in 2nd CH from hook, 1 SC in next 2 CH, 3 SC in last CH, working on opposite side of CH, 1 SC in next 2 CH, 2 SC in last CH. Do not join. Use stitch marker if needed. (10 SC)
Rnd 2 :
2 SC in next SC, SC in next 2 SC, 2 SC in next 3 SC, 1 SC in next 2 SC, 2 SC in next 2 SC. (16 SC)
Rnd 3 :
1 SC in next SC, 2 SC in next SC, 1 SC in each of the next 2 SC, *1 SC in next SC, 2 SC in next SC*, repeat from * to * 2 more times, SC in next 2 SC, *1 SC in next SC, 2 SC in next SC*, repeat from * to * 1 more time, SLST to join, fasten off leaving a tail to sew with. (22 SC)
— Cartoon Eyes — Pupils (make 2) :
Info :
With Black and H hook.
Rnd 1 :
CH 2, 6 SC in 2nd CH from hook. Do not join. (6 SC)
Rnd 2 :
2 SC in each SC around, SLST to join, fasten off leaving a tail to sew with. (12 SC)
— Serious Eyes (make 2 — optional alternative) :
Info :
With Black and F hook.
Rnd 1 :
CH 2, 6 SC in 2nd CH from hook, SLST to join, fasten off. (6 SC)
Rnd 2 :
Attach Warm Brown (or eye color of choice) in any SC with a SC, SC again in same SC, 2 SC in each SC around, SLST to join, fasten off. (12 SC)
Rnd 3 :
Attach White in any SC with a SC, 2 SC in next SC, *SC in next SC, 2 SC in next SC*, repeat from * to * around. Do not join. (18 SC)
Rnd 4 :
SC in each SC around, SLST to join, fasten off leaving a long tail to sew with. (18 SC)
— Serious Eyelids (make 2 — optional) :
Info :
With Main Color (Warm Brown) and H hook.
Rnd 1 :
CH 2, 6 SC in 2nd CH from hook. Do not join. (6 SC)
Rnd 2 :
2 SC in each SC around. (12 SC)
Rnd 3 :
*SC in next SC, 2 SC in next SC*, repeat from * to * 5 more times. (18 SC)
Rnd 4 :
*2 SC in next SC, SC in next SC, 2 SC in next SC, SC in next 6 SC*, repeat from * to * one time, SC in next 2 SC. (22 SC)
Row 1 :
Fold piece in half and working through both thicknesses SC in each SC across, fasten off leaving a tail to sew with. (11 SC)
— Cartoon Mouth :
Info :
With Main Color (Warm Brown) and H hook.
Rnd 1 :
CH 2, 5 SC in 2nd CH from hook. Do not join. (5 SC)
Rnd 2 :
2 SC in each SC around. (10 SC)
Rnd 3 :
*1 SC in next SC, 2 SC in next SC*, repeat from * to * around. (15 SC)
Rnd 4–5 :
1 SC in each SC around. (15 SC)
Rnd 6 :
1 SC in each SC around, SLST to join, fasten off leaving a tail to sew with. (15 SC)
Info :
This will be sewn under the snout during assembly.
— Cartoon Tongue :
Info :
With Red and H hook.
Row 1 :
CH 2, 6 SC in 2nd CH from hook, CH 1, turn. (6 SC)
Row 2 :
*2 SC in first SC, 1 SC in next SC*, repeat from * to * across, fasten off leaving a tail to sew with. (9 SC)
Info :
This will be sewn to the top of the mouth during assembly.
— Ties :
Tri-color tassels :
Cut 6 x 36" strands of each of the 3 colors used (18 strands total). Separate into piles of 3 per color. Take 1 pile of each color, string through the bottom of one earflap ensuring both sides are even. Separate back into individual color groups and braid. Secure with a slip knot at the bottom and trim ends even. Repeat for the second earflap.
Striped tassels (alternative) :
Cut 8 x 36" strands of Main Color and 8 strands of Trim Color (16 strands total). Separate into piles of 4 per color. String 1 pile of each color through one earflap. Separate into 4-strand groups per color and work a 4-way braid alternating colors to create striping. Secure with a slip knot and trim even. Repeat for the second earflap.
This Crochet Hatimals Puppy Hat is pure handmade joy in every single stitch. From those irresistible floppy ears that drape perfectly over the sides of the hat to the sweet stuffed snout and that cheeky little tongue peeking out, every detail works together to create something genuinely special. Sized for everyone from a brand new baby to a full-grown adult, this is one of those patterns you'll come back to again and again because the finished result never stops being completely wonderful. 🐾 Grab your hook, pick your colors, and crochet something that will be loved for years — happy crocheting! 🧶✨