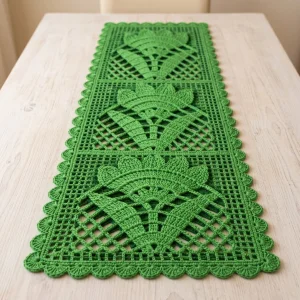
Imagine a long, leafy-green runner stretching down your table, with three open panels lined up like little garden windows. This pattern has you build a crisp filet grid first, then crochet the pieces that decorate it on their own and sew them on, so the project never feels overwhelming. The rhythm is calm and repetitive in the best way, and the finished piece looks far fancier than it feels to make. Grab some fine cotton thread and a cozy spot, and let’s get stitching.
Progress Tracker
0% Complete
— 1. Mesh Base :
Info :
The mesh base measures roughly 6 in (15.5 cm) wide and 18 in (46 cm) long, and about 8.5 x 20 in (21.5 x 51 cm) with the scalloped border, depending on your thread and tension. To make it wider, add 8 ch to the foundation for every 4 extra mesh spaces (ch 73 gives 35 spaces), work 4 extra repeats of (ch 1, skip next st, dc in next st) in every mesh row, work 8 more sc along the top and bottom in Border Round 1, and add one extra shell repeat along the top and bottom in Round 2. To make it longer, work Rows 31-59 once more before the final solid row, skip the single gap sc on each side in Border Round 1 and work sc2tog over the 2 row ends nearest the middle instead, and work the side repeat 28 times in Round 2.
Info :
Hold the runner with the foundation edge at the top. Rows 2-29, 31-58, and 60-87 are the mesh rows, and Rows 1, 30, 59, and 88 are solid dc rows that frame each panel.
Row 1 :
ch 65. Dc in 4th ch from hook (the 3 skipped ch count as the first dc) and in each ch across (63 dc).
Row 2-29 :
ch 4 (counts as dc + ch 1), turn. Skip first 2 sts, dc in next st, (ch 1, skip next st, dc in next st) 29 times, ch 1, skip next st, dc in last st, working it in the 3rd ch of the turning ch from the row below (32 dc, 31 ch-1 spaces).
Row 30 :
ch 3 (counts as dc), turn. Dc in each dc and in each ch-1 space across, working the last dc in the 3rd ch of the turning ch (63 dc).
Row 31-58 :
ch 4 (counts as dc + ch 1), turn. Skip first 2 sts, dc in next st, (ch 1, skip next st, dc in next st) 29 times, ch 1, skip next st, dc in last st, working it in the 3rd ch of the turning ch from the row below (32 dc, 31 ch-1 spaces).
Row 59 :
ch 3 (counts as dc), turn. Dc in each dc and in each ch-1 space across, working the last dc in the 3rd ch of the turning ch (63 dc).
Row 60-87 :
ch 4 (counts as dc + ch 1), turn. Skip first 2 sts, dc in next st, (ch 1, skip next st, dc in next st) 29 times, ch 1, skip next st, dc in last st, working it in the 3rd ch of the turning ch from the row below (32 dc, 31 ch-1 spaces).
Row 88 :
ch 3 (counts as dc), turn. Dc in each dc and in each ch-1 space across, working the last dc in the 3rd ch of the turning ch (63 dc). Do not fasten off; continue to the border.
— 2. Scalloped Border :
Info :
Place a stitch marker in the center sc of each corner as you work Round 1. They will guide you through Rounds 2 and 3. Along the foundation edge, the 3 ch at each end count as one corner st, so you will work 1 sc in each of the 61 foundation ch between them.
Round 1 :
Hold the runner with the foundation edge at the top and join thread in the top right corner. ch 1, 3 sc in the corner st. Sc in each of the next 61 sts across the top, 3 sc in the corner. Down the left side: 2 sc in the end of each of Rows 2-44, 1 sc in the gap between Row 44 and Row 45, then 2 sc in the end of each of Rows 45-87 (173 sc). 3 sc in the bottom corner, sc in each of the 61 sts across Row 88, 3 sc in the corner. Up the right side: 2 sc in the end of each of Rows 87-45, 1 sc in the gap, 2 sc in the end of each of Rows 44-2 (173 sc). Join with sl st to the first sc (480 sc).
Round 2 :
Sl st in next sc (the center of the corner). ch 3 (counts as dc), 8 dc in same sc (9-dc corner shell). Across the top: (skip 3 sc, sc in next sc, skip 3 sc, 7 dc in next sc) 7 times, skip 3 sc, sc in next sc, skip 3 sc, 9 dc in the corner center sc. Down the left side: (skip 3 sc, sc in next sc, skip 3 sc, 7 dc in next sc) 21 times, skip 3 sc, sc in next sc, skip 3 sc, 9 dc in the corner center sc. Across the bottom: repeat the top instructions, ending with 9 dc in the corner center sc. Up the right side: (skip 3 sc, sc in next sc, skip 3 sc, 7 dc in next sc) 21 times, skip 3 sc, sc in next sc, skip 3 sc. Join with sl st to the top of beginning ch 3 (60 shells, 60 sc).
Round 3 :
ch 1, sc in top of beginning ch 3, (ch 2, sc in next dc) 8 times, sl st in next sc. Along each edge: (sc in first dc of the 7-dc shell, (ch 2, sc in next dc) 6 times, sl st in next sc) for every shell, and at each remaining corner work sc in the first dc of the 9-dc shell, (ch 2, sc in next dc) 8 times, sl st in next sc. Continue around all 60 shells (7 along the top, 21 down the left, 7 along the bottom, 21 up the right), then join with sl st to the first sc. Fasten off and weave in the end.
— 3. Fan Motif (make 3) :
Info :
Each fan is worked flat in rows and ends up about 5 in (12.5 cm) across, with five rounded petals along the top. Leave a long tail at the end for sewing.
Row 1 :
ch 2, 5 sc in 2nd ch from hook (5).
Row 2 :
ch 1, turn. 2 sc in each sc (10).
Row 3 :
ch 2 (does not count as a st), turn. Hdc in each st across (10).
Row 4 :
ch 2 (does not count as a st), turn. (Hdc in next st, 2 hdc in next st) 5 times (15).
Row 5 :
ch 2 (does not count as a st), turn. Hdc in each st across (15).
Row 6 :
ch 2 (does not count as a st), turn. (Hdc in each of next 2 sts, 2 hdc in next st) 5 times (20).
Row 7 :
ch 2 (does not count as a st), turn. Hdc in each st across (20).
Row 8 :
ch 2 (does not count as a st), turn. (Hdc in each of next 3 sts, 2 hdc in next st) 5 times (25).
Row 9 :
ch 2 (does not count as a st), turn. Hdc in each st across (25).
Row 10 :
ch 2 (does not count as a st), turn. (Hdc in each of next 4 sts, 2 hdc in next st) 5 times (30).
Row 11 :
ch 2 (does not count as a st), turn. Hdc in each st across (30).
Row 12 :
ch 1, turn. (Sc in each of next 5 sts, 2 sc in next st) 5 times (35).
Row 13 :
ch 1, turn. (Sc in next st, hdc in next st, dc in next st, 3 dc in next st, dc in next st, hdc in next st, sc in next st) 5 times (45). Fasten off, leaving a long tail.
— 4. Center Stem (make 3) :
Info :
The stem is a short ridged strip, about 2 in (5 cm) long, that sits between the fan and the leaves.
Row 1 :
ch 21, sc in 2nd ch from hook and in each ch across (20).
Row 2-3 :
ch 1, turn. Sc blo in each st across (20). Fasten off after Row 3, leaving a long tail.
— 5. Leaves (make 6) :
Info :
Each leaf is worked flat from one pointed end to the other and is symmetrical, so there is no need to make mirrored versions. Working every row in the back loop only gives the ridged look. Each leaf is about 3.5 in (9 cm) long and 1 in (2.5 cm) wide at its widest.
Row 1 :
ch 4, sc in 2nd ch from hook and in each of next 2 ch (3).
Row 2 :
ch 1, turn. Sc blo in each st (3).
Row 3 :
ch 1, turn. 2 sc blo in first st, sc blo in next st, 2 sc blo in last st (5).
Row 4-5 :
ch 1, turn. Sc blo in each st (5).
Row 6 :
ch 1, turn. 2 sc blo in first st, sc blo in each of next 3 sts, 2 sc blo in last st (7).
Row 7-8 :
ch 1, turn. Sc blo in each st (7).
Row 9 :
ch 1, turn. 2 sc blo in first st, sc blo in each of next 5 sts, 2 sc blo in last st (9).
Row 10-25 :
ch 1, turn. Sc blo in each st (9).
Row 26 :
ch 1, turn. Sc2tog blo, sc blo in each of next 5 sts, sc2tog blo (7).
Row 27-28 :
ch 1, turn. Sc blo in each st (7).
Row 29 :
ch 1, turn. Sc2tog blo, sc blo in each of next 3 sts, sc2tog blo (5).
Row 30-31 :
ch 1, turn. Sc blo in each st (5).
Row 32 :
ch 1, turn. Sc2tog blo, sc blo in next st, sc2tog blo (3).
Row 33 :
ch 1, turn. Sc2tog blo, sc blo in next st (2).
Row 34 :
ch 1, turn. Sc2tog blo (1). Fasten off, leaving a long tail.
— 6. Diagonal Lattice (make 1 per panel) :
Info :
Work the lattice strands before sewing on any motifs. Count dc from the left edge of the panel (there are 32 across) and mesh rows up from the bar below the panel, with the foundation edge of the runner at the top. Chain loosely and keep the panel flat while you anchor each strand so the mesh doesn’t pucker. Repeat in all three panels.
Left Group - Rising Right :
Join thread with a sl st in dc 2 of mesh row 4, ch 18 loosely, sl st in dc 8 of mesh row 10. Fasten off. Repeat starting in dc 4, 6, and 8 of mesh row 4, each ending 6 dc to the right in mesh row 10 (4 strands).
Left Group - Rising Left :
Join thread with a sl st in dc 8 of mesh row 4, ch 18 loosely, sl st in dc 2 of mesh row 10. Fasten off. Repeat starting in dc 10, 12, and 14 of mesh row 4, each ending 6 dc to the left in mesh row 10 (4 strands).
Right Group - Rising Right :
Join thread with a sl st in dc 19 of mesh row 4, ch 18 loosely, sl st in dc 25 of mesh row 10. Fasten off. Repeat starting in dc 21, 23, and 25 of mesh row 4, each ending 6 dc to the right in mesh row 10 (4 strands).
Right Group - Rising Left :
Join thread with a sl st in dc 25 of mesh row 4, ch 18 loosely, sl st in dc 19 of mesh row 10. Fasten off. Repeat starting in dc 27, 29, and 31 of mesh row 4, each ending 6 dc to the left in mesh row 10 (4 strands).
Thank you for stitching along with me! 🧶 By the time you reach that last scallop, you’ll have a piece that looks like it came from a little boutique shelf, and you made every single stitch yourself. Take a quick photo, smooth it out on the table, and step back to admire it for a minute. Then make another in a different shade, because trust me, one is never enough. Happy crocheting, friend! ✨