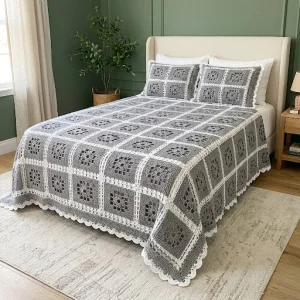
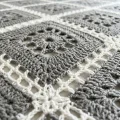
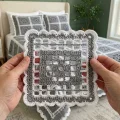
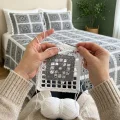
Picture a bed dressed in soft gray squares edged with crisp white lace, and you've got the feel of this coverlet. Each square pairs a solid gray heart with an airy white mesh frame, so the finished piece has weight where you want it and a little breathing room everywhere else. You'll work one motif at a time, which makes the project easy to pick up and set down. Grab your favorite cotton, put on something good to listen to, and settle in for a project that gets a little more beautiful with every square you finish.
Progress Tracker
0% Complete
— 1. Gray Center Block :
Info :
Each finished square measures about 18 cm (7 in) across using DK cotton and a 3.5 mm hook. The full bedspread uses 10 squares across and 12 down (120 squares) for roughly 180 x 216 cm (71 x 85 in). You'll also make 8 extra squares for the two pillow shams, so 128 squares in total. To make the coverlet wider or longer, add whole squares: each extra column adds about 18 cm (7 in) of width and each extra row adds about 18 cm (7 in) of length. Keep your total of columns plus rows at 22, 25, 28 and so on so the border stitch count still divides evenly by 6. Gray corners are worked as 2dc, ch2, 2dc and white corners are worked as dc, ch2, dc.
Round 1 :
With gray, make an MR. ch3 (counts as first dc), 2dc in the ring, ch2, [3dc, ch2] x3 in the ring. Pull the ring closed and sl st to the top of the beginning ch3 (12 dc, four ch2 sps).
Round 2 :
sl st in each of the next 2 dc, then sl st into the first ch2 sp. ch3 (counts as first dc), dc, ch2, 2dc in the same sp for the first corner. [dc in next dc, ch1, skip 1 dc, dc in next dc, 2dc, ch2, 2dc in next ch2 sp] x3. dc in next dc, ch1, skip 1 dc, dc in next dc. sl st to the top of the beginning ch3 (24 dc, four ch1 sps, four ch2 sps).
Round 3 :
sl st in the next dc and into the ch2 sp. ch3 (counts as first dc), dc, ch2, 2dc in the same sp. [dc in each of the next 7 sts (the ch1 sp counts as a st), 2dc, ch2, 2dc in next ch2 sp] x3. dc in each of the next 7 sts. sl st to the top of the beginning ch3 (44 dc, four ch2 sps). Fasten off gray.
— 2. White Mesh Frame :
Round 4 :
Join white with a sl st in any ch2 sp. ch3 (counts as first dc), ch2, dc in the same sp. [dc in next dc, (ch1, skip 1 dc, dc in next dc) x5, dc, ch2, dc in next ch2 sp] x3. dc in next dc, (ch1, skip 1 dc, dc in next dc) x5. sl st to the top of the beginning ch3 (32 dc, 20 ch1 sps, four ch2 sps). Each side now has 13 sts between corner sps.
Round 5 :
sl st into the first ch2 sp. ch3 (counts as first dc), ch2, dc in the same sp. [dc in next 2 dc, (ch1, skip the ch1 sp, dc in next dc) x5, dc in next dc, dc, ch2, dc in next ch2 sp] x3. dc in next 2 dc, (ch1, skip the ch1 sp, dc in next dc) x5, dc in the top of the Round 4 beginning ch3. sl st to the top of the beginning ch3 (40 dc, 20 ch1 sps, four ch2 sps). Each side now has 15 sts between corner sps. Fasten off white.
— 3. Gray Border :
Round 6 :
Join gray with a sl st in any ch2 sp. ch3 (counts as first dc), dc, ch2, 2dc in the same sp. [dc in each of the next 15 sts (every dc and every ch1 sp counts as a st), 2dc, ch2, 2dc in next ch2 sp] x3. dc in each of the next 15 sts. sl st to the top of the beginning ch3 (76 dc, four ch2 sps).
Round 7 :
sl st in the next dc and into the ch2 sp. ch3 (counts as first dc), dc, ch2, 2dc in the same sp. [dc in each of the next 19 dc, 2dc, ch2, 2dc in next ch2 sp] x3. dc in each of the next 19 dc. sl st to the top of the beginning ch3 (92 dc, four ch2 sps). Fasten off gray.
— 4. White Edge Round :
Round 8 :
Join white with a sl st in any ch2 sp. ch3 (counts as first dc), ch2, dc in the same sp. [dc in next dc, (ch1, skip 1 dc, dc in next dc) x11, dc, ch2, dc in next ch2 sp] x3. dc in next dc, (ch1, skip 1 dc, dc in next dc) x11. sl st to the top of the beginning ch3 (56 dc, 44 ch1 sps, four ch2 sps). Each side now has 25 sts from corner dc to corner dc. Fasten off and weave in ends.
— 5. Gray Accent Bars :
Info :
Make these on every square before joining. Cut a 50 cm (20 in) length of gray yarn and thread it on a tapestry needle. The bars sit in the first white mesh frame, running straight across the top and bottom sides of each square.
Top Bar :
Start at the outer edge of Round 5 on any one side, which becomes the top. Weave the needle over each dc and under each ch1 sp across all 15 sts between the corner sps, keeping the strand relaxed. Leave a 5 cm (2 in) tail at each end and tie the tails together on the wrong side.
Bottom Bar :
Repeat the same weaving along Round 5 on the side directly opposite the top bar, again across all 15 sts between the corner sps. Tie off the tails and weave them into the gray rounds.
— 6. Scalloped Border :
Info :
Work this after all 120 squares are joined into one 10 by 12 rectangle. Every square edge contributes 25 sc and every seam contributes 1 sc, so the numbers below work out exactly. Because the corner starts the count, the first shell sits just past the corner, so the scallops at each corner may look slightly off center, which is perfectly normal.
Round 1 :
Join white with a sl st in the ch2 sp at any outer corner of the coverlet. ch1, 3sc in the same corner sp. Working around, sc in each dc and each ch1 sp along every square edge, sc once in each seam where two squares meet, and 3sc in each of the other three outer corner ch2 sps. Each short side has 259 sc and each long side has 311 sc, not counting the 3sc corners. sl st to the first sc (1,152 sc).
Round 2 :
ch1, then starting in the first sc of Round 1, [sc in next sc, skip 2 sc, 5dc in next sc, skip 2 sc] x192. sl st to the first sc (192 shells). Fasten off and weave in ends.
— 7. Pillow Shams (Make 2) :
Info :
Each sham front is 2 squares across by 2 squares down, joined as described in the assembly steps, which gives a panel about 36 cm (14 in) square. The back panel is made the same way but has no scalloped border.
Round 1 :
Join white with a sl st in the ch2 sp at any outer corner of the front panel. ch1, 3sc in the same corner sp. sc in each dc and each ch1 sp along every square edge, sc once in the seam between the two squares on each side, and 3sc in each of the other three outer corner ch2 sps. Each side has 51 sc, not counting the 3sc corners. sl st to the first sc (216 sc).
Round 2 :
ch1, then starting in the first sc of Round 1, [sc in next sc, skip 2 sc, 5dc in next sc, skip 2 sc] x36. sl st to the first sc (36 shells). Fasten off and weave in ends.
You've got everything you need to start your very first square, and honestly the hardest part will be choosing a cozy corner to crochet in. Take it one block at a time, enjoy the easy rhythm of the mesh rounds, and watch your pile of squares slowly turn into a bedspread you'll be proud to spread across the bed. Give it to someone you love or keep it all for yourself, either way this one is going to make a room feel finished. Happy stitching! 🧶✨