About This Crochet Flower Square Bedspread and Pillow Sham Pattern
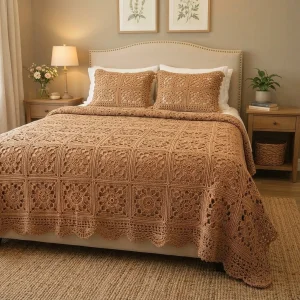
Lovely as a wedding or housewarming gift, or as the cozy finishing layer on a guest bed that gets compliments from every visitor who stays over.
Ideal for those with basic crocheting experience, featuring slightly more advanced stitches and techniques to expand your skills.
A 10-12 hour project—great for savoring the process over several sessions.
A warm touch for your space that transforms ordinary corners into inviting nooks filled with handmade charm.
Lovely as a wedding or housewarming gift, or as the cozy finishing layer on a guest bed that gets compliments from every visitor who stays over.
I love this pattern because the squares are so forgiving. You can finish a couple on a quiet evening and feel like the bedspread actually moved forward. The first time the petal round clicked into place I may have squealed out loud. There are no fussy post stitches or hard-to-read charts, just plain dc, sc and chains, with the open gaps doing all the pretty work. Laying every block out on the floor before sewing is honestly my favorite part.

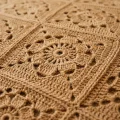

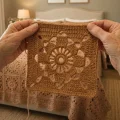
I started my first flower square on a rainy afternoon with a leftover ball of caramel cotton and no plan at all. By the third square I was hooked. There’s something so satisfying about the moment the petal round comes together and a plain little circle suddenly looks like a real bloom.
Here’s my honest tip: block every square before you sew a single seam. I skipped it once, the corners came out wavy, and I had to unpick a whole strip. Pin each one to 18 cm, mist it, and let it dry flat. It feels slow, but it saves you hours later.
Color-wise, I went with warm caramel because it looks so cozy against white sheets, but this one would be lovely in soft sage or deep cream too. For a little contrast, try the last round of each square in a slightly darker shade and keep the border in the main color so the flowers pop.
Mostly, I love how the finished spread feels like something from a grandmother’s cedar chest, except you made it yourself. Keep a stack of finished squares by your chair where you can see your progress. Take your time with it.
Picture a bedroom that feels like a warm hug the moment you walk in. This bedspread is built from lacy flower squares in a soft caramel tone, each one small enough to carry in your bag and finish in a single sitting. Stitch them one at a time, sew them into one big cozy piece, and finish the edge with a scalloped lace border that gives the bed a handmade, heirloom look. Two matching pillow panels tie the whole set together, so your bed ends up feeling like a little retreat.
Make 71 squares in total: 63 for the bedspread and 8 for the two pillow panels. Each square measures about 18 cm (7 in) after blocking. The finished bedspread, 7 squares across and 9 down plus the border, measures about 138 x 174 cm (54 x 69 in). Each pillow panel, 2 x 2 squares plus the border, measures about 48 cm (19 in) square.
Make a MR. Ch 3 (counts as dc), 11 dc in the MR. Pull the MR tight and sl st to the top of the beg ch 3. (12 dc)
Ch 1, sc in the same st, ch 3, *sc in next dc, ch 3; repeat from * 10 more times, sl st to the first sc. (12 sc and 12 ch-3 sps)
Sl st in the first ch-3 sp, ch 3 (counts as dc), 3 dc in the same sp, 4 dc in next ch-3 sp (first petal made). *Ch 2, 4 dc in next ch-3 sp, 4 dc in next ch-3 sp; repeat from * 4 more times, ch 2, sl st to top of beg ch 3. (6 petals of 8 dc each = 48 dc, and 6 ch-2 sps)
Sl st in each of next 7 dc, sl st in next ch-2 sp. Ch 1, sc in the same sp, ch 1. *2 dc in next dc, dc in each of next 6 dc, 2 dc in next dc, ch 1, sc in next ch-2 sp, ch 1; repeat from * 4 more times. 2 dc in next dc, dc in each of next 6 dc, 2 dc in next dc, ch 1, sl st to the first sc. (6 petals of 10 dc each = 60 dc, 6 sc, and 12 ch-1 sps)
The 6 sc from Round 4 mark the gaps between petals. Four of them become the corners of the square in Round 5 and the other two sit in the middle of the two sides that have a petal on each end. The petals at the top and bottom of the flower become the two sides with open mesh. Mark the four corner sc with stitch markers before you start Round 5.
Ch 3 (counts as dc), dc in the same sc, ch 2, 2 dc in the same sc (first corner made). Sk next ch-1 sp, dc in each of next 10 dc, sk next ch-1 sp, dc in next sc, sk next ch-1 sp, dc in each of next 10 dc, sk next ch-1 sp (21 dc along this side). Work (2 dc, ch 2, 2 dc) in next sc for the second corner. Sk next ch-1 sp, *ch 1, dc in next dc; repeat from * 9 more times, ch 1, sk next ch-1 sp (10 dc and 11 ch-1 sps along this side). Work (2 dc, ch 2, 2 dc) in next sc for the third corner. Sk next ch-1 sp, dc in each of next 10 dc, sk next ch-1 sp, dc in next sc, sk next ch-1 sp, dc in each of next 10 dc, sk next ch-1 sp (21 dc). Work (2 dc, ch 2, 2 dc) in next sc for the fourth corner. Sk next ch-1 sp, *ch 1, dc in next dc; repeat from * 9 more times, ch 1, sk next ch-1 sp, sl st to top of beg ch 3. (78 dc, 4 ch-2 corner sps, and 22 ch-1 sps. Each side measures 25 sts and sps between corner ch-2 sps)
Sl st in next dc, sl st in next ch-2 sp. Ch 3 (counts as dc), dc in the same sp, ch 2, 2 dc in the same sp (corner made). *Dc in each of next 25 sts and ch-1 sps, (2 dc, ch 2, 2 dc) in next ch-2 sp; repeat from * 2 more times, dc in each of next 25 sts and ch-1 sps, sl st to top of beg ch 3. (116 dc and 4 ch-2 sps)
Sl st in next dc, sl st in next ch-2 sp. Ch 3 (counts as dc), dc in the same sp, ch 2, 2 dc in the same sp (corner made). *Dc in each of next 29 sts, (2 dc, ch 2, 2 dc) in next ch-2 sp; repeat from * 2 more times, dc in each of next 29 sts, sl st to top of beg ch 3. (132 dc and 4 ch-2 sps)
Sl st in next dc, sl st in next ch-2 sp. Ch 1, 3 sc in the same sp. *Sc in each of next 33 sts, 3 sc in next ch-2 sp; repeat from * 2 more times, sc in each of next 33 sts, sl st to first sc. Fasten off and weave in the ends. (144 sc: 33 sc along each side plus 3 sc at each corner. Counting both corner center sc, each edge has 37 sc)
Block every square to about 18 cm (7 in) before joining. Lay out 9 rows of 7 squares on the floor and turn them all the same way so the flowers sit consistently. Join with a flat seam so the border counts below stay exact.
Hold two squares with the right sides together, or side by side with the right sides facing up, and pin them at both corner center sc. Using a tapestry needle and matching yarn, whipstitch through the back loops only of the matching sc along the edge, matching all 37 sc from corner center to corner center. Add squares the same way until each strip has 7 squares. Make 9 strips.
Pin the strips together at every spot where four corners meet first, then pin the rest of each seam. Sew the strips together the same way as the squares, keeping the seam tension loose enough that the seams lie flat. You now have a panel of 7 x 9 squares.
The border counts below are for the 7 x 9 size. To change the size, add the following for every extra square along an edge: 36 sc in Round 1, 12 more dc groups in Round 2, 12 more sc units in Round 3, and 6 more arches (2 more scallops) in Round 4. Scallops are worked in groups of 3 arches, so always change by whole squares to keep them centered.
Join yarn with a sl st in the center sc of the top left corner. Ch 1, 3 sc in the same st (the start corner). Sc in each st across the top edge, working sc2tog over the two corner center sts that meet at each seam, until you reach the top right corner center sc, then 3 sc in that st (251 sc along the top). Work the same way down the right edge, with 3 sc in the bottom right corner center sc (323 sc along the right side). Work the same way along the bottom edge, with 3 sc in the bottom left corner center sc (251 sc). Work the same way up the left edge (323 sc), then sl st to the first sc. (1160 sc: 251 + 323 + 251 + 323 along the edges and 3 sc at each of the 4 corners)
Sl st in next sc (the corner center sc). Ch 3 (counts as dc), ch 2, dc in the same st, ch 2, dc in the same st (corner made). *Sk 1 sc, then work dc in next sc, ch 2, sk 2 sc, across the top edge 84 times. Work (dc, ch 2, dc, ch 2, dc) in the next corner center sc. Sk 1 sc, then work dc in next sc, ch 2, sk 2 sc, 108 times down the right edge. Work (dc, ch 2, dc, ch 2, dc) in the next corner center sc. Sk 1 sc, then work dc in next sc, ch 2, sk 2 sc, 84 times along the bottom edge. Work (dc, ch 2, dc, ch 2, dc) in the next corner center sc. Sk 1 sc, then work dc in next sc, ch 2, sk 2 sc, 108 times up the left edge. Sl st to top of beg ch 3. (396 dc and 392 ch-2 sps)
Ch 1, sc in the same st, 2 sc in next ch-2 sp, 3 sc in next dc, 2 sc in next ch-2 sp, sc in next dc (corner made, 9 sc). Across the top edge: *sc in next dc, 2 sc in next ch-2 sp; repeat from * 83 more times (252 sc). Work the corner: sc in next dc, 2 sc in next ch-2 sp, 3 sc in next dc, 2 sc in next ch-2 sp, sc in next dc. Down the right edge: *sc in next dc, 2 sc in next ch-2 sp; repeat from * 107 more times (324 sc). Work the corner. Along the bottom edge: *sc in next dc, 2 sc in next ch-2 sp; repeat from * 83 more times. Work the corner. Up the left edge: *sc in next dc, 2 sc in next ch-2 sp; repeat from * 107 more times. Sl st to the first sc. (1188 sc: 1152 along the edges and 36 at the corners)
Ch 1, sc in the same st, ch 5, sk 3 sc, (sc, ch 5, sc) in the next sc (the center of the corner), ch 5, sk 4 sc (first corner made, 3 arches). Along the top edge: *sc in next sc, ch 5, sk 5 sc; repeat from * 41 more times (42 arches). Work the corner: sc in next sc, ch 5, sk 3 sc, (sc, ch 5, sc) in next sc, ch 5, sk 4 sc. Down the right edge: *sc in next sc, ch 5, sk 5 sc; repeat from * 53 more times (54 arches). Work the corner. Along the bottom edge: *sc in next sc, ch 5, sk 5 sc; repeat from * 41 more times. Work the corner. Up the left edge: *sc in next sc, ch 5, sk 5 sc; repeat from * 53 more times. Sl st to the first sc. (204 ch-5 sps in total, in groups of 3 that make 68 scallops)
Sl st in the first ch-5 sp. Ch 1, (sc, hdc, 3 dc) in the same sp. In the next ch-5 sp work 4 dc, ch 2, 4 dc. In the next ch-5 sp work 3 dc, hdc, sc (first scallop made). Repeat this 3-sp scallop in every group of 3 ch-5 sps around, sl st to the first sc. (68 scallops of 18 sts and 1 ch-2 sp each = 1224 sts and 68 ch-2 sps)
Ch 1, sc in the same st and in each of next 4 sts (5 sc), sc in each of next 4 dc, (sc, ch 3, sl st in first ch, sc) in the ch-2 sp, sc in each of next 4 dc, sc in each of next 5 sts (first scallop edged). *Sc in each of next 5 sts, sc in each of next 4 dc, (sc, ch 3, sl st in first ch, sc) in next ch-2 sp, sc in each of next 4 dc, sc in each of next 5 sts; repeat from * 66 more times, sl st to the first sc. Fasten off and weave in the ends. (68 scallops with 20 sc and 1 picot each = 1360 sc and 68 picots)
Each panel is 4 squares joined in a 2 x 2 block, then edged with the same scalloped border as the bedspread, using the smaller counts below. A finished panel measures about 48 cm (19 in) square and slips over a 40 cm (16 in) cushion cover, with the scalloped border forming a pretty frill around it.
Sew 2 squares side by side to make a strip, make a second strip, then sew the two strips together. Match all 37 sc along each edge and pin at every corner center before sewing, the same way as for the bedspread.
Join yarn with a sl st in the center sc of any outer corner. Ch 1, 3 sc in the same st. Sc in each st along the edge, working sc2tog over the two corner center sts that meet at the seam, until you reach the next corner center sc, then 3 sc in that st. Repeat on all sides, then sl st to the first sc. (71 sc along each edge plus 3 sc at each corner = 296 sc)
Sl st in next sc (the corner center sc). Ch 3 (counts as dc), ch 2, dc in the same st, ch 2, dc in the same st (corner made). *Sk 1 sc, then work dc in next sc, ch 2, sk 2 sc, 24 times along the edge, then work (dc, ch 2, dc, ch 2, dc) in the next corner center sc; repeat from * 2 more times. Sk 1 sc, then work dc in next sc, ch 2, sk 2 sc, 24 times along the last edge, sl st to top of beg ch 3. (108 dc and 104 ch-2 sps)
Ch 1, sc in the same st, 2 sc in next ch-2 sp, 3 sc in next dc, 2 sc in next ch-2 sp, sc in next dc (corner made, 9 sc). *[Sc in next dc, 2 sc in next ch-2 sp] 24 times along the edge, then sc in next dc, 2 sc in next ch-2 sp, 3 sc in next dc, 2 sc in next ch-2 sp, sc in next dc for the next corner; repeat from * 2 more times. [Sc in next dc, 2 sc in next ch-2 sp] 24 times along the last edge, sl st to the first sc. (324 sc: 288 along the edges and 36 at the corners)
Ch 1, sc in the same st, ch 5, sk 3 sc, (sc, ch 5, sc) in the next sc (the center of the corner), ch 5, sk 4 sc (first corner made, 3 arches). *Sc in next sc, ch 5, sk 5 sc, 12 times along the edge, then sc in next sc, ch 5, sk 3 sc, (sc, ch 5, sc) in next sc, ch 5, sk 4 sc for the next corner; repeat from * 2 more times. Sc in next sc, ch 5, sk 5 sc, 12 times along the last edge, sl st to the first sc. (60 ch-5 sps in total, making 20 scallops)
Sl st in the first ch-5 sp. Ch 1, (sc, hdc, 3 dc) in the same sp. In the next ch-5 sp work 4 dc, ch 2, 4 dc. In the next ch-5 sp work 3 dc, hdc, sc (first scallop made). Repeat this 3-sp scallop in every group of 3 ch-5 sps around, sl st to the first sc. (20 scallops = 360 sts and 20 ch-2 sps)
Ch 1, sc in the same st and in each of next 4 sts (5 sc), sc in each of next 4 dc, (sc, ch 3, sl st in first ch, sc) in the ch-2 sp, sc in each of next 4 dc, sc in each of next 5 sts (first scallop edged). *Sc in each of next 5 sts, sc in each of next 4 dc, (sc, ch 3, sl st in first ch, sc) in next ch-2 sp, sc in each of next 4 dc, sc in each of next 5 sts; repeat from * 18 more times, sl st to the first sc. Fasten off and weave in the ends. (20 scallops with 20 sc and 1 picot each = 400 sc and 20 picots)
There’s real magic in watching a pile of little flower squares turn into something big enough to cover a whole bed. 🧶 Take them with you, make a few each evening, and let the stack grow beside your favorite chair. When you finally smooth the last scallop flat and spread it over the mattress, you’ll see every stitch you made and feel so proud of it. ✨ Don’t be surprised if the cat claims the pillow panels first! Happy hooking, and thank you for crocheting along with me. 🧵
Yes. For a queen mattress top, plan roughly 9 squares across and 11 down. For every extra square along an edge, add 36 sc to Round 1 of the border, 12 more dc groups to Round 2, 12 more sc units to Round 3, and 6 more arches (2 scallops) to Round 4. Work the corners exactly as written.
You can, but the pattern was designed around DK weight cotton and a hook of about 3.5 mm, giving an 18 cm (7 in) square. Worsted weight makes the squares and the open gaps bigger, so the whole piece grows. Make one square first and measure it, and change the number of squares accordingly.
Sewing is the safest option because the border counts rely on a flat seam with 37 sc matched along each edge. If you want to join as you go, use a sl st or sc join in Round 8 that does not add or remove any stitches, and check the border counts.
The flower has six petals but a square has four sides. The two sides that have a petal on each end use dc in each stitch, and the top and bottom sides use ch-1 mesh so they come out the same width. Counting 25 sts and sps between each pair of corners will keep you on track.
Each panel measures about 48 cm (19 in) square with the border and is meant to sit over a plain 40 cm (16 in) cushion cover or pillow form, with the scalloped edge as a frill around it. For a bigger pillow, join more squares before you add the border.