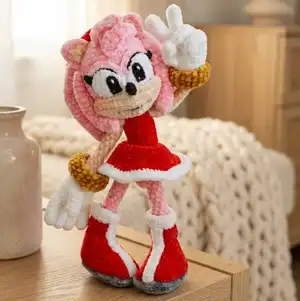
Create your own adorable Amy Rose from Sonic the Hedgehog with this detailed crochet pattern! This charming design features Amy's signature pink color, cute dress with white trim, iconic prickles (quills), and her beloved Piko Piko Hammer. Perfect for Sonic fans and amigurumi enthusiasts, this pattern brings the beloved character to life in soft, huggable form. Standing approximately 36cm tall when made with plush yarn, this project combines multiple techniques including color changes, detailed facial features, and intricate assembly to create a truly special handmade treasure.
Progress Tracker
0% Complete
— Arms (Make 2):
Thumb (white yarn, don't stuff):
Round 1: 6 SC in MR
Rounds 2-5:
4 rounds of 6 SC
Finishing:
Work a CH, fold in half and crochet sides together with 3 SC, fix and cut thread
Other Fingers (white yarn, make 4, don't stuff):
Round 1: 6 SC in MR
Rounds 2-6:
5 rounds of 6 SC
Info:
Fix and cut thread in 3 details. Do NOT cut thread on 4th finger, begin joining all 4 fingers
Round 7 (joining fingers):
3 SC on 1st finger, 3 SC on 2nd finger, 3 SC on 3rd finger, 6 SC on 4th finger, 3 SC on 3rd finger, 3 SC on 2nd finger, 3 SC on 1st finger (24)
Rounds 8-12:
5 rounds of 24 SC
Info:
Fold detail in half along fingers and shift stitch marker to next SC from fold line to position thumb correctly
Round 13:
Left arm: SC, 3 SC with thumb, 20 SC (24) | Right arm: 8 SC, 3 SC with thumb, 13 SC (24)
Round 14:
(10 SC, DEC) x 2 (22)
Round 15:
(9 SC, DEC) x 2 (20)
Round 16:
(3 SC, DEC) x 4 (16)
Round 17:
(2 SC, DEC) x 4 (12)
Info:
Change to ivory yarn, fix and cut white thread
Round 18:
(4 SC, DEC) x 2 (10)
Round 19:
(3 SC, DEC) x 2 (8)
Round 20:
(2 SC, DEC) x 2 (6)
Info:
Stuff only the palm to keep it flat
Rounds 21-30:
10 rounds of 6 SC
Finishing:
Work additional SCs if needed so 1st finger aligns with fold line. Work CH, fold in half, crochet sides together with 3 SC, fasten off
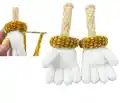
— Gloves (Make 2, mustard yarn, don't stuff):
Round 0:
Chain 8, lock with SS, work CH
Round 1:
Work in spiral: 8 SC
Rounds 2-22:
21 rounds of 8 SC
Finishing:
Fasten off with long end. Sew edges in circle from inside to outside. Put on arm and fix with 2 stitches on opposite sides with seam opposite from thumb between Rounds 15-16
— Tail (pink yarn):
Row 1:
Start in 2nd chain from hook: 2 SC
Finishing:
Work CH, turn detail on side and work SS series on side to initial row, fasten off
— Boots/Legs (Make 2, stuff in process):
Round 0 (grey yarn):
Chain 12, work in spiral
Round 1:
Start in 2nd chain from hook: 10 SC, 5 SC into last chain, on other side: 9 SC, INC (26)
Round 2:
INC, 10 SC, 3 SC in 1 St, SC, 3 SC in 1 St, 10 SC, 2 INC (33)
Round 3:
SC, INC, 11 SC, 3 SC in 1 St, 3 SC, 3 SC in 1 St, 11 SC, (SC, INC) x 2 (40)
Round 4:
2 SC, INC, 12 SC, 3 SC in 1 St, 5 SC, 3 SC in 1 St, 12 SC, (2 SC, INC) x 2 (47)
Info:
Change to red yarn, leave grey thread on outside for later use
Round 6:
16 SC, DEC 3 SC in 1 St, 5 SC, DEC 3 SC in 1 St, 20 SC (43)
Info:
Return to grey thread, work 47 SS in loose front loops of Round 4, join with SS, fasten off, hide thread inside foot. Continue with red thread
Round 7:
15 SC, DEC 3 SC in 1 St, 3 SC, DEC 3 SC in 1 St, 19 SC (39)
Round 8:
14 SC, DEC 3 SC in 1 St, SC, DEC 3 SC in 1 St, 18 SC (35)
Round 9:
12 SC, DEC 3 SC in 1 St, SC, DEC 3 SC in 1 St, 16 SC (31)
Round 10:
10 SC, DEC 3 SC in 1 St, SC, DEC 3 SC in 1 St, 14 SC (27)
Round 11:
8 SC, DEC 3 SC in 1 St, SC, DEC 3 SC in 1 St, 12 SC (23)
Round 12:
6 SC, DEC 3 SC in 1 St, SC, DEC 3 SC in 1 St, 10 SC (19)
Round 13:
4 SC, DEC 3 SC in 1 St, SC, DEC 3 SC in 1 St, 8 SC (15)
Info:
Stuff foot tightly keeping square shape on toe. Change to pink yarn, leave red thread on outside for boot top
Round 14:
BLO: (3 SC, DEC) x 3 (12)
Round 15:
(2 SC, DEC) x 3 (9)
Round 16:
3 SC, DEC, 2 SC, DEC (7)
Info:
Stuff ankle well, continue stuffing leg in process
Rounds 17-30:
14 rounds of 7 SC, finish with straight line
— Upper Edge of Boot:
Info:
Return to red thread, attach to loose front loop of Round 13
Rounds 2-4:
3 rounds of 15 SC
Info:
Change to white yarn, fasten off red thread
Round 5:
FLO: (4 SC, INC) x 3 (18)
Round 6:
(5 SC, INC) x 3 (21)
Round 7:
21 SC, finish with straight line
Info:
Bring all thread ends through loops from inside out to Round 1 and hide inside leg
— Front Stripe on Boot (Make 2, white yarn):
Row 0:
Chain 18, leave long thread at beginning
Row 1:
Start in 2nd chain from hook: 17 SC
Finishing:
Leave long thread to hide inside boot. Sew on with thin cotton thread to match
— Body:
Info:
Mark joining points on each leg from the side. Attach white thread to marked St on right leg and work chain of 3 CH
Round 31:
On left leg: 7 SC, on chain: 3 SC, on right leg: 7 SC, on chain: 3 SC (20)
Info:
Stitch marker is on back. Stuff in process. If gap between legs, sew with thread end on wrong side
Round 32:
(SC, INC) x 10 (30)
Info:
Mark 2 SC in middle on back for tail attachment. Pattern may differ due to shifting, double-check with markers
Round 34:
27 SC, 2 SC with tail, SC (30)
Round 35:
(8 SC, DEC) x 3 (27)
Round 36:
(7 SC, DEC) x 3 (24)
Round 37:
(6 SC, DEC) x 3 (21)
Info:
Change to red yarn, fasten off white thread
Round 38:
(5 SC, DEC) x 3 (18)
Round 41:
(5 SC, INC) x 3 (21)
Round 43:
(6 SC, INC) x 3 (24)
Round 45:
(6 SC, DEC) x 3 (21)
Round 46:
(5 SC, DEC) x 3 (18)
Info:
Mark 3 SC for arm attachment at distance of 6 SC in front and back. Pattern may differ, double-check with markers. Adjust stitch marker if needed
Round 47:
4 SC, 3 SC with arm, 6 SC, 3 SC with arm, 2 SC (18)
Info:
Change to white yarn, fasten off red thread
Round 48:
18 SC, fasten off but leave loop to change to pink for head
— Skirt:
Info:
Go back to Round 38 of body. Turn toy upside down, attach red thread to loose front loop of Round 38 on back, work in spiral
Round 1:
FLO: (2 SC, INC) x 6 (24)
Round 2:
(3 SC, INC) x 6 (30)
Round 3:
(4 SC, INC) x 6 (36)
Round 4:
(5 SC, INC) x 6 (42)
Round 5:
(6 SC, INC) x 6 (48)
Round 6:
(7 SC, INC) x 6 (54)
Round 7:
(8 SC, INC) x 6 (60)
Round 8:
(9 SC, INC) x 6 (66)
Info:
Change to white yarn, fasten off red thread
Round 9:
(10 SC, INC) x 6 (72)
Round 10:
(11 SC, INC) x 6 (78)
Finishing:
Fasten off, hide all thread ends between loops on wrong side
— Head (pink yarn):
Round 49:
(SC, INC) x 9 (27)
Round 50:
(2 SC, INC) x 9 (36)
Round 51:
(5 SC, INC) x 6 (42)
Round 52:
(6 SC, INC) x 6 (48)
Rounds 53-56:
4 rounds of 48 SC
Round 57:
(15 SC, INC) x 3 (51)
Round 58:
(16 SC, INC) x 3 (54)
Rounds 59-61:
3 rounds of 54 SC
Round 62:
(17 SC, INC) x 3 (57)
Round 63:
(18 SC, INC) x 3 (60)
Round 65:
(8 SC, DEC) x 6 (54)
Round 66:
(7 SC, DEC) x 6 (48)
Round 67:
(6 SC, DEC) x 6 (42)
Round 68:
(5 SC, DEC) x 6 (36)
Round 69:
(4 SC, DEC) x 6 (30)
Round 70:
(3 SC, DEC) x 6 (24)
Round 71:
(2 SC, DEC) x 6 (18)
Round 72:
(SC, DEC) x 6 (12)
Info:
When stuffing head, pay attention to shape - narrower below than above. Do NOT tighten hole, needed for muzzle tightening. Fix thread and leave long end
— Muzzle (ivory yarn):
Round 1:
Start in 2nd chain from hook: 12 SC, 3 SC into last chain, on other side: 11 SC, INC (28)
Round 2:
INC, 11 SC, 3 INC, 5 SC, 3 SC in one St, 5 SC, 2 INC (36)
Round 3:
SC, INC, 11 SC, (SC, INC) x 3, 6 SC, 3 SC in one St, 6 SC, (SC, INC) x 2 (44)
Rounds 4-5:
2 rounds of 44 SC, finish with straight line
Finishing:
Mark middle of detail from above. Fold in half with inside out. Sew with needle or work seam of 3 SS at top area. Turn out to front side
— Nose (black semi-cotton yarn, don't stuff):
Rounds 2-3:
2 rounds of 6 SC
Finishing:
Tighten hole, leave long end to sew. Sew on muzzle two rows below seam line. Lift nose up and fix with stitch one row higher
— Eye Whites (Make 2, white yarn):
Round 1:
Start in 2nd chain from hook: 3 SC, 3 SC into last chain, on other side: 2 SC, INC (10)
Round 2:
INC, 2 SC, 3 INC, 2 SC, 2 INC (16)
Round 3:
SC, INC, 2 SC, (SC, INC) x 3, 2 SC, (SC, INC) x 2 (22)
Finishing:
Finish with straight line. Attach eye whites front sides to each other and crochet both together with 3 SS. Fix and cut thread. Count 14 SC from middle of eye whites attachment to side for each eye white
— Eyelids (pink yarn):
Info:
Attach pink thread to right extreme front loop (marked)
Round 1:
FLO: 14 SC, SC in middle between eyes, 14 SC (29)
Finishing:
Fasten off. Work two lines of 9-10 SS (chain stitch) with black semi-cotton yarn along upper border between pink and white yarn
— Eyelashes (Make 2, black semi-cotton yarn):
Row 1:
Start in 2nd chain from hook: SS, SC, 2 HDC (4)
Finishing:
Fix thread and leave long end to sew. Sew on sides with wrong side up so eyelashes don't bend forward
— Pupils (Make 2, black semi-cotton yarn):
Row 1:
Start in 3rd chain from hook: 4 HDC
Finishing:
Fix thread and leave long end to sew. Sew pupils onto eyes shifted to center. Embroider highlights
— Ears (Make 2):
Inner Part (ivory yarn, make 2):
Row 0: Chain 2
Row 1:
Start in 2nd chain from hook: INC (2)
Row 4:
INC, 3 SC (5). Fix thread, leave long end to sew if using plush thread
Outer Part (pink yarn, make 2):
Row 0: Chain 2
Row 1:
Start in 2nd chain from hook: INC (2)
Finishing:
Work CH, work detail on sides: 3 SC on one side, 3 SC in top, 3 SC on other side. Don't cut thread. Work CH, attach ivory inner part to outer part and crochet together with SC on sides. Work 3 SC in top. Fix thread, leave long end to sew if using plush thread
— Rim (pink yarn, make 3):
Row 1:
Start in 2nd chain from hook: 4 SC
Row 3:
Skip a St, 3 SC (3)
Row 5:
Skip a St, 2 SC (2)
Finishing:
Work CH, turn detail on side and work SS series on side to initial row. Fix thread and leave long end to sew
— Bangs (red yarn):
Row 1:
Start in 2nd chain from hook: SC
Row 14:
Skip a St, 2 SC (2)
Rows 15-16:
2 rows of 2 SC
Finishing:
Fix thread and leave long end to sew
— Prickles/Quills (pink yarn, don't stuff):
Front Side Prickles (make 2):
Round 1: 6 SC in MR
Round 2:
2 SC, 2 INC, 2 SC (8)
Round 3:
3 SC, 2 INC, 3 SC (10)
Round 4:
4 SC, 2 INC, 4 SC (12)
Round 5:
5 SC, 2 INC, 5 SC (14)
Round 6:
6 SC, 2 INC, 6 SC (16)
Round 7:
DEC, 5 SC, 2 INC, 5 SC, DEC (16)
Round 8:
7 SC, 2 INC, 7 SC (18)
Round 9:
8 SC, 2 INC, 8 SC (20)
Round 10:
9 SC, 2 INC, 9 SC (22)
Round 11:
10 SC, 2 INC, 10 SC (24)
Rounds 12-14:
3 rounds: DEC, 9 SC, 2 INC, 9 SC, DEC (24)
Finishing:
Work CH, fold in half and crochet sides together with 12 SC. Fasten off, hide thread inside detail (or leave long thread if using semi-cotton)
Back Side Prickles (make 2):
Round 1: 6 SC in MR
Round 2:
(2 SC, INC) x 2 (8)
Round 3:
(3 SC, INC) x 2 (10)
Round 4:
(4 SC, INC) x 2 (12)
Round 5:
(5 SC, INC) x 2 (14)
Round 6:
(6 SC, INC) x 2 (16)
Round 7:
(7 SC, INC) x 2 (18)
Round 8:
(8 SC, INC) x 2 (20)
Round 9:
(9 SC, INC) x 2 (22)
Round 10:
(10 SC, INC) x 2 (24)
Round 11:
(11 SC, INC) x 2 (26)
Rounds 12-23:
12 rounds of 26 SC
Finishing:
Work CH, fold in half and crochet sides together with 13 SC. Fasten off, hide thread inside detail (or leave long thread if using semi-cotton)
Central Upper & Lower Prickles (make 2):
Round 1: 6 SC in MR
Round 2:
(SC, INC) x 3 (9)
Round 3:
(2 SC, INC) x 3 (12)
Round 4:
(3 SC, INC) x 3 (15)
Round 5:
(4 SC, INC) x 3 (18)
Round 6:
(5 SC, INC) x 3 (21)
Round 7:
(6 SC, INC) x 3 (24)
Round 8:
(7 SC, INC) x 3 (27)
Round 9:
(8 SC, INC) x 3 (30)
Round 10:
(9 SC, INC) x 3 (33)
Round 11:
(10 SC, INC) x 3 (36)
Rounds 12-19:
8 rounds of 36 SC
Finishing:
Work CH, fold in half and crochet sides together with 18 SC. Fasten off, hide thread inside detail (or leave long thread if using semi-cotton)
— Piko Piko Hammer (stuff in process):
Hammer Head (start with mustard yarn):
Round 1: 8 SC in MR
Round 3:
(SC, INC) x 8 (24)
Round 4:
(2 SC, INC) x 8 (32)
Round 5:
(3 SC, INC) x 8 (40)
Round 6:
(4 SC, INC) x 8 (48)
Round 7:
(5 SC, INC) x 8 (56)
Round 11:
(5 SC, DEC) x 8 (48)
Round 12:
(4 SC, DEC) x 8 (40)
Rounds 13-26:
14 rounds of 40 SC
Round 27:
(4 SC, INC) x 8 (48)
Info:
Change to mustard yarn
Round 28:
(5 SC, INC) x 8 (56)
Round 32:
BLO: (5 SC, DEC) x 8 (48)
Round 33:
(4 SC, DEC) x 8 (40)
Round 34:
(3 SC, DEC) x 8 (32)
Round 35:
(2 SC, DEC) x 8 (24)
Round 36:
(SC, DEC) x 8 (16)
Finishing:
Tighten hole, fix thread, hide end inside
Handle (start with dark brown yarn, stuff in process):
Round 1: 6 SC in MR
Round 2:
(SC, INC) x 3 (9)
Rounds 3-9:
7 rounds of 9 SC
Info:
Change to mustard yarn
Rounds 10-21:
12 rounds of 9 SC
Round 22:
(2 SC, INC) x 3 (12)
Rounds 23-25:
3 rounds of 12 SC
Finishing:
Fix thread and leave long end to sew to hammer. Optional: insert bent insulated copper or steel wire into handle (half inside hammer). Not recommended for young children or active play, especially with plush yarn
This enchanting Amy Rose pattern captures the spirit of Sonic's most loyal friend in beautifully crafted detail! From her signature pink quills to her adorable dress and beloved Piko Piko Hammer, every element has been thoughtfully designed to bring this beloved character to life. The pattern challenges you with advanced techniques like facial tightening, multi-part assembly, and precise color work, resulting in a stunning amigurumi that showcases your crochet mastery. Perfect as a gift for Sonic fans or as a proud addition to your handmade collection! 🧶💗✨