About This Crochet Flower Motif Bedspread Pattern
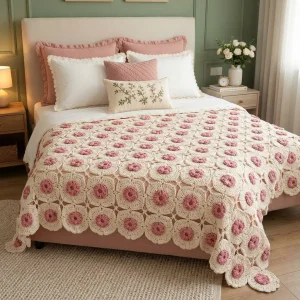
Drape it over the foot of a guest bed, spread it across a sofa, or give it as a wedding or housewarming gift. It brings a soft, cottage feel to blush or sage bedrooms.
Ideal for those with basic crocheting experience, featuring slightly more advanced stitches and techniques to expand your skills.
A 10-12 hour project—great for savoring the process over several sessions.
A comforting piece for home or gifts that brings handmade warmth to everyday moments and special occasions.
Drape it over the foot of a guest bed, spread it across a sofa, or give it as a wedding or housewarming gift. It brings a soft, cottage feel to blush or sage bedrooms.
I'm a sucker for any project where the finished pieces are small enough to feel like little wins. Every motif is done in under an hour, and the rose centers are the part I get giddy about because they look so much like real blooms. I also love that there's no separate sewing marathon at the end, since the joining happens as you go. Honestly, I find myself making one more circle before bed almost every night.
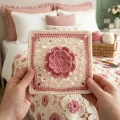
I made my first joined-motif bedspread years ago and honestly nearly gave up around motif forty. Then I started keeping a basket by the sofa with a little pile of finished ivory circles and a bag of rose centers, and suddenly it felt like collecting something instead of grinding through it.
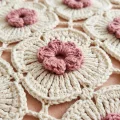
This one is my favorite since. The raised dusty rose blossoms sit on a pale background like flowers floating on cream, and the open gaps between motifs let whatever you've put underneath peek through. I tested it over a blush sheet and over soft sage, and both looked gorgeous, so try a few colors under it before you commit.
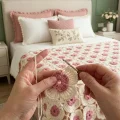
My best tip is to join as you go. I used to make every motif first and sew later, and I hated that stage. Here the corner loops let you attach each new circle in the last round, so the blanket grows with every motif.
Color idea: try a warm butter yellow center with a soft grey background for a sunnier bedroom, or a deep terracotta center on oatmeal for autumn.
Picture a big, soft bedspread made of creamy round motifs, each one wearing a puffy dusty rose blossom right in the middle. You make it one circle at a time, so it's easy to carry along and pick up whenever you have a spare half hour. The motifs link at their corners and leave small open gaps, so the colors of your bedding glow through the lace. It's a lovely project for anyone who enjoys the steady rhythm of joined crochet motifs and wants a bedroom showpiece that feels like a family heirloom.
Each finished motif measures about 12 cm (4.7 in) across, and the finished bedspread is about 150 x 200 cm (59 x 79 in) using 12 motifs across and 16 down. Work in joined rounds and turn at the end of each round only if you prefer; the motif is meant to be worked with the right side facing. Make the first motif exactly as written, then join the others in Round 4 (see section 3).
Make a MR, ch 3 (counts as first dc), 15 dc into the ring, sl st to the top of the ch 3 to join, pull the MR tail snug (16 dc).
Ch 3 (counts as first dc), dc in the same st, 2 dc in each remaining st around, sl st to the top of the ch 3 to join (32 dc).
Ch 3 (counts as first dc), 2 dc in next st, *dc in next st, 2 dc in next st; rep from * 15 more times, sl st to the top of the ch 3 to join (48 dc).
Ch 1, *sc in each of next 11 sts, (sc, ch 6, sc) in next st; rep from * 3 more times, sl st to the first sc to join and fasten off (52 sc and 4 corner loops). The first sc goes in the same st as the join, and the four ch 6 corner loops fall evenly 12 sts apart.
Make a MR, ch 1, 10 sc into the ring, sl st to the first sc to join (10 sc). Pull the tail only until a small center hole remains rather than closing it fully.
Ch 1, *sl st in next st, (hdc, 3 dc, hdc) in next st; rep from * 4 more times, sl st to the first st to join and fasten off (5 petals). Leave a 25 cm (10 in) tail for sewing.
Work Round 4 of every motif after the first so the corner loops join as you go. Where a corner loop needs to join, replace ch 6 with ch 3, sl st in the matching corner loop of the neighboring motif, ch 3. Where a fourth motif meets a corner that's already joined, sl st into the center of the existing joined loop. To make the bedspread wider or longer, add one more motif for every 12.5 cm (4.9 in) you want to gain.
Make and fasten off motif 1 as written. For motifs 2-12, work Round 4 and join each one to the previous motif at the two corners facing it (12 motifs in the row).
Make the first motif of this row, joining it at the two top corners to the matching corners of the first motif in Row 1. Make the next 11 motifs, joining each at its two top corners to Row 1 and at its left-hand corners to the previous motif in this row (12 motifs in the row).
Work the same as Row 2, joining each row to the one below until you have 16 rows of 12 motifs (192 motifs total).
The raised blossoms sit on top of the ivory background and are sewn on afterward, which keeps the ivory rounds flat and lets you swap colors easily. See the assembly steps for exact placement.
Every ivory circle you finish brings you a little closer to a bedspread you'll be proud to spread across your bed and show off to guests. Take your time, tuck a few motifs in your bag for waiting rooms and road trips, and enjoy watching the rose blossoms pop up one by one. By the time you sew on the last flower, you'll have a cozy, heirloom-worthy piece full of your own handiwork. Happy hooking! 🧶✨🌸
You can, but the pattern was designed around worsted weight cotton and a 4 mm hook, giving a motif of about 12 cm (4.7 in). A lighter yarn makes each motif smaller, so you'll need more motifs to cover the same bed, while a chunkier yarn makes them bigger and uses fewer. Make one motif first and measure it.
Each motif adds about 12.5 cm (4.9 in) once joined. Divide your target width and length by 12.5 to get the number of motifs per row and the number of rows. For example, a throw of 100 x 125 cm needs 8 x 10 motifs, which is 80 in total.
Sewing them on works best. The ivory motif stays flat, and the rose petals stay puffy and free. Stitch through only the sc ring of Round 1 of the flower and the top loops of Round 1 of the motif, so the petals aren't flattened.
Keep each ch 3 on either side of the join the same length as the ch 3 on the neighboring motif. When the fourth motif arrives, sl st into the center of the loop that's already joined instead of making a new one, which keeps the open gap neat and square.
If you're comfortable with a MR, dc, sc, and slip stitching, you can do it. The only fiddly parts are joining the corner loops and making the little puffed petals. Try a few practice motifs first, and you'll be joining like a pro by row 2.