🧢 Beautiful ✨ Detailed πŸ’ Adorable

Crochet Flower Bouquet Pattern

Crochet Flower Bouquet Pattern
4.6β˜… Rating
3-4 Hours Time Needed
2.9K Made This
βœ‚οΈ

Beginner Friendly Level

Perfect for those just starting their sewing journey, with clear instructions and simple techniques

⏱️

Weekend Treat

Takes 5-7 hours, making it an enjoyable project to finish over a couple of days.

🌸

Spring Bloom

Light and fresh designs for warmer days, capturing the renewal and brightness of the season.

About This Crochet Flower Bouquet Pattern

Crochet Flower Bouquet Pattern crochet pattern - detailed view of completed project

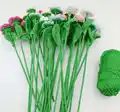
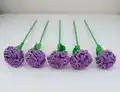
Each flower is worked in rounds with simple increases and chain stitches to create realistic petal shapes. The carnation variation uses the same technique as the daisy with slight modifications for a fuller bloom.

Why You'll Love This Crochet Flower Bouquet Pattern

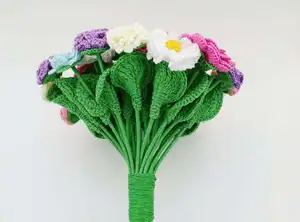
I absolutely love this pattern because it transforms simple yarn into everlasting beauty that brightens any room. There's something magical about creating flowers that never wilt, and these blooms are perfect for gifting to loved ones or decorating your own space. The repetitive nature of the stitches makes it wonderfully relaxing, and watching the petals take shape is incredibly satisfying. Plus, you can customize the colors to match any decor or personal preference, making each bouquet uniquely yours.

Crochet Flower Bouquet Pattern step 1 - construction progress Crochet Flower Bouquet Pattern step 2 - assembly progress Crochet Flower Bouquet Pattern step 3 - details and accessories Crochet Flower Bouquet Pattern step 4 - final assembly and finishing

Switch Things Up

I love experimenting with different color combinations to create unique bouquets for every season. Try making daisies in soft pastels for spring, bright sunflower yellows for summer, or deep burgundy carnations for autumn. You can also add variety by creating flowers in different sizesβ€”simply use thinner or thicker yarn with appropriate hook sizes.

For a modern twist, I sometimes work these flowers in monochromatic color schemes, like all white for weddings or all navy for coastal decor. Adding metallic yarn as an accent in the centers creates a touch of glamour. Consider mixing textures too by combining matte cotton with silky acrylic blends.

I've also found that adding small pearl beads or buttons to the flower centers gives them extra dimension and elegance. For a rustic look, use natural jute or twine instead of traditional yarn. The possibilities are truly endless, and each variation teaches you something new about color, texture, and design.

Common Mistakes & How to Fix Them

βœ— Not tightening the magic ring properly at the start can leave a visible hole in the flower center βœ— Skipping the chain stitches between double crochets results in petals that don't lay flat or spread correctly βœ— Pulling too tightly when gathering the carnation creates an unnatural bunched look instead of elegant ruffles βœ— Missing the proper placement when passing needle behind double crochets causes the carnation to lose its dimensional shape

Crochet Flower Bouquet Pattern

Create a stunning handmade bouquet that lasts forever with this delightful crochet flower pattern. This pattern guides you through crafting beautiful daisies and carnations using simple stitches and techniques. Perfect for home decor, thoughtful gifts, or special occasions, these charming flowers bring a touch of handcrafted warmth to any space. Learn to transform basic yarn into elegant blooms that capture the beauty of nature without ever wilting.

Beginner Friendly 3-4 Hours

Materials Needed for Crochet Flower Bouquet Pattern

β€” Main Fabric

  • 01
    Cotton or acrylic yarn in your choice of colors for petals (white, pink, red, yellow, etc.)
  • 02
    Green yarn for stems and leaves
  • 03
    Medium weight yarn (worsted weight) recommended for best results

β€” Tools Required

  • 01
    Crochet hook (size appropriate for your yarn weight, typically 3.5mm-4mm)
  • 02
    Yarn needle for weaving and assembly
  • 03
    Scissors
  • 04
    Stitch markers (optional but helpful)
  • 05
    Wire for stems (optional for sturdier bouquet)

Progress Tracker

0% Complete

β€” Daisy :

Row 1 :

CH 1, SC 16 in the magic ring, tighten the magic ring, ST in the first SC

Row 2 :

CH 3 from the first SC, DC 1 in the first SC, CH 1, DC 1 in the second SC, CH 1. Continue this pattern around the ring

β€” Carnation :

Info :

The carnation is made in the same way as the daisy. For daisy, the first row began with CH 16, for carnation make CH 20 in the first row

Row 1 :

CH 20, tighten the magic ring, ST in the first SC

Row 2-3 :

Make the next two rows in the same way as you did the daisy

Assembly :

With the help of a needle and yarn, pull the round element into a bundle. Pass the needle with yarn behind the DC of the second row as follows: pass the needle under the bottom of the first DC, pass the needle above the second DC, pass the needle under the bottom of the next DC, pass the needle above the next DC. In the same way, pass the entire row to the starting point.

Assembly Instructions

  • Weave in all loose ends from your flower petals using the yarn needle to secure them
  • For the carnation, carefully thread your needle with matching yarn and gather the petals by weaving under and over the double crochets
  • Pull the gathering thread gently to create the ruffled carnation effect, adjusting tension for desired fullness
  • If adding wire stems, insert wire through the center of each flower and secure with yarn wrapping
  • Arrange multiple flowers together and bind stems with green yarn or floral tape to create your bouquet
  • Add crochet leaves if desired by attaching them to the stems with slip stitches

Important Notes

  • πŸ’‘Keep consistent tension throughout to ensure all petals are uniform in size
  • πŸ’‘Use the same color yarn for gathering the carnation as the flower itself for invisible assembly
  • πŸ’‘Practice the magic ring technique if you're new to it, as it's crucial for a clean flower center
  • πŸ’‘Count your stitches carefully in Row 1 to ensure the correct number of petals
  • πŸ’‘Don't pull the gathering thread too tight on carnations or the petals may lose their delicate shape
  • πŸ’‘Consider using starch or fabric stiffener to help flowers hold their shape better

This timeless flower bouquet pattern brings the beauty of nature into your home with blooms that never fade. Whether you're creating a centerpiece for your table or a heartfelt gift for someone special, these handcrafted flowers offer endless possibilities. Mix and match colors to suit any season or occasion, and enjoy the meditative process of watching petals come to life under your hook. 🌼 Happy crocheting! 🧢✨

You ask,

we answer.

FAQs

What's the difference between the daisy and carnation in this pattern?

The main difference is that the carnation starts with CH 20 instead of CH 16 in the first row, creating more petals. The carnation also requires a gathering technique in the final step to create its characteristic ruffled appearance.

Can I use different yarn weights for this pattern?

Yes, you can use any yarn weight, but remember to adjust your hook size accordingly. Thinner yarn creates delicate, small flowers while bulkier yarn makes larger, chunkier blooms.

How do I make my flowers stand upright in a vase?

Insert floral wire or pipe cleaners through the center of each flower before gathering, then wrap the wire with green yarn to create a sturdy stem that can stand upright.

How many flowers do I need for a full bouquet?

A small bouquet typically uses 5-7 flowers, while a fuller arrangement might need 10-15 flowers. Mix daisies and carnations for visual interest.

My magic ring has a hole in the center, what am I doing wrong?

Make sure to pull the tail end tightly after completing your first round of stitches. You can also weave the tail through the center stitches with a needle to close any remaining gap.